|
This build requires a rating. Please apply the appropriate tag based upon consensus. This build has been designed for the following use: |
This build is for people who don't have a monk, or are tired of using their monk, to dual Eye of the North; Dungeon - Temple of the Damned in Hard Mode, with a 600HP Rit. It works, just as good, if not better than dual monking, As VwK kills a little bit faster.
Attributes and Skills
<pvxbig> [build prof=Rt/Mo pro=12 res=12+1+3 spa=3][Vengeful Was Khanhei][Spirit Bond][Shield of Absorption][Protective Spirit][Vengeful Weapon][Essence Bond][Vital Blessing][Life Attunement][/build] </pvxbig>
<pvxbig> [build prof=Mo/N blo=3 smi=12+3 div=12+1+3][Blessed Signet][Spell Breaker][Blood Ritual][Holy Wrath][Retribution][Balthazar's Spirit][Blessed Aura][Rebirth][/build] </pvxbig>
- If you are new to smiting, or new to running this dungeon, do not change a thing. This is the easiest way and safest way to learn.
- If you are an experienced smiter/dungeon running than If you want to drop rebirth to bring, Light of Deldrimor: feel free.
- 600 Rit, Possibly might be able to drop Vengeful Weapon for Light of Deldrimor: Although I haven't tested this so I'm not sure how well it will work, so as of right now i wouldnt recomend it, as Vengeful Weapon is a great health boost at times.
Equipment
- 600hp Rit uses Lowest AL Armor (Starter Armor).
- Smiter can use whatever. (He will only gain energy from blessed signet, so Insignia's and runes don't make a difference)
- Smiter's weapons, should be anything w/ +20 enchant
- 600HP Rit should use +5 energy 20% recharge wand, and 10% Fast Casting, and 20% recharge off hand, making 40% chance of faster recharge for VwK
- 600 should have highest vigor, and all radiant/attunement runes.
Usage
You can kill EVERYTHING in the dungeon. Smiter bonds 600RIT. Use Blood Ritual to give 600 Energy when needed. Spell breaker is only needed for Charr Mesmers/Hex breakers, but it makes killing all the caster mobs a lot easier.
To do this the easiest, and safest way: Smiter Casts blood rit on 600, And Spell breaker just before aggro, 600 casts Protective Spirit, Just as the mob hits your aggro bubble, cast Spirit Bond, And VwK, when you start taking damage, cast Shield of Absorbtion, and spam Vengeful weapon. Keep Spirit Bond, VwK, and Protective Spirit up at all times. Spam vengeful weapon when possible, and SoA.
Spell breaker only needs to be cast upon aggro no need to recast, everything should be dead in 15 seconds.
Usage Tips
- If using a Hero smiter, keep him flagged far enough away that there is no chance of him taking aggro. Click on your name in the party list, before having him cast spell breaker, even though he's out of your range, he will run to you no matter where.
- Stay close enough to the mobs before casting spell breaker, so you don't have to run far. With a +20% enchant mod, spell breaker should last about 29.83 seconds, giving you more than enough time to kill the mob, sometimes it's long enough to kill two mobs back to back.
- You can aggro 2 mobs at a time, but obviously you lessen your survival rate.
- Single Enemies don't need to be pulled to another mob, as VwK and VW will kill them fine.
- When you kill a mob, if there is a Spirit of Blood Song left, run! It takes too long to kill it's a waste of time, just leave it behind or wait for it to die.
- When you come to the infamous flame dart run, i like to Re-Cast vital blessing onto my smiter/hero, to give a big hp boost for the run.
- If your smiter/hero accidently dies, from dungeon traps or accidental aggro, and you're in the middle of taking down a mob, DON'T FREAK OUT!, you can still efficiently drop/kill the mob without worrying. (Specially if Spell breaker is up) It's better to finish killing the mob, and go die somewhere, where you know you will spawn in safety.
- If you take down a Char Mender mob, and the Mender for some reason happens to survive, Just keep Spamming your skills Mainly Vengeful weapon, until he drops, might take an extra 15 seconds if he's alone.
Temple Of the Damned - Walkthrough
- This guide was taken from the Dual Monk Guide for temple,(it's well written and i found no need to re-make a specific guide) found here: http://www.pvxwiki.com/wiki/Build:Team_-_Temple_of_the_Damned_600/Smite
- Edited a few steps specifically for Rt/Mo procedure, they are noted at the end of each step.
Level 1
First Level Map
- Kill the group closest to you without aggroing the patrol that patrols behind it.
- Take a left.
- There will either be a Charr Axemaster or a Charr Blademaster that can die relatively quickly.
- Normally, there will be a group of 3-4 charr that will patrol away from you and get killed by a group of 5 undead at the end of the passage. If this doesn't happen, kill the charr as they come back along their patrol pattern. Threat them like undead in terms of skill usage.
- Then, proceed to the end of the corridor and kill the undead there.
- There will then be a group of undead patrolling east-west along a corridor and a group of charr patrolling north-south. Kill the undead without aggroing the charr and continue down that corridor.
- At the end of the corridor, there will be a group of patrolling undead that should be killed.
- Do not continue into the big hall area, but instead turn left and move towards the dungeon lock (which should now be visible). There will be a group of allied charr that will turn into enemies as you approach.
- No need to worry about spell breaker running out before the boss dies, because he will be dead in 4 seconds, leaving 25 seconds of spell breaker left. This Step Edited for Rt/Mo Specific Guide.
- Pick up the dungeon key and use it to open the dungeon lock.
- There will be a patrol group that should not be aggroed. Instead, wait a few seconds for another group of undead to come and begin to fight you. Kill them and then kill the patrol group.
- There will be two groups of patrolling undead in the next area, you can kill them separately or at the same time. Combining the groups is for more experienced people.
- The Keeper is easy to kill. Treat his group as any other group of undead. After killing him, move into level 2.
Level 2
Second Level Map
- Kill the lone Charr Axemaster or Charr Blademaster unless the undead do it first.
- Kill the two groups of undead that are patrolling around a stalactite.
- Move towards the area map (to the right) and the charr that are guarding it, but do not aggro them.
- Move by the charr and kill the first group of enchanted.
- Enter the area with poison geysers and kill the next group of patrolling enchanted.
- NOTE- Pop-up Alert!: There is a group of 5-6 undead that will pop up upon entering the center of the poison geysers area.
- Move into the center with Protective Spirit and Spell Breaker on yourself. Kill them and continue on the kill the third and final group of enchanted in the area. Edited for Rt/Mo Specific guide.
- There will be another lone Charr Axemaster or Charr Blademaster that will probably get killed by undead if you wait long enough, but if it doesn't, kill it.
- Up ahead (which is to the right) there will be a group of undead and charr. They will usually fight and the undead will win. If they don't, check to see if there is a Charr Mender in the charr's group. If there is, combine the undead and charr groups so they will kill each other. If there isn't a mender and they don't fight, kill each group separately. If they do fight, kill the remaining enemies on either side.
- Next, you will see the Dungeon Key boss for level 2.
- Do the same thing you did for the other dungeon key boss. If a Charr Mender lives, grab the dungeon key and open the dungeon lock. Then aggro the undead group with the boss in it come and kill themselves and the Charr Mender.
- If there is no Charr Mender, just continue with opening the lock and killing the undead boss's group.
- Then, continue and kill the other two groups of undead in the area.
- Avoid the enchanted group and kill The Master.
- Proceed into level 3.
Level 3

Third Level Map
- Upon entering the area, you will see a Keymaster of Murakai. Do not try to kill it and just ignore it.
- There will be two groups of undead patrolling to your left. Kill the one that patrols along where the Keymaster of Murakai goes.
- Follow the Keymaster of Murakai until you get to a group of undead, which you will then kill. If you cannot see the Keymaster of Murakai, move in the direction it was going until you get to the area with the enchanted. Before entering the enchanted area, take a right down the corridor.
- After killing that group, loop around and kill the Keymaster of Murakai and a group of undead. Pick up the Dungeon Key.
- Move back slightly, take your first right, and move east until you reach a group of undead, which you should kill.
- Continue down that passage.
- You will see a group of enchanted that are patrolling which can avoided or killed.
- As you continue down the corridor, there will be a group of enchanted with about 8 members. Kill them and return to original course.
- After killing the enchanted, there will be a dungeon lock which will be opened.
- Head towards and aggro Murakai's Steward and activate Spell Breaker, after aggro, and the pop-ups around him, fall back slightly pulling him away from the center, and proceed normally. (makes it easier to grab key) This Step Edited for Rt/Mo specific guide
- Kill Murakai's Steward and creatures around him that the killing of may be fun and grab the boss key.
- Exit the Murakai's Steward's chamber and take the first two lefts. There will be two groups of undead that should be killed.
- The group will then be facing the flame dart area.
- The 600 rit should maintain Spirit Bond on him/herself and Protective Spirit, Spirit Bond, and Shield of Absorption on the smiter as they make their way across the multitude of flame darts. Also I like to re-cast Vital Blessing onto my smiter/hero to ensure a safe trip through the infamous flame darts. This step edited for Rt/Mo specific guide
- Enter the stairs form the left/eastern side. At the top of the stairs there will be a boss lock to open.
- While crossing the pit, it is important for both people to move in a zig-zag way to limit the number of hits dealt to them.
- The group will now be in Murakai's chamber.
- Choose a side and kill the undead on that side. They are easy and do not require Spell Breaker.
- While facing Murakai, cast Spell Breaker before aggro, no need for a recast, she will die within 10 seconds of it ending. This step edited for Rt/Mo specific guide
- Unless there are Servants of Murakai that have been summoned, do not use Shield of Absorption. Maintain Spirit Bond at all times that Shield of Absorption is not up.
- When Murakai is dead, collect the chest reward.
- After Collecting Chest, you may kill the remaining undead, as they still drop gold items and crafting materials.
- /resign, Collect your 1.5k for dungeon reward, re-zone, take quest again, rinse and repeat.
Counters
- Recasting Spirit Bond before it ends.
- Enchantment shattering, if you dont cast spell breaker.
- Too much bleeding. (cast PS and SB to stay alive)
Variants
- Monk Variant: Team - Temple of the Damned 600/Smite
Notes
- This can be done with a hero smiter.
- If done correctly you should never die.
- Clearing EVERY mob in the entire dungeon should take about 1 hour.
- If running the mission. Will take about 32-38 Minutes.
- With or without minor tweaks, this build can also be used to Vanquish almost all of EoTN and Elona. Particularly good for farming all rapters and angorodons in Rata Sum.
- Can be done with a 600 E/Mo and smiter as well. (Check Variants)
- While running people, Ask them to bring Light of Deldrimor, as it boosts the rewards of the dungeon, as much as 20K if you're lucky, i get a lot of rubies saphires and onyx from the hidden chests.
- If you have necro's in your party while running, kindly ask them to BiP you and your hero, you could be nice and charge them less, as it will GREATLY reduce your down time in between mobs.
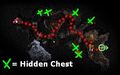
Hidden Chests (Incomplete Still)
- Hidden chests, can boost your money made on the run, if you're lucky up to 20k, but at least 2-5k. And your customers will appreciate the lock picks, sapphires, onyx, and rubies accumulated from these chests.
- See Maps For Locations
- For level 2, in the lava pit where there is 2 chests, there is a lot of spiders that pop up in the area, Pop them and Drop them, before people collect the chest. You do not need spell breaker for them, but there is a chance of them interrupting your spirit bond.
- For lava pits, Protective Spirit your customers, so they don't die while on fire in the pit.
- If you happen to Grab the Dwarven Ghost, No big deal, he won't aggro, and he wont follow you, he'll stay with your allies, which might be a good thing in case of accident aggro, (i would recommend grabbing them if you have time, to reduce embarrassment and deaths if your party aggros, or you accidentally pull a mob to them.
- For level 3, first chest upon entrance has a glitch, you have to clear out the first two mobs to get it to appear, even then, very rarely it still will not be revealed.


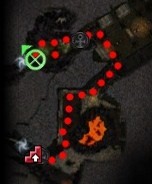
Level 1 Hidden Chests

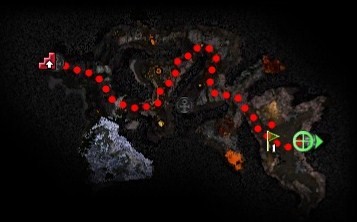
Level 2 Hidden Chests


Level 3 Hidden Chests
| # | Level | Chest | Location | Notes |
|---|---|---|---|---|
| 1 | 1 | (need map) | in front of the area map | |
| 2 | 1 | (need map) | close to the table near the prison guard | |
| 3 | 1 | Hidden Treasure | (need map) | (2x) Between 2nd an 3rd column, near wall on either side of the room with the Dungeon Gate. |
| 4 | 1 | Hidden Treasure | (need map) | By Beacon of Drokner across the room from the Dungeon Gate |
| 5 | 1 | Hidden Treasure | (need map) | In the room with the keeper, just inside the dead-end path on the north side. |
| 6 | 2 | Hidden Treasure | (need map) | (2x) close to each other, from the start turn left and head north |
| 7 | 2 | Hidden Treasure | (need map) | (2x) in a lava pool, just north of the dungeon lock |
| 8 | 2 | Hidden Treasure | (need map) | in a lava pool, just south of the dungeon lock, close to the orange pool on the area map |
| 9 | 2 | Hidden Treasure | (need map) | just north of the map in a small alcove |
| 10 | 3 | Hidden Treasure | (need map) | near the start, map pinged but treasure did not appear and map would not ping upon further attempts (may happen with any treasure) |
| 11 | 3 | Hidden Treasure | (need map) | next to the area map |
| 12 | 3 | Hidden Treasure | (need map) | in the area with the burning trees, just past the first tree on the eastern side |
| 13 | 3 | Hidden Treasure | (need map) | near the area with the burning trees, sloping part that overlooks a chasm |
| 14 | 3 | Hidden Treasure | (need map) | (x2) near the second Beacon of Droknar |
Optional Farming Areas
- Various enemies (and by Various I mean a crap load) can be farmed with this build, almost every caster/melee mob, too many to list specifically, but look below for Key Places of interest that profit can be made.
- You can use this build to vanquish almost everything
- Outside Rata Sum, can be vanquished w/ this build. (Also: Raptor Nestling's drop elemental swords)
- A Time for hero's : EoTN Endgame mission
- All of the Battledepths : Good for farming elemental dust and Dwarven Points
- The Underworld
- Fissure Of Woe
- The Labyrinth
- Ice Wastes
- Forgotten Vale
- Twin Serpent Mountains
- Chaos Planes
- Bone Pits
- Spawning Pools
- Sanctum Cay
- Snowman Dungeon HM
- Stonewolve Caves
- Bjora Marches
- Ice Cliff Chasm's
See also
- Build:Team - 600/Smite - Dual Monk UW Build
- Build:Team - Dual FoW Smite - FoW Dual Monk Build
- Build:Team - Temple of the Damned 600/Smite - Temple of the Damned HM Dual Monk Smite Guide.