Phenaxkian (talk | contribs) |
|||
| (19 intermediate revisions by 12 users not shown) | |||
| Line 1: | Line 1: | ||
| + | {{Archived-Build|reason1=covered in [[Build:Team - FoW Caster Spike]]|date=20:39, January 24, 2010 (UTC)|category=Good|type1=PvE team|type2=SC}} |
||
| − | {{Great-Build|farming|PvE team|}} |
||
| − | {{ |
+ | {{Requires-Cons}} |
{{TOCright}} |
{{TOCright}} |
||
| − | This build is to complete FoW in the quickest time possible by using 2 Shadow Form Assassins to split. It requires a full conset to work. |
+ | This build is to complete [[gww:Fissure of Woe|FoW]] in the quickest time possible by using 2 Shadow Form Assassins to split. It requires a full conset to work. |
== The Team == |
== The Team == |
||
| Line 15: | Line 15: | ||
*1x{{Mo}}/{{E}} Unyielding Aura Monk |
*1x{{Mo}}/{{E}} Unyielding Aura Monk |
||
| − | == Terra #1== |
+ | === Terra #1=== |
<pvxbig> |
<pvxbig> |
||
[build prof=A/E ear=12 dead=3 sha=12+1+3][Deadly Paradox][Shadow Form][Glyph of Lesser Energy][Ebon Battle Standard of Honor][Sliver Armor]["By Ural's Hammer!"][Feigned Neutrality][Death's Charge][/build] |
[build prof=A/E ear=12 dead=3 sha=12+1+3][Deadly Paradox][Shadow Form][Glyph of Lesser Energy][Ebon Battle Standard of Honor][Sliver Armor]["By Ural's Hammer!"][Feigned Neutrality][Death's Charge][/build] |
||
</pvxbig> |
</pvxbig> |
||
| − | === Equipment === |
+ | ==== Equipment ==== |
*+10AL vs Fire shield |
*+10AL vs Fire shield |
||
*20% enchantment weapon |
*20% enchantment weapon |
||
| − | == Terra #2 == |
+ | === Terra #2 === |
<pvxbig> |
<pvxbig> |
||
[build prof=A/E ear=12 dead=3 sha=12+1+3][Deadly Paradox][Shadow Form][Glyph of Lesser Energy][Ebon Battle Standard of Honor][Sliver Armor]["Finish Him!"]["By Ural's Hammer!"][Death's Charge][/build] |
[build prof=A/E ear=12 dead=3 sha=12+1+3][Deadly Paradox][Shadow Form][Glyph of Lesser Energy][Ebon Battle Standard of Honor][Sliver Armor]["Finish Him!"]["By Ural's Hammer!"][Death's Charge][/build] |
||
</pvxbig> |
</pvxbig> |
||
| ⚫ | |||
| − | |||
| − | |||
| − | |||
| ⚫ | |||
*+10AL vs Slashing shield |
*+10AL vs Slashing shield |
||
*20% enchantment weapon |
*20% enchantment weapon |
||
| − | |||
| − | finish him is not rly needed at all ... khobay normaly die in 10-15 second if u aggro corectly without it |
||
| − | and some heal definitly help to avoid trouble crossing and crossing again shadow army ...specialy when you meet terra 1 running for his mage and that his aggro sudently surond you at same time you have a massive lag |
||
== Main Team == |
== Main Team == |
||
| − | == Assassin Perma == |
+ | === Assassin Perma === |
<pvxbig> |
<pvxbig> |
||
[build prof=A/Me ins=12 crit=3 sha=12+1+3][Deadly Paradox][Shadow Form]["I Am Unstoppable!"][Dark Escape][Feigned Neutrality][optional][Channeling][Death's Charge][/build] |
[build prof=A/Me ins=12 crit=3 sha=12+1+3][Deadly Paradox][Shadow Form]["I Am Unstoppable!"][Dark Escape][Feigned Neutrality][optional][Channeling][Death's Charge][/build] |
||
| Line 45: | Line 39: | ||
*Optional for: [[gww:Technobabble|Technobabble]] or [[gww:Cry of Pain|Cry of Pain]] |
*Optional for: [[gww:Technobabble|Technobabble]] or [[gww:Cry of Pain|Cry of Pain]] |
||
| ⚫ | |||
| − | *a/me is like no longer used for fow but it can be good in cryway if the perma is enough xp to call target and deal mesmer hexes... |
||
| − | though most pug game use 4roj because mutch easier to use even if slow as hell |
||
| − | usualy so we use a/e with glyph of swiftness as a back up , grasping earth and sliver armor for the forest wolf and ofc death charge to speed up and avoid bodyblok. |
||
| − | to tank fow sc you realy only need : deadly paradox+ shadow form +feigned neutrality + shadow sanctuary ...all the rest is optional |
||
| − | some use glyph of lesser nrj+ stone flesh aura because they dont feel confident in tanking 100 blades but it is not needed |
||
| − | (kiss of nawak) |
||
| − | |||
| − | |||
| ⚫ | |||
*Radiants or Blessed insignias |
*Radiants or Blessed insignias |
||
*Caster Shield and enchanting weapon |
*Caster Shield and enchanting weapon |
||
| Line 60: | Line 46: | ||
===Mesmers=== |
===Mesmers=== |
||
<pvxbig> |
<pvxbig> |
||
| − | [build prof=Me/Mo fas=11+1+1 ins=6+1 smi=12][Ray of Judgment][ |
+ | [build prof=Me/Mo fas=11+1+1 ins=6+1 smi=12][Ray of Judgment][Arcane Echo][Cry of Pain]["By Ural's Hammer!"][Mind Wrack][Smite Condition][Judge's Insight][Auspicious Incantation][/build] |
</pvxbig> |
</pvxbig> |
||
*Can be played by Mo/Me, template code OwUSMYHTLB+M2gpixAUfAAiOA |
*Can be played by Mo/Me, template code OwUSMYHTLB+M2gpixAUfAAiOA |
||
| Line 68: | Line 54: | ||
<pvxbig> |
<pvxbig> |
||
| − | [build prof=Me/E fas= |
+ | [build prof=Me/E fas=11+1 dom=12+1+2 illu=6+1][Energy Surge][Arcane Echo][Cry of Pain]["By Ural's Hammer!"][Arcane Conundrum][Empathy][Glyph of Lesser Energy][Air of Superiority][/build] |
</pvxbig> |
</pvxbig> |
||
*This build will be the main hex caller (Arcane Conundrum)<br> |
*This build will be the main hex caller (Arcane Conundrum)<br> |
||
<pvxbig> |
<pvxbig> |
||
| − | [build prof=Me/E fas=12+1 illu=12+1+3][ |
+ | [build prof=Me/E fas=12+1 illu=12+1+3 ins=3][Wandering Eye][Clumsiness][Cry of Pain]["By Ural's Hammer!"][Deep Freeze][Auspicious Incantation][Signet of Illusions][Air of Superiority][/build] |
</pvxbig> |
</pvxbig> |
||
| − | *Low energy set when using Signet of Disenchantment |
||
*This build is the main group snarer (Deep Freeze).<br> |
*This build is the main group snarer (Deep Freeze).<br> |
||
| ⚫ | |||
| − | *if your team is quite organised and focus or if you use some program to talk eatch other |
||
| − | it can go even mutch more fast to have 4 fast cast cryer : |
||
| − | echo+arcane echo+cry+ hex and nrj regeneration like ether signet ether lord etc |
||
| − | then in perfect team the perma hex ,the 4 cryer spyke ,and if team was syncro they will not even have enough time to cast last cry ...but if some one missed then there will alway be someone able to achieve them before they heal up |
||
| − | mainly the shit is about syncronisation ... if u spike correctly then you dont need any other skills |
||
| − | (kiss of nawak) |
||
| − | |||
| ⚫ | |||
<pvxbig> |
<pvxbig> |
||
[build prof=Rt/R name="Splinter Barrage" bea=10 mar=8 cha=12+1+3][Distracting Shot][Splinter Weapon][Barrage][Summon Spirits (Luxon)][Nightmare Weapon][Triple Shot (Luxon)][Edge of Extinction][Flesh of My Flesh][/build] |
[build prof=Rt/R name="Splinter Barrage" bea=10 mar=8 cha=12+1+3][Distracting Shot][Splinter Weapon][Barrage][Summon Spirits (Luxon)][Nightmare Weapon][Triple Shot (Luxon)][Edge of Extinction][Flesh of My Flesh][/build] |
||
</pvxbig> |
</pvxbig> |
||
| − | === Equipment === |
+ | ==== Equipment ==== |
*Vampiric Longbow, requires 9 Markmanship |
*Vampiric Longbow, requires 9 Markmanship |
||
*Use Nightmare Weapon + Triple Shot for single enemies |
*Use Nightmare Weapon + Triple Shot for single enemies |
||
| Line 95: | Line 73: | ||
*Can also be played by R/Rt |
*Can also be played by R/Rt |
||
| − | == Unyielding Aura Monk == |
+ | === Unyielding Aura Monk === |
<pvxbig> |
<pvxbig> |
||
[build prof=Mo/E name="Unyielding Aura Monk" hea=12+1+1 div=10+1 prot=8][Unyielding Aura][Seed of Life][Protective Spirit][Orison of Healing][Cure Hex][Heal Party][Glyph of Lesser Energy][Optional][/build] |
[build prof=Mo/E name="Unyielding Aura Monk" hea=12+1+1 div=10+1 prot=8][Unyielding Aura][Seed of Life][Protective Spirit][Orison of Healing][Cure Hex][Heal Party][Glyph of Lesser Energy][Optional][/build] |
||
</pvxbig> |
</pvxbig> |
||
| − | *Optional for [[gww:Healing Seed|Healing Seed]] |
+ | *Optional for [[gww:Healing Seed|Healing Seed]] or [[gww:Air of Superiority|Air of Superiority]] |
==Usage== |
==Usage== |
||
| Line 113: | Line 91: | ||
*3) Run to 3, getting as much aggro as possible. Pull the Skeleton casters so they are just below the priest of menzies, but make sure the priest of menzies doesn't start running round. Deaths Charge up to menzies. The warriors will start running round but the casters will keep wanding, so sliver armor can kill menzies before any warriors steal Sliver's target. Once menzies is dead, recast SF and pick up the book. Run round (don't death's charge down or the book will be left up the top) and take the book back to the ghosts. Don't forget to drop the book before recasting shadow form, or it will run out early (enchanting weapon not out). Dragon lich's can interrupt through shadow form with deafening roar, so if you have aggroed one, stop a few seconds before you need to cast so it can waste it before you try to cast. |
*3) Run to 3, getting as much aggro as possible. Pull the Skeleton casters so they are just below the priest of menzies, but make sure the priest of menzies doesn't start running round. Deaths Charge up to menzies. The warriors will start running round but the casters will keep wanding, so sliver armor can kill menzies before any warriors steal Sliver's target. Once menzies is dead, recast SF and pick up the book. Run round (don't death's charge down or the book will be left up the top) and take the book back to the ghosts. Don't forget to drop the book before recasting shadow form, or it will run out early (enchanting weapon not out). Dragon lich's can interrupt through shadow form with deafening roar, so if you have aggroed one, stop a few seconds before you need to cast so it can waste it before you try to cast. |
||
| − | *alternate way is to make menzies go down witch can be done in 8 second with some experience |
||
| − | and one good shit to know is that dragon can not interupt you : they put you under interuption condition that berserk skelleton trigger with savage blow... |
||
| − | so : no berserk =dragon is powerless |
||
| − | normaly you should do all this and bring book before main team could finish quest 1 (kiss of nawak) |
||
| − | |||
*4) Once the book is back, run to the Shard wolf in the middle of the battlefield and kill it. |
*4) Once the book is back, run to the Shard wolf in the middle of the battlefield and kill it. |
||
*5) Run to burning forest (check the quest log to see if Terra 2 took the quest off Miko The Unchained before going in. If they didn't take it, take it yourself, shout at them a bit and go into forest). Mahgo Hydra's will try to follow you, and use inferno which hits for 190 without the right equipment. Run to (5) and recast SF, GoLE and Charge the Shard wolf, and kill. If you aren't moving, then keep feigned neutrality up, to reduce the hydra's damage and heal - you should only be standing still while Sliver Armor is up. One Sliver should kill the wolf and most hydras. Run on to (6) |
*5) Run to burning forest (check the quest log to see if Terra 2 took the quest off Miko The Unchained before going in. If they didn't take it, take it yourself, shout at them a bit and go into forest). Mahgo Hydra's will try to follow you, and use inferno which hits for 190 without the right equipment. Run to (5) and recast SF, GoLE and Charge the Shard wolf, and kill. If you aren't moving, then keep feigned neutrality up, to reduce the hydra's damage and heal - you should only be standing still while Sliver Armor is up. One Sliver should kill the wolf and most hydras. Run on to (6) |
||
| − | *alternate way is to equip shadow sanctuary (and it can help to have a +10vs fire shield) |
||
| − | takequest , run to wolf cast shadow sanctuary ,gole+ebon+sliver+ural,...check how long resting on shadow form..., and decide if u need to cast sf or can just cast feigned neutrality and wait for all hydra to die : this way you will be sure to deal maximum amont of damage to hydra and be very protected(kiss of nawak) |
||
| − | |||
*6) There are 6 Shadow Overlords you need to kill, they don't pull far so you need to stand around the middle of them all after aggroing. There are lots of Hydras, so keep moving until you've just recast SF, then charge something that is alone and use sliver. If done right, all Shadow overlords should die in one go, if not find the last few and kill them off. By then most hydras should be dead so it will be easy. Run on to (7) |
*6) There are 6 Shadow Overlords you need to kill, they don't pull far so you need to stand around the middle of them all after aggroing. There are lots of Hydras, so keep moving until you've just recast SF, then charge something that is alone and use sliver. If done right, all Shadow overlords should die in one go, if not find the last few and kill them off. By then most hydras should be dead so it will be easy. Run on to (7) |
||
| − | *there is also a way to make a body blok on the enslaved hero so that hydra cant touch you. |
||
| − | or use the technick described upward with shadow sanctuary (kiss of nawak) |
||
| − | *7) Tower of Strength - there should be lots of Shadow |
+ | *7) Tower of Strength - there should be lots of Shadow Patrols, Abyssals, mesmers and Rangers. Kill all the shadow patrols and rangers, leaving any mesmers alive. It is easy to split the rangers from mesmers as they have different weapon ranges. When they are all dead, ask where Terra two is. If they are still doing Khobey, then run to forge and get the mage (just run into minimap range and he will start running) (this shouldn't be the case). Terra two should have finished long ago, and should be waiting near forge to trigger mage. Either way, you have time to kill the shard wolf at(8) before he turns up (Pull the wolf towards the tower so the monks do not heal him). Once the mage opens the tower, kill the nightmare and wait for main team. |
| − | *alternative is : |
||
| − | usualy main team will be slower than you so you aggro the 4 groups of abbysals and the wolf... kill the abysal only then use mesmer (you should have 8 of them) to fast kill quest once taken... so normaly when maint team take quest you will need 60-90 second to finish quest |
||
| − | with luck the terra 2 will not be gone for khobay yet and will trigger mage but anyway dont loose time waiting and run for him ...if you meet him on the road then come back but there is no reason for you to stay there waiting ! (kiss of nawak) |
||
| − | *8) Kill the wolf if he isn't already dead. |
+ | *8) Kill the wolf if he isn't already dead. |
===Terra #2=== |
===Terra #2=== |
||
| − | === Usage === |
||
*Keep up Shadow form with deadly paradox or glyph of swiftness (see first paragraph on the page) |
*Keep up Shadow form with deadly paradox or glyph of swiftness (see first paragraph on the page) |
||
*Use glyph of lesser energy before activating the Battle Standard -> Sliver armor chain, and only use "Finish Him!" in a situation where you wouldn't be able to kill otherwise. Try to aggro as many monsters as possible, as the using of "Finish Him!" puts a drain on your energy and you may find yourself in a situation where you run out of energy. |
*Use glyph of lesser energy before activating the Battle Standard -> Sliver armor chain, and only use "Finish Him!" in a situation where you wouldn't be able to kill otherwise. Try to aggro as many monsters as possible, as the using of "Finish Him!" puts a drain on your energy and you may find yourself in a situation where you run out of energy. |
||
Latest revision as of 21:22, 2 November 2010
|
This build has been archived as of 20:39, January 24, 2010 (UTC), for the following reason:
This build had been designed for the following use: This build was in the category Good before being archived. |
| |
This build requires Consumables to operate properly. |
This build is to complete FoW in the quickest time possible by using 2 Shadow Form Assassins to split. It requires a full conset to work.
The Team
The Team Consists of:
- 2x
 /
/ Terra
Terra - 1x
 / Perma
 - 1x/ RoJ Cryer
- 1x/ DF/SoD Cryer
- 1x/ AC Cryer
- 1x/ Splinter Barrager
- 1x/ Unyielding Aura Monk
Terra #1
<pvxbig> [build prof=A/E ear=12 dead=3 sha=12+1+3][Deadly Paradox][Shadow Form][Glyph of Lesser Energy][Ebon Battle Standard of Honor][Sliver Armor]["By Ural's Hammer!"][Feigned Neutrality][Death's Charge][/build] </pvxbig>
Equipment
- +10AL vs Fire shield
- 20% enchantment weapon
Terra #2
<pvxbig> [build prof=A/E ear=12 dead=3 sha=12+1+3][Deadly Paradox][Shadow Form][Glyph of Lesser Energy][Ebon Battle Standard of Honor][Sliver Armor]["Finish Him!"]["By Ural's Hammer!"][Death's Charge][/build] </pvxbig>
Equipment
- +10AL vs Slashing shield
- 20% enchantment weapon
Main Team
Assassin Perma
<pvxbig> [build prof=A/Me ins=12 crit=3 sha=12+1+3][Deadly Paradox][Shadow Form]["I Am Unstoppable!"][Dark Escape][Feigned Neutrality][optional][Channeling][Death's Charge][/build] </pvxbig>
- Optional for: Technobabble or Cry of Pain
Equipment
- Radiants or Blessed insignias
- Caster Shield and enchanting weapon
- High Energy staff to swap to if low on energy.
Mesmers
<pvxbig> [build prof=Me/Mo fas=11+1+1 ins=6+1 smi=12][Ray of Judgment][Arcane Echo][Cry of Pain]["By Ural's Hammer!"][Mind Wrack][Smite Condition][Judge's Insight][Auspicious Incantation][/build] </pvxbig>
- Can be played by Mo/Me, template code OwUSMYHTLB+M2gpixAUfAAiOA
- Optional skills for Monk: Mindbender, "Finish Him!", Air of Superiority, "By Ural's Hammer!"
- PuG teams may choose to take 4 of these.
<pvxbig>
[build prof=Me/E fas=11+1 dom=12+1+2 illu=6+1][Energy Surge][Arcane Echo][Cry of Pain]["By Ural's Hammer!"][Arcane Conundrum][Empathy][Glyph of Lesser Energy][Air of Superiority][/build]
</pvxbig>
- This build will be the main hex caller (Arcane Conundrum)
<pvxbig> [build prof=Me/E fas=12+1 illu=12+1+3 ins=3][Wandering Eye][Clumsiness][Cry of Pain]["By Ural's Hammer!"][Deep Freeze][Auspicious Incantation][Signet of Illusions][Air of Superiority][/build] </pvxbig>
- This build is the main group snarer (Deep Freeze).
Splinter Barrage
<pvxbig> [build prof=Rt/R name="Splinter Barrage" bea=10 mar=8 cha=12+1+3][Distracting Shot][Splinter Weapon][Barrage][Summon Spirits (Luxon)][Nightmare Weapon][Triple Shot (Luxon)][Edge of Extinction][Flesh of My Flesh][/build] </pvxbig>
Equipment
- Vampiric Longbow, requires 9 Markmanship
- Use Nightmare Weapon + Triple Shot for single enemies
- Replace Distracting Shot by "By Ural's Hammer"
- Can also be played by R/Rt
Unyielding Aura Monk
<pvxbig> [build prof=Mo/E name="Unyielding Aura Monk" hea=12+1+1 div=10+1 prot=8][Unyielding Aura][Seed of Life][Protective Spirit][Orison of Healing][Cure Hex][Heal Party][Glyph of Lesser Energy][Optional][/build] </pvxbig>
- Optional for Healing Seed or Air of Superiority
Usage
Terra #1
- Keep up Shadow form with deadly paradox or glyph of swiftness (see first paragraph on the page)
- Use glyph of lesser energy before activating the Battle Standard -> Sliver armor chain, and only use "Finish Him!" in a situation where you wouldn't be able to kill otherwise. Try to aggro as many monsters as possible, as the using of "Finish Him!" puts a drain on your energy and you may find yourself in a situation where you run out of energy.
- Use feigned neutrality right before--rarely--your shadow form drops due to a lack of 25 or 15 energy.
- Use death's charge as a heal or a method of getting out of a bodyblock.

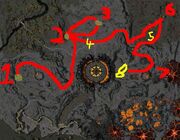
Terra One Route
- 1) Start
- 2) Run here and kill the Shadow Priest, 3 Rangers and Beast. The ghosts will pop, take both quests. Don't worry about the Skeletons aggroing the ghosts, - they no longer kill them.
- 3) Run to 3, getting as much aggro as possible. Pull the Skeleton casters so they are just below the priest of menzies, but make sure the priest of menzies doesn't start running round. Deaths Charge up to menzies. The warriors will start running round but the casters will keep wanding, so sliver armor can kill menzies before any warriors steal Sliver's target. Once menzies is dead, recast SF and pick up the book. Run round (don't death's charge down or the book will be left up the top) and take the book back to the ghosts. Don't forget to drop the book before recasting shadow form, or it will run out early (enchanting weapon not out). Dragon lich's can interrupt through shadow form with deafening roar, so if you have aggroed one, stop a few seconds before you need to cast so it can waste it before you try to cast.
- 4) Once the book is back, run to the Shard wolf in the middle of the battlefield and kill it.
- 5) Run to burning forest (check the quest log to see if Terra 2 took the quest off Miko The Unchained before going in. If they didn't take it, take it yourself, shout at them a bit and go into forest). Mahgo Hydra's will try to follow you, and use inferno which hits for 190 without the right equipment. Run to (5) and recast SF, GoLE and Charge the Shard wolf, and kill. If you aren't moving, then keep feigned neutrality up, to reduce the hydra's damage and heal - you should only be standing still while Sliver Armor is up. One Sliver should kill the wolf and most hydras. Run on to (6)
- 6) There are 6 Shadow Overlords you need to kill, they don't pull far so you need to stand around the middle of them all after aggroing. There are lots of Hydras, so keep moving until you've just recast SF, then charge something that is alone and use sliver. If done right, all Shadow overlords should die in one go, if not find the last few and kill them off. By then most hydras should be dead so it will be easy. Run on to (7)
- 7) Tower of Strength - there should be lots of Shadow Patrols, Abyssals, mesmers and Rangers. Kill all the shadow patrols and rangers, leaving any mesmers alive. It is easy to split the rangers from mesmers as they have different weapon ranges. When they are all dead, ask where Terra two is. If they are still doing Khobey, then run to forge and get the mage (just run into minimap range and he will start running) (this shouldn't be the case). Terra two should have finished long ago, and should be waiting near forge to trigger mage. Either way, you have time to kill the shard wolf at(8) before he turns up (Pull the wolf towards the tower so the monks do not heal him). Once the mage opens the tower, kill the nightmare and wait for main team.
- 8) Kill the wolf if he isn't already dead.
Terra #2
- Keep up Shadow form with deadly paradox or glyph of swiftness (see first paragraph on the page)
- Use glyph of lesser energy before activating the Battle Standard -> Sliver armor chain, and only use "Finish Him!" in a situation where you wouldn't be able to kill otherwise. Try to aggro as many monsters as possible, as the using of "Finish Him!" puts a drain on your energy and you may find yourself in a situation where you run out of energy.
- Use feigned neutrality right before--rarely--your shadow form drops due to a lack of 25 or 15 energy.
- Use death's charge as a heal or a method of getting out of a bodyblock.

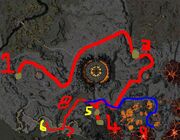
Terra Two Route
- 1) Start
- 3)Grab quest from Miko The Unchained on your way past
- 4)Take quest from Nimros The Hunter
- 5) Kill this Shard wolf. Lots of monks heal him so you might want to try pulling him into cave. (Also annoying as there is such a steep slope he loses aggro if you go too fast)
- 6) Kill the beach Wolf, try not to aggro the warrior guys
- 7) Wait at beach for the main team to take the quest Restore The Temple Of War. Work though the cave killing the Seeds of Corruption
- 8) Where the Seeds of Corruption are :p If your slow, (because of trouble with the first wolf) then ask where the other terra is. If he is almost finished at tower of strength, wait outside forge so you can trigger mage straight away, then go on to (8)
- 9)Follow Blue line to Khobey The Betrayer. If your struggling to kill, pull him out of his cave and to the left so you can get more aggro. Once you reach the bottom of the "bridge", khobey will run out ahead of all the others. Once this is done, if you haven't already, wait outside forge to trigger mage. (If your fast then you will)
Main Team
- Clear the way to the Tower of Courage and complete Rastigan The Eternal's quest.
- Clear the way to the Temple of War and clear it so the Forgemaster appears. Terra 1 takes the quests so you can go directly to the Temple of War.
- Take the first quest once the Perma is waiting on the south side of the forge. Pull them towards the middle. Once they are dead, pull the Shadow Beasts to the other side and kill. Do the same for the North side.
- Before leaving the Temple of War, make sure all three quests are taken - Khobay the Betrayer, Restore the Temple of War and Tower of Strength from Eternal Lord Taeres.
- Head to the Wailing Forest, clear all foes to the wailing lord. Do not kill the Wailing Lord.
- Pull and kill the nearby wolf.
- The Signet of Illusion Mesmer is the quest taker. Wait until everyone else is off the map and ready, then take the quest from the Wailing Lord. Wait until you are called by the main team.
- If you were far enough away, the griffins will not have followed you. Clear the way back to the Tower of Courage. Once you are almost there, tell the SoI mesmer they can come with Griffins.
- Pull and kill the last Wolf. Wait in the Tower until the griffins get there, then head to forge for your reward.
See Also
Pre-shadow form change - 16minutes
Full videos of Main team, T1 and T2