|
The PvXwiki community finds this to be an excellent build. If you disagree with this rating, please discuss it on the build's talk page. This build has been designed for the following use: |
| This build is part of the current PvE meta. Remove this tag if it is no longer used in the current PvE meta. |
A Mount Qinkai Speed Clear (MQSC) team build in order to farm Luxon factions by vanquishing the area. This build addresses the nerf and buffs caused by the February 25th, 2010 skill changes. The meeting location is in Aspenwood Gate in the European German Districts. The average time to clear the area is 8-13 minutes. Each player gains approximately 10k-11k Luxon Factions. This build is very reliable and simple to use. The Yeti Tank can aggro as many enemies as he/she wishes without dying and at the same time able to clear within 10 minutes. Each member of the Wallow and Beach team has a resurrection skill, thus there is a very low chance of a team wipe if pulled correctly.
Overview
The team splits into three teams:
Yeti Team
 /
/ (Yeti Tank Ritualist)
 / (Yeti Spirits Ranger)
- / (Yeti Smite Monk)
Wallow Team
- / (Wallow Channeling Ritualist)
- / (Wallow Communing Ritualist)
Beach Team
- / (Beach Channeling Ritualist)
- / (Beach Communing Ritualist)
- / or / (Beach UA Healer)
Yeti Team
Yeti Tank
Attributes and Skills
<pvxbig> [build prof=ritua/mesme restor=12+1+3 inspir=12 spawni=3][vengeful was khanhei][vengeful weapon][spirit shackles][i am unstoppable][ether nightmare (luxon)][cry of pain][mantra of flame][channeling][/build] </pvxbig>
Equipment
- Max Armor with Blessed Insignia or Herald's Insignia.
- Any Weapon, Bows may be useful for pulling
Usage
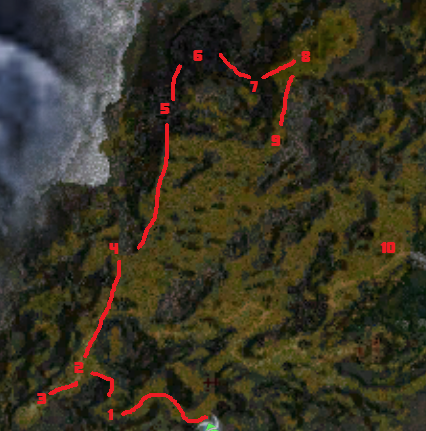
- Receive the Luxon Blessing from the Luxon Priest upon starting.
- Wait for the Smiter and the Ranger to bond you.
- Once you see that you are under the effect of Quickening Zephyr and Greater Conflagration use Mantra of Flame, Channeling, Vengeful was Khanhei, Vengeful Weapon and "I am Unstoppable!" then take the Yeti's aggro.
- Maintain Vengeful was Khanhei, Vengeful Weapon, "I am Unstoppable!", Ether Nightmare and Cry of Pain as much as possible. Use Mantra of Flame and Channeling when they are about to end.
- The Smiter will bond you with Life Barrier to help against boss Yeti's. Pull a group of yeti into Chehbaba Roottripper.
- Once in location 6 wait for the Smiter to bond you with Life Barrier again then use Spirit Shackles on Hukhrah Earthslove.
Tips
- If your team is very experienced and fast or the wallow team is very slow, then you may ask to wallow team to skip the Naga in location 10 so that the Yeti team can do them and save time.
- You must always stay within range of the spirits.
- It is advisable to move steadily so that the Spirits can be moved.
- When the Yetis use a healing skill they may temporary change targets, thus make sure you are their closest target at all times or else the yetis may attack the Ranger or Smiter.
- You may aggro as many Yetis as you like without dieing so try to take out two or three groups at once to speed up the run and to maintain energy.
- Reserve around 10-13 energy when Vengeful was Khanhei is about to end.
- When at the cave timing is very important Spirit Shackles because it takes three seconds to activate, with the aftercast delay, it will take approximately four seconds. Do not use Spirit Shackles when Vengeful was Khanhei is about to end.
Counters
- Going out of the range of spirits.
- The Yeti switch targets to the Smiter or Ranger.
- The Spirits die.
- Running out of energy with small groups and the Smiter and Ranger does not help finish.
Yeti Spirits
Attributes and Skills
<pvxbig> [build prof=Ranger/Monk Wilderness=12+1+3 Protection=10 Expertise=8+3][Serpent's Quickness][Quickening Zephyr][Greater Conflagration][Purge Signet][Vital Blessing][Essence Bond]["Finish Him!"][Ebon Vanguard Assassin Support][/build] </pvxbig> <pvxbig> [build prof=Ranger/Ritualist Wilderness=12+1+3 Restoration=10 Expertise=8+3][Serpent's Quickness][Quickening Zephyr][Greater Conflagration][Mend Body and Soul][Spirit Light][Summon Spirits (Luxon)]["Finish Him!"][Ebon Vanguard Assassin Support][/build] </pvxbig>
- The last two skill can be replaced with another which the party finds more useful.
- Purge can be replaced with another damage or healing skill.
- Spirit Light can replaced with another damage skill.
Equipment
- Max Armor.
- Extra energy runes and insignias are suggested.
- Any weapon.
Usage
- Receive the Luxon Blessing from the Luxon Priest.
- Follow the yeti tank throughout the run.
- Enchant the Yeti Tank with Vital Blessing and Essence Bond.
- Use Serpent's Quickness and setup the spirits so that they will be within range of the fight.
- Once there is only one or two enemies left attack them using "Finish Him!" and Ebon Vanguard Assassin Support.
- Use the purge signet on the Tanker or the rest of the Yeti team when needed.
- When everything is cleared move quickly to the next location and setup the spirits to prepare for the next engagement.
- Make sure to stay out of the range of the enemy, if the spirits die then so too does the Tanker.
Tips
- Location of the spirits are very important. Practice estimating the range of the spirits before joining a group.
Yeti Smite
Attributes and Skills
<pvxbig> [build prof=Monk/Nec Smiting=12+1+3 Protection=12+3 Blood=3][Life Barrier][Retribution][Balthazar's Spirit]["By Ural's Hammer!"][Blessed Signet][Ebon Vanguard Assassin Support][Blood Ritual][Rebirth][/build] </pvxbig>
- Ebon Vanguard Assassin Support can be replaced with Holy Warmth or any other damage skill.
Equipment
- Max Armor.
- Extra energy runes and insignias are suggested.
- Any weapon.
Usage
- Receive the Luxon Blessing from the Luxon Priest. You may also kneel at the shrine to receive additional benefits increase your attributes.
- Follow the Yeti Tank throughout the run.
- While wearing a Smiting +1 +3 headgear, enchant the Yeti Tanker with Balthazar's Spirit, use "By Ural's Hammer!" and enchant the Tanker with Retribution.
- Use Blood Ritual on the Ranger to help the Ranger regain energy.
- When the Tanker begins to use Mantra of Flame, enchant him with Blood Ritual then back up.
- Use Blood Ritual each time the Ranger needs to setup the spirit or when the Tanker needs energy.
- While the Tanker is engaged, use the Blessed Signet to gain energy.
- When there is only one or two enemies left, use Ebon Vanguard Assassin Support to help finish the group
- Each time the Tanker is about to engage a boss (Locations 3, 4, 6) equip a Protection Prayers +1 +3 headgear and enchant the Tanker with Life Barrier. Once the boss in the area dies terminate Life Barrier, it is no longer needed.
- If the team makes a mistake and the Tanker dies, carefully use Rebirth to revive the Tanker.
Wallow Team
Wallow Channeling Rit
Attributes and Skills
<pvxbig> [build prof=Ritualist/Any Channeling=12+1+3 Spawning=12+3][Spirit Siphon][optional][Signet Of Spirits][BloodSong][optional][Painful Bond][Summon Spirits (Luxon)][Flesh Of My Flesh][/build] </pvxbig>
Optional Combinations
- "You Move Like a Dwarf!" and "By Ural's Hammer!"
- Rupture Soul and Destruction or Agony
- Vampirism and Spiritleech Aura or Spirit Light (Be sure to check if your partner is carrying vampirism)
- Drop Channeling and Spawning each to 11 and bring up Restoration to 8.
- If you are taking too much damage you can try replace Summon Spirits with Ebon Escape.
- For more experienced teams, Summon Spirits may be replaced with another skill such as Technobabble, "Finish Him!" or Ancestor's Rage.
- For more experienced teams, Flesh Of My Flesh may be replaced with another damage.
- "By Ural's Hammer" works well with Painful Bond.
Equipment
- Max Armor with Shaman's Insignia.
- Longbow.
Usage

- Receive the Luxon Blessing from the Luxon Priest.
- Move to location 1 and set up all spirits.
- Wait for the first group of wallow to go into the aggro. If the first group of wallow is a bit far from the reach of your spirits, you can pull using your longbow.
- Always fight one group at a time.
- Once the first group is dead stay in location 1 and wait for the second group of wallow and repeat the process.
- After the first two groups, DO NOT attack the Guardian Moss group, instead go around them to location 2, which is on higher ground and slightly out of the range of aggro. Once in location 2, create all spirits except Destruction and attack the Island Guardian group using your longbow. The spirits will now start attacking the group but the enemy will not attack back. Continue attacking with your longbow so that the spirits keep attacking as well.
- Next move slightly up and kill the wallow group which is moving down toward you.
- Move to location 3 and attack the Island Guardian group using the same method as before, they should not attack you back as long as you stay out of range. During this time another group of wallow may come from behind. Kill them as priority.
- After location 3, move to location 4, 5 and 6 to repeat the process.
Tips
- Use Spirit Siphon as often as possible to maintain energy.
- If the other teams are not finished go to location 7 and kill the Nagas. You may also kill the Naga in location 7 after location 5 and before moving to location 6.
- It is suggested that you pull slowly and only one group at a time. In location 5, there can be up to four groups of wallows so be careful how you pull them. The Island Guardian group here does not attack back as well as long as you are out of range.
- If you are using the Caltrops or "You Move like a Dwarf!", try to cripple as many wallows as possible and use summon spirits to heal the spirits and at the same time move them away from the wallows.
- If your partner dies run away and wait for the fight to finish then come back and resurrect your partner.
Counters
- Over aggroing the enemy.
- Taking too much damage.
Wallow Communing Rit
Attributes and Skills
<pvxbig> [build prof=Ritualist/Any Communing=12+1+3 Spawning=12+3][Optional][Pain][Shadowsong][Anguish][Optional][Boon of Creation][Armor of Unfeeling][Flesh Of My Flesh][/build] </pvxbig>
Elite Optional
- Ritual Lord
- Wanderlust
- Signet of Ghostly Might
Second Optional
- Vampirism or Disenchantment (Check to see if your partner is carrying Vampirism)
- The first version, make sure you use Ritual Lord before each Binding Ritual, or else it will require a 45 second recharge.
- The second version can be tried however if the spirits die then there is a long recharge.
- The third optional elite skill provides the highest sustained damage ouput.
- For more experienced teams, Flesh of My Flesh may be replaced with another skill.
- Armor of Unfeeling or be replaced with another damage inflicting skill, such as Remove Hex or Ebon Vanguard Assassin Support.
- Boon of Creation may be replaced with another damage skill, such as "Finish Him!" or "You Move Like a Dwarf!".
Equipment
- Max Armor with Shaman's Insignia.
- Longbow.
Usage
- Same usage as the Channeling Rit.
Tips
- It is suggested that you use Energetic was Lee Sa as often as possible for energy upkeep.
- If your partner dies run away and wait for the fight to finish then come back and resurrect your partner.
Counters
- Over aggroing the enemy.
- Taking too much damage.
Beach Team
Beach Channeling Rit
Attributes and Skills
<pvxbig> [build prof=Ritualist/Any Channeling=12+1+3 Spawning=12+1][Spirit Siphon]["You Move like a Dwarf!"][Spirit Burn][Signet Of Spirits][BloodSong]["By Ural's Hammer!"][Painful Bond][Flesh Of My Flesh][/build] </pvxbig>
- Spirit Burn may be replaced with another skill such as Summon Rudy Djinn or Ancestor's Rage.
- For more experienced teams, Flesh Of My Flesh may be replaced with another damage.
Equipment
- Max Armor with Shaman's Insignia.
- Any weapon. A longbow may be useful for pulling.
Usage
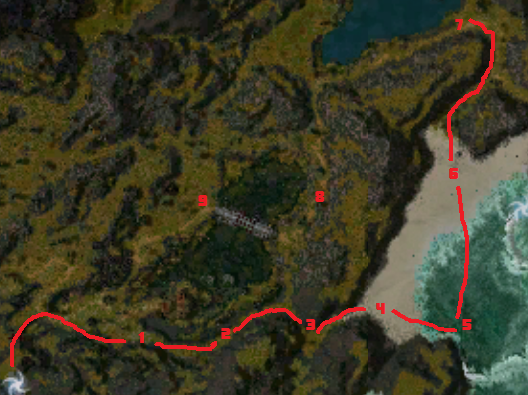

- Receive the Luxon Blessing from the Luxon Priest.
- Move to location 1 and create all spirits. Wait for the first wallow group to come toward you. Once they become engaged with the spirits use "By Ural's Hammer!" and then Painful Bond. From there use Pain Inverter and Spirit Burn as often as possible. Also make sure to create new spirits when the former ones die.
- Next move to location 2 which slightly below the crest of the hill. Setup spirits then move to the top of the hill to spawn the Oni. Repeat this process for location 3.
- In location 4 setup the spirits slightly out of aggro range of the Naga then use the same pattern as stated before.
- Once you are done you may see a group of Outcasts nearby. Move toward them but do not engage in a fight, this is location 5. Wait for the Outcasts to start fighting the Naga group coming from the north. Once they are fighting start setting up the Spirits and pull the Outcast group as soon as they have finished with the fight. Be careful of Kayali for he does heavy damage.
- Next move to locations 6 and 7 and kill the Naga there.
- Once finished go by location 8 to check if there is another group of wallows patrolling the area, the wallow team may or may not have killed them.
- If the Wallow team is not finished, move to location 9 to kill the Naga there.
Tips
- The lake contains two groups of Naga. Pull only one at a time to avoid a team wipe.
- It is suggested to place the spirits by the bank where they are on higher ground.
- If the UA Healer dies it is suggested that you run away then come back and resurrect.
Counters
- Over aggroing the enemy.
- Going out of range of the healer.
- Taking too much damage.
- Use Spirit Siphon as often as possible to maintain energy.
Beach Communing Rit
Attributes and Skills
<pvxbig> [build prof=Ritualist/Any Communing=12+1+3 Spawning=12+1][Wanderlust][Pain][Shadowsong][Anguish][Vampirism][Energetic Was Lee Sa][Summon Spirits (Luxon)][Flesh Of My Flesh][/build] </pvxbig> <pvxbig> [build prof=Ritualist/Any Communing=12+1+3 Spawning=12+1][Ritual Lord][Pain@20][Shadowsong@20][Anguish@20][Vampirism][Energetic Was Lee Sa][Armor of Unfeeling][Flesh Of My Flesh][/build] </pvxbig>
- If you having trouble with the spirits dying too fast, try the second build for faster recharge.
- Armor of Unfeeling may be replaced with Summon Spirits
- Vampirism may be replaced with "You Move like a Dwarf!" to help knock down Naga warriors that get past the spirits.
- For more experienced teams, Flesh of My Flesh may be replaced with another skill.
Equipment
- Max Armor with Shaman's Insignia.
- Any weapon. A longbow may be useful for pulling.
Usage
- Same usage as the Channeling Rit.
- Use Ritual Lord before making each spirit. Use Ritual Lord only for spirits or else it will require a 45 second recharge.
- Before facing Kayali the Brave, make the Pain and Anguish first. Then behind them put Shadowsong. This way there is a higher chance of Kayali staying blinded for a longer period of time. Replace Shadowsong as quickly as possible if it is about to die.
Tips
- It is suggested that you use Energetic was Lee Sa as often as possible for energy upkeep.
- If the UA Healer dies it is suggested that you run away first then come back and resurrect.
Counters
- Over aggroing the enemy.
- Going out of range of the healer.
- Not blinding Kayali.
- Taking too much damage.
Beach UA Healer
Attributes and Skills
<pvxbig> [build prof=Monk/Any Div=10+1 Protection=11+1+3 Healing=10+1][Pain Inverter][Ebon Vanguard Assassin Support]["You move like a Dwarf!"][Guardian][Patient Spirit][Signet of Rejuvenation][Protective Spirit][Unyielding Aura][/build] </pvxbig> <pvxbig> [build prof=Ritualist/Monk Communing=10+1 Restoration=11+1+3 Spawning=10+1][Pain Inverter][Ebon Vanguard Assassin Support]["You move like a Dwarf!"][spirit light][soothing memories][protective was kaolai][Shelter][Unyielding Aura][/build] </pvxbig>
- The healing skills can be replaced with other healing skills of the monk's choice.
- Ebon Vanguard Assassin Support and "You Move Like a Dwarf!" are suggested but not required.
- If your Ritualists are taking too much damage replace any of the first three skills with more healing skills.
Equipment
- Max Armor.
- 40/40 Set.
Usage
- Follow the Channeling and Communing Rit.
- Heal them when they are hurt and use the first three skills to attack the enemy but always stay out of range of the wallows as much as possible.
- When a Ritualist dies, use UA and revive them as quickly as possible, thus it is advisable to always reserve approximately 10 energy for UA.
Tips
- "You Move Like a Dwarf!" is very useful when the Wallow or Naga starts attacking you, while running use "You Move Like a Dwarf!" to lose the aggro.
- You can use "You Move Like a Dwarf!" to knock down and interrupt Naga rangers who are attempting to use troll urgent which has a three second activation.
- If you are using the second version, make sure to make the Displacement relatively far back so that it does not get attacked.
Counters
- Over aggroing the enemy.
- Taking too much damage.
Also See
- Build:Rt/any Mobile Spirits
- Build:Any/Rt Spirit Farmer
- Build:Team - 2 Man Spirit Farmer
-