m (Reverting to pre-skele and archiving) |
m (moved Build:Team - Underworld Speed Clear to Archive:Team - Underworld Speed Clear: archived.) |
Revision as of 19:58, 1 September 2010
|
This build has been archived as of 02:09, November 17, 2009 (UTC), for the following reason:
This build had been designed for the following use: This build was in the category great before being archived. |
| |
This build requires Consumables to operate properly. |
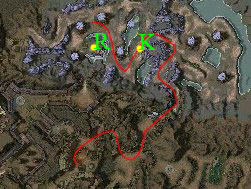
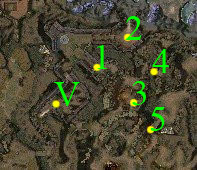
This build is for Hard Mode Underworld runs. Advanced teams can complete the full run in less than 15 minutes. The Vale team consists of the Perma Sin tank and an SS Necro who work together to accomplish Wrathful Spirits and Escort of Souls. The Perma Sins split up to handle Servants of Grenth in the Ice Wastes, The Terrorweb Queen in the Spawning Pools, Imprisoned Spirts in the Bone Pits, Demon Assassin in the Mountains, and clearing the monsters around the Chaos Planes statue in preparation for the Four Horsemen. The A/Me Perma and handles Clearing the Chamber and Unwanted Guests in the Labyrinth. Refer to images below for guidelines on areas.
The Assassin Permas should all carry Zealous Scythes with 20% enchant and +5 energy in case one ever gets low on energy. Make sure to sweep where there are lots of enemies, but never hit Aatxes.
This team relies on the use of consets, make sure that at least one person on the team has one, with a backup essence of celerity, or full extra conset if you are less confident. The Permas should also carry one or more res scrolls in case the Necro dies.
Wastes Perma
<pvxbig>[build prof=A/E name="A/E UW Perma Tank (Wastes)" ear=12 cri=3 sha=12+1+3][Deadly Paradox][Shadow Form][Glyph of Lesser Energy][Ebon Battle Standard of Honor][Sliver Armor]["By Ural's Hammer!"][Radiation Field][Shadow of Haste][/build] </pvxbig>
Equipment
- Max Armor with Radiant Insignias.
- A Weapon with Enchanting +20%.
- A shield with +10 armor vs. Fire.
- Necessary Runes.
Usage
Path for Wastes Perma
- Party enters Underworld and wait for Consumables to be activated.
- After the Chamber Sin clears the chamber head to Wastes.
- Use Radiation Field to kill Dryders and Coldfires quickly.
- After popping the Reaper, make certain that the quest objective's spawning point (The Ice King) is safe.
- Stand where the Terrorweb Dryders spawn and recycle your Shadow Form, Wait 10 seconds then use Shadow of Haste.
- Run to the Reaper of the Icy Wastes and take quest right before you recycle Shadow Form again.
- Deadly Paradox will cancel your Shadow of Haste and shadow step you instantly back to where the Dryders have spawned.
- Kill all 18 Dryders, the quest will erroneously update as complete after the first 2 groups of 6 have appeared, but you still have to kill all the Dryders or your team will be kicked from UW.
- When finished, head to The Chaos Plains to assist for The Four Horsemen quest if necessary, otherwise wait until your team is finished.
Optional
- Feigned Neutrality if you are newer to the build or less confident.
- Death's Charge for additional self-healing and escape from body block.
Counters
- Failing to maintain Shadow Form.
- Riposte and Deadly Riposte; don't attack Bladed Aatxes with melee weapons.
- Lava Font; avoid standing adjacent to a Terrorweb Dryder with another person near it.
- Shock; goes through Shadow Form's protection, Charged Blacknesses use it.
- Traps; laid by Obsidian Behemoth.
- Smite Crawlers use Area of Effect Smiting skills which will go through Shadow Form.
Notes
- Usually referred to as "waste" by PUGs.
Perma of Pools
<pvxbig> [build prof=A/E ear=12 dead=3 sha=12+1+3][Deadly Paradox][Shadow Form][Glyph of Lesser Energy][Ebon Battle Standard of Honor][Sliver Armor][Radiation Field]["I Am Unstoppable!"][Death's Charge][/build] </pvxbig>

Paths for Permas
Equipment
- Max Armor with Radiant Insignias.
- A Weapon with Enchanting +20%.
- A shield with +10 armor vs. Lightning.
- Neccessary Runes.
Usage
- Party enters Underworld and wait for Consumables to be activated.
- After the Chamber Sin clears the chamber head to Pools.
- Avoid aggroing as many Charged Blacknesses as you can on your way to pop the reaper.
- Before popping the reaper, make certain that the area around where he will appear is cleared of Terrorweb Dryders.
- Take quest The Terrorweb Queen, then make your way back to her spawning point and kill her.
- When finished, head to The Chaos Plains to assist for The Four Horsemen quest. You will often be the first Perma finished, so you will most likely end up taking the "poolside" for 4H.
Counters
- Failing to maintain Shadow Form.
- Riposte and Deadly Riposte; don't attack Bladed Aatxes with melee weapons.
- Lava Font; avoid standing adjacent to a Terrorweb Dryder with another person near it.
- Shock; goes through Shadow Form's protection, Charged Blacknesses use it.
- Traps laid by Obsidian Behemoths.
Notes
- Usually referred to as "pools" by PUGs.
Perma of Mountains
Another Good Tutorial (watch in High Quality) <pvxbig> [build prof=A/E name="Mts Perma" ear=12 cri=3 sha=12+1+3][Deadly Paradox][Shadow Form][By Urals Hammer][Sliver Armor][Ebon Battle Standard of Honor][Glyph of Lesser Energy]["I Am Unstoppable!"][Feigned Neutrality][/build] </pvxbig>

Areas of the Underworld
Equipment
- Max Armor with Radiant Insignias.
- A Zealous Scythe with Enchanting +20% and energy +5.
- A shield with +10 armor vs Piercing and a shield with +10 armor vs. Lightning.
- Necessary Runes.
- A +20 energy staff of enchanting.
Usage
- Party enters Underworld and wait for Consumables to be activated.
- After the Chamber Sin clears the Chamber, go out the left passage from the entrance room and aggro all Aatxes and Graspings in the room so the other Permas can run by.
- If the way is blocked by Obsidian Behemoths, you may need to use your aggro to kill a couple of them in order to open the way.
- After all the rest of the Permas are through, head through to the Mountains Statue.
- Kill all Obsidian Behemoths in range of Reaper pop first, using aggro from Terrorwebs.
- When killing Behemoths, make sure to stand in Nearby range as Sliver Armor will still hit but you will not trigger traps.
- Due to the Behemoths using Healing Spring, you will need to wand them to interrupt them, otherwise they can outheal your damage.
- Pop the Reaper and take the Demon Assassin quest.
- Run down to where you have as much aggro from Obsidian Behemoths as possible, to maximize Sliver Armor's effectiveness.
- Kill the Slayer and, if your party is not finished, the Keepers of Souls following him.
- When finished, head to The Chaos Plains to assist for The Four Horsemen quest if necessary.
Counters
- Failing to maintain Shadow Form.
- Riposte and Deadly Riposte; don't attack Bladed Aatxes.
- Lava Font; avoid standing adjacent to a Terrorweb Dryder with another person near it.
- Shock; goes through Shadow Form's protection, Charged Blackness use it.
- Aggroing Charged Blackness when Slayer is still alive.
Notes
- Usually referred to as "mnt" or "mnts" by PUGs.
- Using your staff will prevent the Obsidian Behemoths from using Whirling Defense.
- Mountains is one of the hardest areas with the fewest drops, which means they can be hard to find in PUGs. If you are running this, you won't have much trouble finding a party.
- Sometimes it is useful to use IAU and Feigned to run in and clear the traps every now and again to prevent unwanted surprises.
Variants
- Once you have some experience, you may want to swop
 Feigned Neutrality for Death's Charge, and "I Am Unstoppable!" for "Finish Him!" or Intensity.
 - With Death's Charge you need to run over traps then Death's Charge to one of the terrorwebs quickly. This will cause the traps to trigger without hurting you.
- If running without "I Am Unstoppable!" using a Birthday Cupcake or Red Rock Candy is recommended.
Perma of Pits
Good tutorial <pvxbig> [build prof=A/D name="""A/D"" Shadowform Holy Scytheway" Shadow=12+1+3 Crit=6+1 Scythe=11][Deadly Paradox@2][Shadow Form][Banishing Strike][Mystic Sweep][Aura of Holy Might (Kurzick)][Way of the Master][Death's Charge][Critical Agility][/build] </pvxbig>
Equipment
- Max Armor with Radiant Insignias.
- Zealous Scythe of Enchanting +20%.
- A shield with +10 armor vs. Lightning.
- Neccessary Runes.
Usage
- Party enters Underworld and wait for Consumables to be activated.
- Maintain your enchantments.
- After the Chamber Sin clears the chamber head to the Bone Pits.
- Run until you are near the bridge, and death's charge to the group crossing over it.
- Continue until you reach the slope leading to the monument. At this point, turn around and kill anything following you, taking the time to clump foes together.
- Spam Mystic Sweep on recharge.
- Use Banishing Strike on Bone Minions for additional area damage.
- Before popping the reaper, make certain that the area around where he will appear is cleared of Dead Collectors and Dead Threshers.
- Take quest Imprisoned Spirits, then make your way back to the bridge to block the Terrorweb Dryders.
- Once the third group of Dryders has appeared and come up on top the bridge, it is safe to exit the Bone Pits, however, it is recommended that you kill them for drops.
- If ONE of the Imprisoned Spirits dies, you will NOT fail this quest, but you cannot afford to lose more than one.
- When finished, head to The Chaos Plains to assist for The Four Horsemen quest.
Optional Skills
- Heart of Holy Flame in place of Aura of Holy Might (Kurzick and Luxon title track skill). Less damage, but the build still functions normally if you do not have access to the title track skills yet.
- "I Am Unstoppable!" in place of Death's Charge, if you are worried about KD from Charged Blacknesses.
- Light of Deldrimor in place of Death's Charge if you want to have additional damage and you are sure you won't run into Charged Blacknesses.
- Farmer's Scythe for Mystic Sweep. Experience in pulling groups is required to make this skill effective.
Counters
- Failing to maintain Shadow Form.
- Riposte and Deadly Riposte; don't attack Bladed Aatxes.
- Lava Font; avoid standing adjacent to a Terrorweb Dryder with another person near it.
- Shock; goes through Shadow Form's protection, Charged Blackness use it.
- Trap; laid by Obsidian Behemoths - you have little or no self heal, so you are quite vulnerable.
- Area of Effect Hexes and Spells: kill all Bone Horrors first, killing their owner Bone Collector will cause them to go berserk, and you will be hit by various area effect curses and spells.
Notes
- Although the skill Aura of Holy Might does not mention this fact, it does indeed change your damage to holy damage.
- It is not necessary to kill the two groups of collectors/threshers behind the monument, however it is highly recommended due to the fact that they will sometimes agro onto the spirits from the quest.
- Usually referred to as "pits" by PUGs.
A/Me Variant
<pvxbig> [build prof=Assassin/Mesmer Shadow Arts=12+1+3 Inspiration Magic=12 Critical Strikes=3][Deadly Paradox][Shadow Form][Channeling][Spirit of Failure][Arcane Echo][Light of Deldrimor][Radiation Field][Death's Charge][/build] </pvxbig>
- Note: This build should only be used by those experienced in pits, as it requires knowledge of pulling, wall-hugging, and grouping of the Threshers and Collectors.
Plains Sin
<pvxbig> [build prof=A/E earth=12 critical=3 sha=12+1+3][Deadly paradox][Shadow Form][glyph of lesser energy][ebon battle standard of honor][sliver armor][By ural's hammer!]["I Am Unstoppable!"][Feigned Neutrality][/build] </pvxbig>
- "I Am Unstoppable!" and Feigned Neutrality are only required if you are inexperienced in Pools or Mountains, as you may have to do these areas if another assassin fails.
Equipment
- Max Armor with Radiant Insignias.
- Necessary runes.
- A shield with +10 armor vs Piercing and a shield with +10 armor vs. Lightning.
- Weapon with +20% enchantment duration.
Usage
- Maintain Shadow Form.
- Use GoLE > EBSoH > Sliver > BUH! to kill foes.
- After the Chamber Sin is finished clearing Graspings, run to Chaos Plains via Twin Serpent Mountains. The path can be seen in the Pools section.
- Once you arrive at the Chaos Plains, run to the monument.
- Clear all foes around the Plains monument. Remember to kill the Banished Dream Rider, and its spawns, before you kill the Terrorweb Dryders. If you pop the reaper before everything is killed you will be kicked out of the Underworld.
- Complete the Four Horsemen quest with one other Perma. Make sure your SF always is in recharge, because the four horsemen have Signet of Humility, wich can disable SF. If your SF is disabled, you will die. The horsemen on your side can then reach the reaper unhindered and kill him, sending your party back to the outpost.
- Help any other Perma with their areas if necessary. You job is mostly utility, and you won't be able to do The Four Horsemen quest alone.
Counters
- Failing to maintain Shadow Form.
- Getting KD from Charged Blacknesses while running to plains.
- Signet of Humility, the Four Horsemen use it - make sure to recast SF as soon as possible.
Notes
- Usually referred to as "plains" by PUGs.
- Bringing enemies down to less than 25% health and then changing targets greatly speeds killing when down to small groups of enemies.
- Although the Plains job itself if very easy, you need to be able to do any other area in case that area dies, and for this reason it can also be one of the hardest jobs.
Chamber Sin
<pvxbig> [build prof=A/Me ins=12 dead=3 sha=12+1+3][Deadly Paradox][Shadow Form][Spirit of Failure][Channeling][Ether Nightmare (Kurzick)][Cry of Pain][Radiation Field][Death's Charge][/build]
- If you are confident with your energy, you can replace Spirit of Failure with Arcane Echo to use with Cry of Pain.
</pvxbig>
Videos of the Chamber Sin job can be found here and here.
Equipment
- Full Radiant and Attunement
- Necessary runes.
- Weapon with +20% enchantment duration - Preferably a staff or spear due to the "wall trick."
Usage
- Maintain Shadow Form.
- After you party enters the UW and cons are activated, start maintaining SF.
- Take the quest Clear the Chamber.
- Round up all Aatxes and Graspings in the entrance room, and bring them to the choke point between the left stairs and the cliff. You may miss two of the Aatxes on the far side as they often break aggro. You can cast SoF and your degen spells on the monsters, but not CoP as it causes scatter, and the monsters may go attack the necro, or make themselves harder to kill in general because they aren't balled up.
- Wait until the other Permas have blocked all enemies and the SS has killed them, then head up the stairs towards the statue.
- Round up all Graspings, Aatxes, and Terrorwebs in the statue room, and pull them back through the middle hallway (there are three, the middle is the biggest, the one you came from).
- Walk backwards on the right side of the hallway hugging the wall (the monsters will follow and be bunched up against the wall as well), and once everyone (including Terrorwebs) are outside of where the reaper will pop, take a small step off the wall. This will mean unbreakable aggro.
- Kill the Terrorwebs from afar, keeping aggro with Aatxes and Graspings as well. After Terrorwebs are dead, the Vale team should take the Restoring Grenth's Monuments quest (called "restore" by most groups).
- Kill the rest of the monsters in the Chamber - Watch your energy, sometimes things will stop attacking, even if they are still in aggro. If this happens, attack it to cause it to re-aggro (use a ranged weapon against Aatxes) or find a new target on which to cast Spirit of Failure.
- After everything is dead, walk to the Reaper, collect your reward, and check that the Vale team is clear for the Unwanted Guests quest (UWG).
- Taking UWG will spawn new Terrorwebs, six Keepers of Souls, and several Vengeful Aaxtes. Vengefuls CANNOT BE KILLED except by killing the Keeper of Souls they are associated with and then breaking aggro. They will follow you for a while, but will eventually give up and die.
Keeper Spawn Locations
- The first Keeper to kill is in the leftmost passage (when facing the reaper), where the Vale team exits. Aggro all the Terrorwebs and Keeper into area range and kill. Try to avoid bodyblock from Vengefuls.
- Proceed in this manner until all the Keepers are killed.
- After all six Keepers are dead and you have lost or killed any Aatxes or Graspings following you, head back to the Labyrinth statue and wait until the rest of your team is finished.
- You may be asked to assist the Vale team if the Necro dies in a bad spot.
Counters
- Failing to maintain Shadow Form.
- Casting AoE Hexes on Mindblade Spectres which spawn in the entrace room after a while.
- Running out of energy if the foe hexed with Spirit of Failure stops attacking.
- Bad Aggroing (HM causes Scatter)
Variants
- Light of Deldrimor Instead of Cry of Pain.
Notes
- Usually referred to as "chamber" by PUGs.
Vale Perma
<pvxbig> [build prof=A/D scythe=10 cri=8 sha=12+1+3][Deadly Paradox][Shadow Form][Mystic Sweep][Aura of Holy Might][Asuran Scan][Way Of Perfection][Way Of The Master][Death's Charge][/build] </pvxbig>
A decent tutorial (uses Chilblains build below). Has another tutorial (also uses the Chilblains variant).
Equipment
- Max Armor with Survivors Insignias.
- Scythe with +20% enchantment duration.
- +20 energy staff for recasting SF after getting spiked by "Fear Me!".
Usage
- Wait for the chamber to aggro everyone in the starting area, then go and kill the nightmares, then walk around to the T-split leading to the Wastes.
- Kill the Aatxes and turn towards the Labyrinth. The Chamber should have the way cleared for you now.
- Allow Necro to take the Restoring Grenth's Monuments quest from the Reaper of the Labyrinth which should have popped around this time, when Chamber has killed his three Terrorweb Dryders.
- Move on towards the Vale, killing one or two groups of Aatxes on the way.
- Round up every Grasping Darkness in the Vale, tank them in the corner behind the house in the center. Make sure you don't forget the Grasps at the Statue. If you are having trouble with aggro from the first Darkness group, kill them on the bridge between the Vale and the Labyrinth.
- After all the Grasps are dead, move on to the statue and round up all the patrols circling near the Statue that hinder the way for Wrathful Spirits.
- Ball those patrols at the jagged rock near the statue, and stand in nearby range approximately. Wand any stray patrols, and try to wand targets in the middle of the bunch to trigger splinter weapon the best.
- Let your SF end after these patrols have died and the Reaper is spawned. The reason behind this is that Illusionary Weaponry ignores Shadow Form, and maintaining SF is very hard on energy. Keep using shadow refuge (A/n Variant only) until your health is 3/4, then run towards Mayor Alegerhi.
- Maintain Way of Perfection and Way of The Master while fighting the Tortured Spirits. Be careful with the group atop the ridge, they seem to have aggro problems. The best way to do it (if you aren't short on time) is to take the long way around. Be sure to watch out for enemy groups coming from behind.
- If using the A/N variant try to only use Shadow Refuge directly before Golden Lotus Strike as the energy gain from Golden Lotus Strike requires you to be under an enchantment. Managing your energy like this will allow you to use Chillblains right away on every recharge even with a maximum energy as low as 30, therefore freeing up a spot on the N/RTs bar.
- Once you've completed Wrathful Spirits, move back to the Labyrinth, and wait just behind the bridge. Commence maintaining Shadow Form.
- Tell the support to take the quest Escort of Souls when you're ready to aggro the ~15 Mindblades.
- Ball all of the Mindblades on a pillar on the south end of the large hallway, around the middle. Do not attack the Mindblades and do not move, or the Souls will walk towards you and be killed by the Mindblade Spectres.
- Tell the support to start Restoring Grenth's Monuments.
- Once the support are past the second flight of stairs, you can start attacking the Mindblade Spectres.
- After the Mindblades are dead, feel free to wander around killing some more monsters here and there; you're done.
- Mindblades offer high ecto drop rates, so try and kill them by yourself. (and the N/Rt)
Notes
- Usually referred to as "vale" or "vale sin" by PUGs.
Chilblains Variant
<pvxbig> [build prof=A/N curses=8 dag=10 cri=2+1 dead=1 sha=12+1+3][Deadly Paradox][Shadow Form][golden lotus strike][lotus strike][death blossom][chilblains][shadow refuge][Death's Charge][/build] </pvxbig>
- Coordinate Chilbs with Necro.
- Make sure you don't attack Aatxes with your daggers.
N/Rt Vale
<pvxbig> [build prof=N/Rt sou=8+3 cur=12+1+3 cha=10][Spiteful Spirit][Spirit Rift][Ancestors' Rage][by ural's hammer][Signet of Lost Souls][Great Dwarf Weapon][Chilblains][Flesh of My Flesh][/build] </pvxbig>
Equipment
- Max Armor with Radiant insignias
- Curses 40/40 set
Usage
- Wait for the Chamber Sin to mob up the Chamber and the rest of the Permas to block them, then run in and cast to kill the mob.
- Follow the Vale sin about, and kill everything he tanks.
- Make sure you're not too close - you'll get aggro rather easily.
- Do not rush it - you have one of the faster runs, thus you have enough time to be careful
- Take the Restoring Grenth's Monuments quest from the Reaper of the Labyrinth which should have popped around the time you pass by his spawn spot. (he appears when the Chamber sin has killed his three Terrorweb Dryders)
- Move into the Vale and wait for the Vale sin to ball up the Grasping Darknesses. Cast SS, follow with Spirit Rift and Ancestor's Rage, rinse and repeat until everything is dead.
- Coordinate Chilblains with the Vale sin.
- Drop Chilblains if you have a pro A/N Vale sin who can manage his own energy, and spam Great Dwarf Weapon on both friendly spirits and Vale sin instead.
- Aggro the black widow that spawns after Wrathful Spirits so your Vale sin can shadow step back down to you after killing the group of souls on top of the hill.
- After Wrathful Spirits, move back to Labyrinth for Escort of Souls.
- Wait for the Sin to signal he has the Mindblades balled up. Walk past towards Mayor Alegheri, and make sure you're within spellcasting range of the Souls. Do not stop, or the spirits may stop following you.
- Once the spirits are escorted, walk back and stand behind the Vale sin when you want to kill the Mindblades.
- It's best to cast SS on mobs and then run away, especially those who are dangerous (Terrorwebs, Aatxes)
Variants
- Splinter Weapon over Great Dwarf Weapon
- Ebon Vanguard Assassin Support over Chilblains
- Hexer's Vigor (especially in case of hexes by Mindblades)
Notes
- Usually referred to as "vale nec", "vale support" or "N/Rt" by PUGs.
- "vale team" refers to the Vale sin and N/Rt.
Rt/N Vale support variant
<pvxbig> [build prof=Rt/N spa=6 cur=12 cha=10+1+3 comm=6][Mighty Was Vorizun][Spiteful Spirit][Spirit Rift][Ancestors' Rage][Ebon Vanguard Assassin Support][Great Dwarf Weapon][Chilblains][Flesh of My Flesh][/build] </pvxbig>