mNo edit summary |
mNo edit summary |
||
| Line 1: | Line 1: | ||
| − | {{ |
+ | {{Good-Build|farming}} |
{{TOCright}} |
{{TOCright}} |
||
Uses terrain exploits and the elite skill [[gww:Spoil Victor|Spoil Victor]] to farm elite tomes off of several bosses in [[gww:Hard Mode|Hard Mode]]. So far it can successfully farm [[gww:Elite Tome|Elite]] [[gww:Ranger|Ranger]], [[gww:Elementalist|Elementalist]], [[gww:Ritualist|Ritualist]], [[gww:Necromancer|Necromancer]] and [[gww:Monk|Monk]] [[gww:Tome|tomes]]. |
Uses terrain exploits and the elite skill [[gww:Spoil Victor|Spoil Victor]] to farm elite tomes off of several bosses in [[gww:Hard Mode|Hard Mode]]. So far it can successfully farm [[gww:Elite Tome|Elite]] [[gww:Ranger|Ranger]], [[gww:Elementalist|Elementalist]], [[gww:Ritualist|Ritualist]], [[gww:Necromancer|Necromancer]] and [[gww:Monk|Monk]] [[gww:Tome|tomes]]. |
||
Revision as of 22:29, 15 August 2008
|
The PvXwiki community finds this to be a good build. If you disagree with this rating, please discuss it on the build's talk page. This build has been designed for the following use: |
Uses terrain exploits and the elite skill Spoil Victor to farm elite tomes off of several bosses in Hard Mode. So far it can successfully farm Elite Ranger, Elementalist, Ritualist, Necromancer and Monk tomes.
Attributes and Skills
<pvxbig> [build prof=Nec/any Blood=11+1+3 Curses=9+3 Death=3+3 Soul=6+3][Awaken the Blood][Spoil Victor@17][Price of Failure@14][Reckless Haste@14][Optional][Optional][Optional][Consume Corpse][/build] </pvxbig>
- This leaves you with enough attribute points to set any other attribute at 9. Fill the optional slots with whatever suits you best for the boss you are farming.
Equipment
- Armor
- Anything will do. It doesn't have to be max.
- Runes & Insignias
- Use 5 Superior Runes (one for each attribute and one extra).
- Use 5 Radiant Insignias.
- Weapons
- Use the -50 Grim Cesta to reduce your health to 55.
- Use either a Totem Axe or a Sceptre of the Keeper. Either will do fine.
Usage
- Run around mobs and towards the boss.
- When you get to the boss, hide behind the terrain and cast Awaken the Blood. While still staying behind the terrain you plan to use, cast Spoil Victor, Price of Failure and Reckless Haste.
- If the boss drops anything, use Consume Corpse to teleport in and grab their drops before any foes that may spawn start attacking you.
Soloable Bosses
Chkkr Thousand Tail
- Chkkr Thousand Tail --> medium difficulty
map to Chkkr Thousand Tail
- Optional Slots:
- Attributes
- Use the extra points you have and put them into Beast Mastery.
- Run to the ledge to the right of where the Wardens are patrolling. Some Mantid should be patrolling there. When they run back, run around to below the ledge. Follow the map to the right to avoid accidentally spawning Oni. Once you're behind the rock, cast Awaken the Blood and cast Spoil Victor, Price of Failure, Reckless Haste, and spam Dark Pact and Blood of the Aggressor. He should be dead within 60~ seconds.
- Use Run as One to run faster.
- NOTE: YOU MAY HAVE TO REZONE TO AVOID CONFLICT WITH THE WARDENS. THIS HAPPENS 2/3 TIMES.
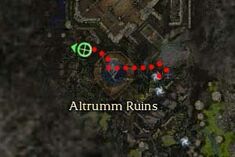
Byzzr Wingmender
- Byzzr Wingmender --> easy difficulty
map to Byzzr Wingmender
- Optional Slots:
- Attributes
- Use the extra points you have and put them into Beast Mastery.
- Follow the map to Byzzr's location, then hide behind the rock. Cast Awaken the Blood and cast Spoil Victor, Price of Failure, Reckless Haste, and spam Dark Pact and Blood of the Aggressor. He should be dead within 60~ seconds.
- Use Run as One to run faster.
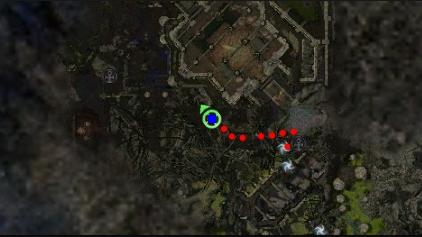
Chkkr Brightclaw

Map to Chkkr Brightclaw.
- Chkkr Brightclaw --> medium dificulty (pull sometimes messes up)
- Optional Slots
- Attributes
- Use the rest of your attributes to max out Curses and Blood Magic. Make Soul Reaping at 3+3.
- When you zone in, run to Chkkr Brightclaw according to the map. Stop at the top of the stone stairs next to Chkkr Brightclaw. Use a longbow to pull him from the pool of water to the bottom of the stairs. Prior to running to the bottom of the stairs, he should cast Recuperation, his only spirit.
- When he's at the bottom of the stair, switch back to your other weapon set and cast Awaken the Blood, Spoil Victor, Price of Failure, Reckless Haste, Lifebane Strike, Signet of Lost Souls, and spam Dark Pact. He should be dead within 3-5 seconds after casting your spells.
- NOTE: BECAUSE CHKKR IS OUT OF RANGE OF HIS SPIRIT, HE WON'T HEAL HIMSELF BECAUSE HE DOESN'T WANT TO SACRIFICE HEALTH FROM SPIRIT LIGHT. THIS MAKES IT TEN TIMES EASIER TO SOLO FARM HIM.'
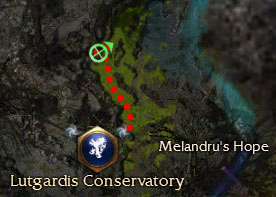
Craw Stonereap

Map to Craw Stonereap.
- Craw Stonereap --> medium/hard difficulty
- Optional Slots
- Attributes
- Curses should be at 14, Blood Magic at 16, Soul Reaping at 9, Death Magic at 5, and Shadow Arts at 1.
- For this boss, you'll need two sets of armor. Your first one should be the set you normally use for this build, and the second should be a regular set (you should have 480~ health with the second set on).
- Make sure you are wearing your regular set of armor.
- When you zone in, run to Craw Stonereap according to the map. Before you run past the group of wardens, select the one farthest away from you and cast Death's Charge, followed by Dash. Renew Dash to get away safely.
- Regenerate your health with Hexer's Vigor. When your health is full, run back towards where Craw Stonereap is. Pull him and run behind the wall so that he can't hit you with his attacks. While still equipped with your regular health set, cast Awaken the Blood, Spoil Victor, Price of Failure, Reckless Haste. Craw Stonereap should die in less than a minute. To see how to kill Zarnas Stonewrath afterwards, see the next section.
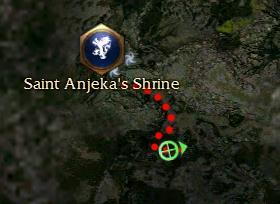
Zarnas Stonewrath
Map to Zarnas Stonewrath.
- Zarnas Stonewrath --> easy difficulty (as long as you have killed Craw Stonereap first)
- Optional Slots
- Attributes
- Curses should be at 14, Blood Magic at 16, Soul Reaping at 9, Death Magic at 5, and Shadow Arts at 1.
- For this boss, you'll need two sets of armor. Your first one should be the set you normally use for this build, and the second should be a regular set (you should have 480~ health with the second set on).
- Make sure you are wearing your regular set of armor.
- You must have killed Craw Stonereap prior to killing Zarnas Stonewrath to kill Zarnas.
- While still equipped with your regular health set, hit him with your wand and run behind the wall. Use Hexer's Vigor to recover any health lost. Switch back to your 55 health armor and weapon set. Cast Awaken the Blood, Spoil Victor, Price of Failure, Reckless Haste. He should be dead within less than 90~ seconds.
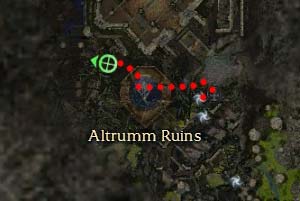
Ritualist's Construct


Map to Ritualist's Construct.
- Ritualist's Construct --> easy difficulty
- Optional Slots
- Attributes
- Curses should be at 15, Blood Magic at 16, Soul Reaping at 6.
- For this boss, you'll need two sets of armor. Your first one should be the set you normally use for this build, and the second should be a regular set (you should have 480~ health with the second set on).
- Make sure you are wearing your regular set of armor.
- While still equipped with your regular health set, use a longbow to pull Ritualist's Construct and run behind a wall. Switch back to your 55 health armor and weapon set. Cast Awaken the Blood, Spoil Victor, Price of Failure, Reckless Haste. Spam Dark Pact and Blood of the Aggressor. He should be dead within 60~ seconds.
Counters
- Being stupid.
- Waiting too long to cast Consume Corpse (when pop-ups are present).
Notes
- This build uses the terrain exploit concept, and will only work with bosses who can be exploited through this concept.
See also
- Build:R/Me Famine Farmer - A similiar build exploiting terrain to farm bosses.
- demonstrational video