Lord Xivor (talk | contribs) m (Undo revision 484692 by Special:Contributions/137.150.201.55 (User talk:137.150.201.55) - If your going to edit the skill bar, then edit the attritbutes so that they synergize as well.) |
|||
| (132 intermediate revisions by 72 users not shown) | |||
| Line 1: | Line 1: | ||
| − | {{ |
+ | {{Meta-Build|rating=Great|PvE team|running}} |
| + | {{Dungeon Build}} |
||
{{TOCright}} |
{{TOCright}} |
||
| ⚫ | |||
| ⚫ | |||
| − | ==600 Monk== |
||
| ⚫ | |||
| ⚫ | |||
| − | [build name="600 monk" prof=monk/any protec=12+1+1 divine=12+1][shield of absorption][spirit bond][protective spirit][spell breaker][blessed signet][blessed aura][balthazars spirit][essence bond][/build] |
||
| ⚫ | |||
| − | *Blessed Signet can be changed for [[gw:Light of Deldrimor|Light of Deldrimor]] if you are confident in your energy management capability. |
||
| + | == Team Composition == |
||
| ⚫ | |||
| + | {{mini skill bar|Spell Breaker|Protective Spirit|Shield of Absorption|Spirit Bond|Light of Deldrimor|Optional|Essence Bond|Blessed Aura}}{{mini skill bar|Optional|Shield of Judgment|Holy Wrath|Blessed Signet|Rebirth|Vital Blessing|Balthazar's Spirit|Retribution}} |
||
| ⚫ | |||
| − | *Highest affordable Vigor Rune with the last 2 spots filled with Runes of Vitae. |
||
| − | *All armor pieces equipped with Survivor Insignias. |
||
| ⚫ | |||
| ⚫ | |||
| ⚫ | |||
| − | ===Attributes and Skills=== |
||
<pvxbig> |
<pvxbig> |
||
| − | [build |
+ | [build prof=Mo/any pro=12+1+1 div=12+1][Spell Breaker][Protective Spirit][Spirit Bond][Shield of Absorption][Light of Deldrimor][optional][Essence Bond][Blessed Aura][/build] |
</pvxbig> |
</pvxbig> |
||
| + | Optional should be: |
||
| + | *{{skill icon|Mantra of Resolve}} |
||
| + | *{{skill icon|Pain Inverter}} |
||
| + | *{{skill icon|Eternal Aura}} |
||
| + | *{{skill icon|"Finish Him!"}} |
||
| ⚫ | |||
| − | *Optional: You could change [[gw:Life Attunement|Life Attunement]] for [[gw:Purifying Veil|Purifying Veil]] to reduce the effects of any conditions your tank might suffer from. |
||
| + | * Full Survivor and Vitae runes |
||
| ⚫ | |||
| ⚫ | |||
| + | * A Divine Favor offhand with HSR (20%) and HP +30. |
||
| ⚫ | |||
| − | *Optional: If your hero is smiting bring [[gw:Purge Signet|Purge Signet]] instead of [[gw:light of deldrimor|Light of Deldrimor]]. Seeing as its not usable on a hero because its a pve only skill. |
||
| + | * Cast and maintain [[gw:Blessed Aura|Blessed Aura]] and [[gw:Essence Bond|Essence Bond]] on yourself. |
||
| + | * Have the smiter cast and maintain [[gw:Vital Blessing|Vital Blessing]], [[gw:Balthazar's Spirit|Balthazar's Spirit]], [[gw:Retribution|Retribution]] on you. |
||
| + | * Before walking into a group of enemies, cast [[gw:Protective Spirit|Protective Spirit]] and [[gw:Spirit Bond|Spirit Bond]] followed by [[gw:Spell Breaker|Spell Breaker]]. |
||
| + | * As soon as you aggro, cast [[gw:Shield of Absorption|Shield of Absorption]]. |
||
| + | * Cast Spirit Bond to keep your health up and maintain Shield of Absorption. |
||
| ⚫ | |||
| − | *Requirement: Now since an Arenanet update, the smiter can take damage by [[gw:reversal of damage|Reversal Of Damage]] triggering on Retribution. Due to this, the smiter needs to bring a self heal, of which [[gw:signet of devotion|Signet Of Devotion]] or [[gw:Restful Breeze|Restful Breeze]] seem to be best suited for, require no points in healing prayers for either. Another option is to request that people being run through the dungeon heal the smiter during the run, if applicable. Retribution should always be cast before Holy Wrath so the smiter only takes 21 damage from Retribution, as opposed to 53 damage from Holy Wrath. |
||
| ⚫ | |||
| + | [build prof=Mo/any smi=12+1+3 pro=12+3 div=3+3][Optional][Shield of Judgment][Holy Wrath][Rebirth][Blessed Signet][Vital Blessing][Balthazar's Spirit][Retribution][/build] |
||
| ⚫ | |||
| + | Optional should be: |
||
| + | * {{Skill icon|Glyph of Swiftness}} to recharge SoJ faster |
||
| + | * {{Skill icon|Blood Ritual}} for energy |
||
| + | * {{Skill icon|Arcane Echo}} |
||
| + | * {{Skill icon|"By Ural's Hammer!"}} to boost damage. |
||
| − | ===Equipment=== |
+ | === Equipment === |
| + | * Players should bring a superior Smiting and Protection runes on separate headsets and switch between them. |
||
| − | *Any Armor |
||
| + | * Full Survivor and Vitae rune |
||
| − | *Any weapon of enchanting |
||
| + | * 20% enchant weapon and +30 health mod preferably |
||
| + | === Usage === |
||
| + | * Cast and maintain [[gw:Vital Blessing|Vital Blessing]], [[gw:Balthazar's Spirit|Balthazar's Spirit]], [[gw:Retribution|Retribution]] on the 600 monk. |
||
| + | *cast [[gw:Holy Wrath|Holy Wrath]] and [[gw:Shield of Judgment|Shield of Judgment]] before 600 goes to fight cast it again if the 600 comes back a little or asks to |
||
| + | * Use [[gw:Rebirth|Rebirth]] to resurrect the monk. |
||
| + | == Cathedral of Flames == |
||
| ⚫ | |||
| ⚫ | |||
| − | *Have every member of your party take the quest [[gw:Temple Of The Damned|Temple of the Damned]] and switch from normal mode to hard mode before entering the dungeon. |
||
| − | *Upon entering any dungeon area have the smiter use his/her maintainable enchantments on the 600 monk. |
||
| − | *The 600 monk then should use his/her maintainable enchantments on him/herself while the smiter uses Blood is Power to keep the energy of the 600 monk at max. |
||
| − | *Take the blessing from the [[gw:Beacon of Droknar|Beacon of Droknar]]. |
||
| − | *Before entering a battle with the undead, use [[gw:Spell Breaker|Spell Breaker]] -> [[gw:Protective Spirit|Protective Spirit]] -> engaging the group -> [[gw:Shield of Absorption|Shield of Absorption]] -> [[gw:Spirit Bond|Spirit Bond]]. |
||
| − | *Before entering a battle with the enchanted use [[gw:Protective Spirit|Protective Spirit]] -> [[gw:Shield of Absorption|Shield of Absorption]] -> [[gw:Spirit Bond|Spirit Bond]] -> engaging the group. |
||
| − | *During a battle maintain [[gw:Protective Spirit|Protective Spirit]] and [[gw:Shield of Absorption|Shield of Absorption]] as much as possible. Use [[gw:Spirit Bond|Spirit Bond]] every time after using [[gw:Shield of Absorption|Shield of Absorption]]. |
||
| − | *Most enemies will die before [[gw:Spell Breaker|Spell Breaker]] ends, but if they don't, they will die within 15 seconds of its ending. There is rarely a reason to reapply [[gw:Spell Breaker|Spell Breaker]] in a battle with normal creatures. |
||
| − | *Enchanted will die in about 15 seconds. |
||
| − | *'''Use Blessed Signet after casting spell breaker, protective spirit and spirit bond to give you an energy boost so you can easily handle smaller mobs |
||
| − | ''' |
||
| − | |||
| − | ==Area Specific Usage== |
||
| ⚫ | |||
[[image:Temple_Level1.JPG|right|thumb|120px|First Level Map]] |
[[image:Temple_Level1.JPG|right|thumb|120px|First Level Map]] |
||
| − | *Kill the group closest to you without aggroing the patrol that patrols behind it. |
+ | * Kill the group closest to you without aggroing the patrol that patrols behind it. |
| − | *Take a left. |
+ | * Take a left. |
| − | *There will either be a [[gw:Charr Axemaster|Charr Axemaster]] or a [[gw:Charr Blademaster|Charr Blademaster]] that |
+ | * There will either be a [[gw:Charr Axemaster|Charr Axemaster]] or a [[gw:Charr Blademaster|Charr Blademaster]] that will die relatively quickly. |
| − | *Normally, there will be a group of 3-4 charr that will patrol away from you and get killed by a group of 5 undead at the end of the passage. If this doesn't happen, kill the charr as they come back along their patrol pattern. Treat them like undead in terms of skill usage. |
+ | *Normally, there will be a group of 3-4 charr that will patrol away from you and get killed by a group of 5 undead at the end of the passage. If this doesn't happen, kill the charr as they come back along their patrol pattern. Treat them like undead in terms of skill usage, except for one detail - [[gw:Charr Dominator|Charr Dominator]]s have [[gw:Power Block|Power Block]], so if any are still alive when Spell Breaker ends, just use Spirit Bond to stay alive. |
| − | * |
+ | * Proceed to the end of the corridor and kill the undead there. |
| − | *There will then be a group of undead patrolling east-west along a corridor and a group of charr patrolling north-south. Kill the undead without aggroing the charr and continue down that corridor. |
+ | * There will then be a group of undead patrolling east-west along a corridor and a group of charr patrolling north-south. Kill the undead without aggroing the charr and continue down that corridor. |
| − | *At the end of the corridor, there will be a group of patrolling undead that should be killed. |
+ | * At the end of the corridor, there will be a group of patrolling undead that should be killed. |
| − | *Do not continue into the big hall area, but instead turn left and move towards the dungeon lock |
+ | * Do not continue into the big hall area, but instead turn left and move towards the dungeon lock. There will be a group of allied charr that will turn into enemies as you approach. |
| − | *If you are carrying [[gw:Arcane Echo|Arcane Echo]], now would be the first time you would use it to echo [[gw:Spell Breaker|Spell Breaker]]. Continue as you would any other group. If you are not carrying [[gw:Arcane Echo|Arcane Echo]], spell breaker will end before the boss is dead. |
+ | * If you are carrying [[gw:Arcane Echo|Arcane Echo]], now would be the first time you would use it to echo [[gw:Spell Breaker|Spell Breaker]]. Continue as you would any other group. If you are not carrying [[gw:Arcane Echo|Arcane Echo]] or [[gw:"Finish Him!|"Finish Him!]], spell breaker will end before the boss is dead. Spam Spirit Bond so he shatters it instead of Protective Spirit. |
| − | *Pick up the dungeon key and use it to open the dungeon lock. |
+ | * Pick up the dungeon key and use it to open the dungeon lock. |
| − | *There will be a |
+ | * There will be a group that runs toward you when you enter the hallway. You can aggro this one alone or take the patrolling group as well. |
| − | *There will be two groups of patrolling undead in the next area, you can kill them separately or at the same time |
+ | * There will be two groups of patrolling undead in the next area, you can kill them separately or at the same time. |
| − | *[[gw:The Keeper|The Keeper]] is easy to kill. |
+ | * [[gw:The Keeper|The Keeper]] is easy to kill. You won't need Spell Breaker for him. |
| + | * Run through the portal, ignoring the two spawns after the Keeper is dead. |
||
===Level 2=== |
===Level 2=== |
||
[[image:Temple_Level2.JPG|right|thumb|150px|Second Level Map]] |
[[image:Temple_Level2.JPG|right|thumb|150px|Second Level Map]] |
||
| − | *Kill the lone [[gw:Charr Axemaster|Charr Axemaster]] or [[gw:Charr Blademaster|Charr Blademaster]] |
+ | * Kill the lone [[gw:Charr Axemaster|Charr Axemaster]] or [[gw:Charr Blademaster|Charr Blademaster]] if it spawns, the undead may kill it though. |
| − | *Kill the two groups of undead that are patrolling around a stalactite. |
+ | * Kill the two groups of undead that are patrolling around a stalactite. |
| − | *Move towards the area map |
+ | * Move towards the area map and the charr that are guarding it, but do not aggro them. |
| − | *Move by the charr and kill the first group of enchanted. |
+ | * Move by the charr and kill the first group of enchanted. |
| − | *Enter the area with poison geysers and kill the next group of patrolling enchanted. |
+ | * Enter the area with poison geysers and kill the next group of patrolling enchanted. |
| − | * |
+ | * A group of undead will spawn in the center, so preprot before running in and cast Spell Breaker when you see them spawn. |
| − | * |
+ | * Continue on the kill the third and final group of enchanted in the area. |
*There will be another lone [[gw:Charr Axemaster|Charr Axemaster]] or [[gw:Charr Blademaster|Charr Blademaster]] that will probably get killed by undead if you wait long enough, but if it doesn't, kill it. |
*There will be another lone [[gw:Charr Axemaster|Charr Axemaster]] or [[gw:Charr Blademaster|Charr Blademaster]] that will probably get killed by undead if you wait long enough, but if it doesn't, kill it. |
||
| − | *Up ahead |
+ | * Up ahead there will be a group of undead and charr. They will usually fight and the undead will win. Otherwise take out each group. |
| + | * Head up the hill and kill [[gw:Tyndir Flamecaller|Tyndir Flamecaller]] and his group. As before, he won't die before Spell Breaker ends. |
||
| − | *Next, you will see the Dungeon Key boss for level 2. |
||
| + | * Open the gate and kill the group of undead that rush at you. Cast Spell Breaker before the boss dies. |
||
| − | *Do the same thing you did for the other dungeon key boss. If a [[gw:Charr Mender|Charr Mender]] lives, grab the dungeon key and open the dungeon lock. Then aggro the undead group with the boss in it come and kill themselves and the [[gw:Charr Mender|Charr Mender]]. |
||
| + | * Continue the next two groups of undead, if you have Spell Breaker up thanks to the boss, feel free to aggro both groups while keeping Spell Breaker up. |
||
| − | *If there is no [[gw:Charr Mender|Charr Mender]], just continue with opening the lock and killing the undead boss's group. |
||
| ⚫ | |||
| ⚫ | |||
| ⚫ | |||
| ⚫ | |||
| ⚫ | |||
===Level 3=== |
===Level 3=== |
||
[[image:Temple_Level3.JPG|right|thumb|150px|Third Level Map]] |
[[image:Temple_Level3.JPG|right|thumb|150px|Third Level Map]] |
||
| − | *Upon entering the area, you will see a [[gw:Keymaster of Murakai|Keymaster of Murakai]]. |
+ | *Upon entering the area, you will see a [[gw:Keymaster of Murakai|Keymaster of Murakai]]. Ignore it. |
| − | *There will be two groups of undead patrolling to your left. Kill the one that patrols along where the [[gw:Keymaster of Murakai|Keymaster of Murakai]] goes. |
+ | * There will be two groups of undead patrolling to your left. Kill the one that patrols along where the [[gw:Keymaster of Murakai|Keymaster of Murakai]] goes. |
| − | *Follow the [[gw:Keymaster of Murakai|Keymaster of Murakai]] until you get to a group of undead, which you will then kill. If you cannot see the [[gw:Keymaster of Murakai|Keymaster of Murakai]], move in the direction it was going until you get to the area with the enchanted. Before entering the enchanted area, take a right down the corridor. |
+ | * Follow the [[gw:Keymaster of Murakai|Keymaster of Murakai]] until you get to a group of undead, which you will then kill. If you cannot see the [[gw:Keymaster of Murakai|Keymaster of Murakai]], move in the direction it was going until you get to the area with the enchanted. Before entering the enchanted area, take a right down the corridor. |
| − | *After killing |
+ | * After killing the group, loop around the lava river and kill the [[gw:Keymaster of Murakai|Keymaster of Murakai]] along with a group of undead. Pick up the Dungeon Key. |
| − | * |
+ | * Turn around and take a right through the arc, and head straight, killing the group of undead. |
| − | *Continue down that passage. |
+ | * Continue down that passage. |
| − | *You will see a group of enchanted |
+ | * You will see a group of patrolling enchanted, it will be faster to kill them rather than wait to pass. |
| − | *As you continue down the corridor, there will be a group of enchanted with |
+ | * As you continue down the corridor, there will be a large group of enchanted. If you have trouble with this part, pull the Enchanted Hammers and Enchanted Daggers around the corner before killing the rest of the group. |
| − | * |
+ | * Open the dungeon lock and you will enter a large and seemingly empty room. |
| + | * Preprot before running in. Cast Spell Breaker when you see enemies spawn. Now aggro the Steward of Murakai and pull him away from the rest of the group. Now kill him and grab the key. |
||
| − | *If you are carrying arcane echo, you should use it before entering the area. Move towards [[gw:Murakai's Steward|Murakai's Steward]] and activate [[gw:Spell Breaker|Spell Breaker]] as soon as the first creature pops up. |
||
| + | * Head down the stairs where the enchanted were and through the tunnel on the left. There will be a group of undead here and at the opening of the other end of the cave to kill. |
||
| − | *Kill [[gw:Murakai's Steward|Murakai's Steward]] and creatures around him that the killing of may be fun and grab the boss key. |
||
| + | * At the flame darts, maintain Spirit Bond and stand in the middle of the darts. Flag your hero to the top of the steps and follow him. Maintain Spirit Bond and Shield of Absorption on him. |
||
| − | *Exit the [[gw:Murakai's Steward|Murakai's Steward's]] chamber and take the first two lefts. There will be two groups of undead that should be killed. |
||
| + | * Open the boss lock with your key and head through. |
||
| − | *The group will then be facing the flame dart area. |
||
| ⚫ | |||
| − | *The 600 monk should maintain [[gw:Spirit Bond|Spirit Bond]] on him/herself and [[gw:Protective Spirit|Protective Spirit]], [[gw:Spirit Bond|Spirit Bond]], and [[gw:Shield of Absorption|Shield of Absorption]] on the smiter as they make their way across the multitude of flame darts. It is also possible to simply let the smiter die, maintain [[gw:Spirit Bond|Spirit Bond]] on the 600 monk, and then once you are past the ressurection shrine the 600 monk should sac himself on the undead popups, both of you then respawn in Murakai's chamber. |
||
| − | * |
+ | * Head up the left side and kill the two groups of undead. |
| + | * Preprot and cast Spell Breaker before aggroing Murakai. Pull Murakai into the nearby flame jet near the center of the room. The easiest way to do this is to hug the wall as you move back, moving a few steps at a time. Maintain Protective Spirit, Spirit Bond, and Spell Breaker. Watch when Murakai uses [[gw:Murakai's Consumption|Murakai's Consumption]], if she uses it just before Spell Breaker ends, you can wait approximately 10 seconds before casting Spell Breaker again. |
||
| − | *While crossing the pit, it is important for both people to move in a zig-zag way to limit the number of hits dealt to them. |
||
| ⚫ | |||
| ⚫ | |||
| − | *Choose a side and kill the undead on that side. They are easy and do not require [[gw:Spell Breaker|Spell Breaker]]. |
||
| − | *While facing Murakai, maintain [[gw:Spell Breaker|Spell Breaker]] as much as possible. Unless there are [[gw:Servant of Murakai|Servants of Murakai]] that have been summoned, do not use [[gw:Shield of Absorption|Shield of Absorption]]. Maintain [[gw:Spirit Bond|Spirit Bond]] at all times that [[gw:Shield of Absorption|Shield of Absorption]] is not up. |
||
| − | *When Murakai is dead, collect the chest reward. |
||
==Time== |
==Time== |
||
| − | *For the first area, a good time is |
+ | * For the first area, a good time is 10-12 minutes. |
| − | *For the second, it is |
+ | * For the second, it is 12-15 minutes. |
| − | *For the third, it is |
+ | * For the third, it is 18-22 minutes. |
| − | *For the entire run, |
+ | * For the entire run, 40-45 minutes is a good time. |
| − | *Death will usually cause a 1-2 minute delay. |
+ | * Death will usually cause a 1-2 minute delay. |
| − | *People who are new to this build should expect a time of |
+ | * People who are new to this build should expect a time of 1 hour, if not longer. Although this decreases quite quickly as it is a relatively simple build. |
| + | * Heroes tend to slow down runs because of the extra management required. However, PUG smiters might be inexperienced and may be prone to messing up. |
||
==Counters== |
==Counters== |
||
| − | *Not having spell breaker up when needed. |
+ | * Not having spell breaker up when needed. |
| − | * |
+ | * Interruptions from [[gw:Enchanted Daggers|Enchanted Daggers]] or [[gw:Crypt Ghoul|Crypt Ghouls]]. |
| + | * Knockdowns from [[gw:Enchanted_Hammer_(Eye_of_the_North)|Enchanted Hammers]]. Cast Shield of Absorption when it reaches you so you will get kded before SoA ends. |
||
| − | *Rarely, enchanted will be able to kill you in ~1 second, before you activate spirit bond. |
||
| + | * Smiter dies from [[gw:Reversal Of Damage|Reversal Of Damage]]. |
||
| − | *These are only minor counters as deaths are not as bad as they are in say the UW, as the party will get ressurected. |
||
| + | |||
| − | *Reversal of damage from some mobs in the cathedral of flames can kill the smiter due to an update by arenanet. |
||
| + | == Variants == |
||
| + | * "Finish Him!" |
||
| + | * Life Attunement |
||
==Rewards== |
==Rewards== |
||
| − | [[Image:Great Temple Drop.JPG|right|thumb|200px|A screen of a |
+ | [[Image:Great Temple Drop.JPG|right|thumb|200px|A screen of what was once a very profitable run.]] |
| − | *In terms of how much money will be made per run, approximately 5-8k will be made |
+ | * In terms of how much money will be made per run, approximately 5-8k will be made. |
| − | *In terms of Deldrimor points, this is a great and profitable way to farm them. In about 35 minutes, about 2000-2500 Deldrimor points can be accumulated. |
+ | * In terms of Deldrimor points, this is a great and profitable way to farm them. In about 35 minutes, about 2000-2500 Deldrimor points can be accumulated. |
| − | *Locked Chests are not necessarily a reward, but they do hold rewards. There usually are 5-6 locked chests along the path over the course of the entire run. Come well equipped with lockpicks if you feel it is good. |
+ | * Locked Chests are not necessarily a reward, but they do hold rewards. There usually are 5-6 locked chests along the path over the course of the entire run. Come well equipped with lockpicks if you feel it is good. |
| − | *Light of Deldrimor chests. There are about 2 per level along the course of the run. On the first level, about 75 gold per chest can be accumulated. On the second level, 225 gold per chest and a ~25% chance of a rare crafting material. On the third level, 225 gold and a ~40% of a rare crafting material. LoDing can add about 1-2k per run, but can add up to 5 extra minutes. |
+ | * Light of Deldrimor chests. There are about 2 per level along the course of the run. On the first level, about 75 gold per chest can be accumulated. On the second level, 225 gold per chest and a ~25% chance of a rare crafting material. On the third level, 225 gold and a ~40% of a rare crafting material. LoDing can add about 1-2k per run, but can add up to 5 extra minutes. |
| + | *The most valuable items in this run are [[gw:Diessa Chalice|Diessa Chalices]] and [[gw:Golden Rin Relic|Golden Rin Relics]], which are normall sold for over 5k and 10k each respectfully. They are normally used to obtain the Blindfold and the Dread Masks. |
||
| − | ==Runs== |
+ | == Runs == |
| − | *Since the creation of this guide, "Temple of the Damned Runs" or "temple runs" have become popular. These are people who will do the dungeon with 6 other members of their party and a hero smiter. This allows for the other members of the party to get drops, LoD chests, and end-dungeon items in exchange for a sum of money. |
+ | * Since the creation of this guide, "Temple of the Damned Runs", "Running CoF" or "temple runs" have become popular. These are people who will do the dungeon with 6 other members of their party and a hero smiter. This allows for the other members of the party to get drops, LoD hidden treasures, locked chests, and end-dungeon items in exchange for a sum of money. |
| − | *These runs are profitable for both the runner and the people getting ran, but |
+ | * These runs are profitable for both the runner and the people getting ran, but can make a run take 40-45 minutes clearing rooms for Hidden Chests. |
| − | *Because of these runs, many items specific to The Temple of the Damned have gone down in price because of the mass numbers of them entering the economy (supply goes up and demand stays the same, price goes down). |
+ | * Because of these runs, many items specific to The Temple of the Damned have gone down in price because of the mass numbers of them entering the economy (supply goes up and demand stays the same, price goes down). |
| − | ==See Also== |
+ | == See Also == |
| ⚫ | |||
| − | *[[Build:Team_-_600/Smite_UW]] - Original build formatted for UW |
||
| + | * [http://www.youtube.com/watch?v=aZQE1P7_GdY&feature=channel Tutorial Video for CoF Runs (HD)] |
||
| − | *[[Build:Team_-_600/Smite_FoW]] - Above build formatted for FoW |
||
| + | [[Category:Multi-campaign builds|Team - Temple of the Damned 600/Smite]] |
||
| − | *[[Build:Team_-_600_Rit/Smite]] - 600/Smite variant using a Ritualist Primary |
||
| ⚫ | |||
Latest revision as of 09:44, 10 July 2011
|
The PvXwiki community finds this to be an important part of the metagame. If you disagree with this rating, please discuss it on the build's talk page. This build has been designed for the following use: |
| |
This is part of the Dungeon Build series, see Dungeon Guide for all Dungeon builds. |
This build uses 600/Smite to farm the Temple of the Damned in Hard Mode.
Team Composition
Attributes and Skills
<pvxbig> [build prof=Mo/any pro=12+1+1 div=12+1][Spell Breaker][Protective Spirit][Spirit Bond][Shield of Absorption][Light of Deldrimor][optional][Essence Bond][Blessed Aura][/build] </pvxbig> Optional should be:
Equipment
- Full Survivor and Vitae runes
- Armor with lowest possible AR (Starter armor if possible).
- Any weapon with a 20% longer enchantment mod such as a Totem Axe.
- A Divine Favor offhand with HSR (20%) and HP +30.
Usage
- Cast and maintain Blessed Aura and Essence Bond on yourself.
- Have the smiter cast and maintain Vital Blessing, Balthazar's Spirit, Retribution on you.
- Before walking into a group of enemies, cast Protective Spirit and Spirit Bond followed by Spell Breaker.
- As soon as you aggro, cast Shield of Absorption.
- Cast Spirit Bond to keep your health up and maintain Shield of Absorption.
Smiter
<pvxbig> [build prof=Mo/any smi=12+1+3 pro=12+3 div=3+3][Optional][Shield of Judgment][Holy Wrath][Rebirth][Blessed Signet][Vital Blessing][Balthazar's Spirit][Retribution][/build] </pvxbig> Optional should be:
 Glyph of Swiftness to recharge SoJ faster
- Blood Ritual for energy
- Arcane Echo
- "By Ural's Hammer!" to boost damage.
Equipment
- Players should bring a superior Smiting and Protection runes on separate headsets and switch between them.
- Full Survivor and Vitae rune
- 20% enchant weapon and +30 health mod preferably
Usage
- Cast and maintain Vital Blessing, Balthazar's Spirit, Retribution on the 600 monk.
- cast Holy Wrath and Shield of Judgment before 600 goes to fight cast it again if the 600 comes back a little or asks to
- Use Rebirth to resurrect the monk.
Cathedral of Flames
Level 1

First Level Map
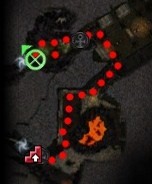
- Kill the group closest to you without aggroing the patrol that patrols behind it.
- Take a left.
- There will either be a Charr Axemaster or a Charr Blademaster that will die relatively quickly.
- Normally, there will be a group of 3-4 charr that will patrol away from you and get killed by a group of 5 undead at the end of the passage. If this doesn't happen, kill the charr as they come back along their patrol pattern. Treat them like undead in terms of skill usage, except for one detail - Charr Dominators have Power Block, so if any are still alive when Spell Breaker ends, just use Spirit Bond to stay alive.
- Proceed to the end of the corridor and kill the undead there.
- There will then be a group of undead patrolling east-west along a corridor and a group of charr patrolling north-south. Kill the undead without aggroing the charr and continue down that corridor.
- At the end of the corridor, there will be a group of patrolling undead that should be killed.
- Do not continue into the big hall area, but instead turn left and move towards the dungeon lock. There will be a group of allied charr that will turn into enemies as you approach.
- If you are carrying Arcane Echo, now would be the first time you would use it to echo Spell Breaker. Continue as you would any other group. If you are not carrying Arcane Echo or "Finish Him!, spell breaker will end before the boss is dead. Spam Spirit Bond so he shatters it instead of Protective Spirit.
- Pick up the dungeon key and use it to open the dungeon lock.
- There will be a group that runs toward you when you enter the hallway. You can aggro this one alone or take the patrolling group as well.
- There will be two groups of patrolling undead in the next area, you can kill them separately or at the same time.
- The Keeper is easy to kill. You won't need Spell Breaker for him.
- Run through the portal, ignoring the two spawns after the Keeper is dead.
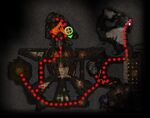
Level 2

Second Level Map
- Kill the lone Charr Axemaster or Charr Blademaster if it spawns, the undead may kill it though.
- Kill the two groups of undead that are patrolling around a stalactite.
- Move towards the area map and the charr that are guarding it, but do not aggro them.
- Move by the charr and kill the first group of enchanted.
- Enter the area with poison geysers and kill the next group of patrolling enchanted.
- A group of undead will spawn in the center, so preprot before running in and cast Spell Breaker when you see them spawn.
- Continue on the kill the third and final group of enchanted in the area.
- There will be another lone Charr Axemaster or Charr Blademaster that will probably get killed by undead if you wait long enough, but if it doesn't, kill it.
- Up ahead there will be a group of undead and charr. They will usually fight and the undead will win. Otherwise take out each group.
- Head up the hill and kill Tyndir Flamecaller and his group. As before, he won't die before Spell Breaker ends.
- Open the gate and kill the group of undead that rush at you. Cast Spell Breaker before the boss dies.
- Continue the next two groups of undead, if you have Spell Breaker up thanks to the boss, feel free to aggro both groups while keeping Spell Breaker up.
- Avoid the enchanted group and kill The Master.
- Proceed into level 3.
Level 3

Third Level Map
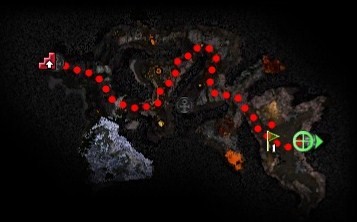
- Upon entering the area, you will see a Keymaster of Murakai. Ignore it.
- There will be two groups of undead patrolling to your left. Kill the one that patrols along where the Keymaster of Murakai goes.
- Follow the Keymaster of Murakai until you get to a group of undead, which you will then kill. If you cannot see the Keymaster of Murakai, move in the direction it was going until you get to the area with the enchanted. Before entering the enchanted area, take a right down the corridor.
- After killing the group, loop around the lava river and kill the Keymaster of Murakai along with a group of undead. Pick up the Dungeon Key.
- Turn around and take a right through the arc, and head straight, killing the group of undead.
- Continue down that passage.
- You will see a group of patrolling enchanted, it will be faster to kill them rather than wait to pass.
- As you continue down the corridor, there will be a large group of enchanted. If you have trouble with this part, pull the Enchanted Hammers and Enchanted Daggers around the corner before killing the rest of the group.
- Open the dungeon lock and you will enter a large and seemingly empty room.
- Preprot before running in. Cast Spell Breaker when you see enemies spawn. Now aggro the Steward of Murakai and pull him away from the rest of the group. Now kill him and grab the key.
- Head down the stairs where the enchanted were and through the tunnel on the left. There will be a group of undead here and at the opening of the other end of the cave to kill.
- At the flame darts, maintain Spirit Bond and stand in the middle of the darts. Flag your hero to the top of the steps and follow him. Maintain Spirit Bond and Shield of Absorption on him.
- Open the boss lock with your key and head through.
- You will now be in Murakai's chamber.
- Head up the left side and kill the two groups of undead.
- Preprot and cast Spell Breaker before aggroing Murakai. Pull Murakai into the nearby flame jet near the center of the room. The easiest way to do this is to hug the wall as you move back, moving a few steps at a time. Maintain Protective Spirit, Spirit Bond, and Spell Breaker. Watch when Murakai uses Murakai's Consumption, if she uses it just before Spell Breaker ends, you can wait approximately 10 seconds before casting Spell Breaker again.
- When Murakai is dead, collect the chest reward and kill the other two groups of undead if you want.
Time
- For the first area, a good time is 10-12 minutes.
- For the second, it is 12-15 minutes.
- For the third, it is 18-22 minutes.
- For the entire run, 40-45 minutes is a good time.
- Death will usually cause a 1-2 minute delay.
- People who are new to this build should expect a time of 1 hour, if not longer. Although this decreases quite quickly as it is a relatively simple build.
- Heroes tend to slow down runs because of the extra management required. However, PUG smiters might be inexperienced and may be prone to messing up.
Counters
- Not having spell breaker up when needed.
- Interruptions from Enchanted Daggers or Crypt Ghouls.
- Knockdowns from Enchanted Hammers. Cast Shield of Absorption when it reaches you so you will get kded before SoA ends.
- Smiter dies from Reversal Of Damage.
Variants
- "Finish Him!"
- Life Attunement
Rewards


A screen of what was once a very profitable run.
- In terms of how much money will be made per run, approximately 5-8k will be made.
- In terms of Deldrimor points, this is a great and profitable way to farm them. In about 35 minutes, about 2000-2500 Deldrimor points can be accumulated.
- Locked Chests are not necessarily a reward, but they do hold rewards. There usually are 5-6 locked chests along the path over the course of the entire run. Come well equipped with lockpicks if you feel it is good.
- Light of Deldrimor chests. There are about 2 per level along the course of the run. On the first level, about 75 gold per chest can be accumulated. On the second level, 225 gold per chest and a ~25% chance of a rare crafting material. On the third level, 225 gold and a ~40% of a rare crafting material. LoDing can add about 1-2k per run, but can add up to 5 extra minutes.
- The most valuable items in this run are Diessa Chalices and Golden Rin Relics, which are normall sold for over 5k and 10k each respectfully. They are normally used to obtain the Blindfold and the Dread Masks.
Runs
- Since the creation of this guide, "Temple of the Damned Runs", "Running CoF" or "temple runs" have become popular. These are people who will do the dungeon with 6 other members of their party and a hero smiter. This allows for the other members of the party to get drops, LoD hidden treasures, locked chests, and end-dungeon items in exchange for a sum of money.
- These runs are profitable for both the runner and the people getting ran, but can make a run take 40-45 minutes clearing rooms for Hidden Chests.
- Because of these runs, many items specific to The Temple of the Damned have gone down in price because of the mass numbers of them entering the economy (supply goes up and demand stays the same, price goes down).