|
The PvXwiki community finds this to be an excellent build. If you disagree with this rating, please discuss it on the build's talk page. This build has been designed for the following use: |
This build uses the Build: Team - 600/Smite to farm the Temple of the Damned in Hard Mode.
600 Monk
Attributes and Skills
<pvxbig> [build name="600 monk" prof=monk/any protec=12+1+1 divine=12+1][shield of absorption][spirit bond][protective spirit][spell breaker][optional][blessed aura][balthazars spirit][essence bond][/build] </pvxbig>
- The optional slot can either be Light of Deldrimor or Arcane Echo depending on if you want to have a safer or more profitable farming scenario.
- Also optional is Mantra of Resolve, to reduce the chance of getting interrupted.
Equipment
- Armor with lowest possible AL.
- Highest affordable Vigor Rune with the last 2 spots filled with Runes of Vitae.
- All armor pieces equipped with Survivor Insignias.
- Any weapon set with 20% longer enchantment mod and additional health
Smiter Monk
Attributes and Skills
<pvxbig> [build name="smiter monk" prof=mo/n smitin=12+1+3 protec=12+3 blo=3 div=0+2][blessed signet][light of deldrimor][Blood is Power][rebirth][vital blessing][life attunement][holy wrath][retribution][/build] </pvxbig>
- Optional: You could change Life Attunement for Purifying Veil to reduce the effects of any conditions your tank might suffer from.
Equipment
- Any Armor
- Any weapon of enchanting
General Usage
- Have every member of your party take the quest Temple of the Damned and switch from normal mode to hard mode before entering the dungeon.
- Upon entering any dungeon area have the smiter use his/her maintainable enchantments on the 600 monk.
- The 600 monk then should use his/her maintainable enchantments on him/herself while the smiter uses Blood is Power to keep the energy of the 600 monk at max.
- Take the blessing from the Beacon of Droknar.
- Before entering a battle with the undead, use Spell Breaker -> Protective Spirit -> engaging the group -> Shield of Absorption -> Spirit Bond.
- Before entering a battle with the enchanted use Protective Spirit -> Shield of Absorption -> Spirit Bond -> engaging the group.
- During a battle maintain Protective Spirit and Shield of Absorption as much as possible. Use Spirit Bond every time after using Shield of Absorption.
- Most enemies will die before Spell Breaker ends, but if they don't, they will die within 15 seconds of its ending. There is rarely a reason to reapply Spell Breaker in a battle with normal creatures.
- Enchanted will die in about 15 seconds.
- If the 600 monk ever needs energy outside of battle, use Blood is Power.
Area Specific Usage
Level 1
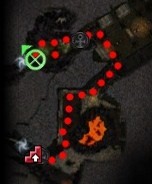
First Level Map
- Kill the group closest to you without aggroing the patrol that patrols behind it.
- Take a left.
- There will either be a Charr Axemaster or a Charr Blademaster that can die relatively quickly.
- Normally, there will be a group of 3-4 charr that will patrol away from you and get killed by a group of 5 undead at the end of the passage. If this doesn't happen, kill the charr as they come back along their patrol pattern. Treat them like undead in terms of skill usage.
- Then, proceed to the end of the corridor and kill the undead there.
- There will then be a group of undead patrolling east-west along a corridor and a group of charr patrolling north-south. Kill the undead without aggroing the charr and continue down that corridor.
- At the end of the corridor, there will be a group of patrolling undead that should be killed.
- Do not continue into the big hall area, but instead turn left and move towards the dungeon lock (which should now be visible). There will be a group of allied charr that will turn into enemies as you approach.
- If you are carrying Arcane Echo, now would be the first time you would use it to echo Spell Breaker. Continue as you would any other group. If you are not carrying Arcane Echo, spell breaker will end before the boss is dead. Because it uses Shatter Enchantment, use spirit bond as a cover enchantment after Spell Breaker has ended.
- Pick up the dungeon key and use it to open the dungeon lock.
- There will be a patrol group that should not be aggroed. Instead, wait a few seconds for another group of undead to come and begin to fight you. Kill them and then kill the patrol group.
- There will be two groups of patrolling undead in the next area, you can kill them separately or at the same time. Combining the groups is for more experienced people.
- The Keeper is easy to kill. Treat his group as any other group of undead. After killing him, move into level 2.
Level 2
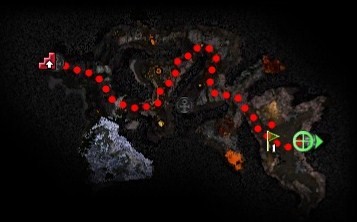
Second Level Map
- Kill the lone Charr Axemaster or Charr Blademaster unless the undead do it first.
- Kill the two groups of undead that are patrolling around a stalactite.
- Move towards the area map (to the right) and the charr that are guarding it, but do not aggro them.
- Move by the charr and kill the first group of enchanted.
- Enter the area with poison geysers and kill the next group of patrolling enchanted.
- NOTE: There is a group of 5-6 undead that will pop up upon entering the center of the poison geysers area.
- Move into the center with Protective Spirit on and activate Spell Breaker once you see the first pop-up appear. Kill them and continue on the kill the third and final group of enchanted in the area.
- There will be another lone Charr Axemaster or Charr Blademaster that will probably get killed by undead if you wait long enough, but if it doesn't, kill it.
- Up ahead (which is to the right) there will be a group of undead and charr. They will usually fight and the undead will win. If they don't, check to see if there is a Charr Mender in the charr's group. If there is, combine the undead and charr groups so they will kill each other. If there isn't a mender and they don't fight, kill each group separately. If they do fight, kill the remaining enemies on either side.
- Next, you will see the Dungeon Key boss for level 2.
- Do the same thing you did for the other dungeon key boss. If a Charr Mender lives, grab the dungeon key and open the dungeon lock. Then aggro the undead group with the boss in it come and kill themselves and the Charr Mender.
- If there is no Charr Mender, just continue with opening the lock and killing the undead boss's group.
- Then, continue and kill the other two groups of undead in the area.
- Avoid the enchanted group and kill The Master.
- Proceed into level 3.
Level 3

Third Level Map
- Upon entering the area, you will see a Keymaster of Murakai. Do not try to kill it and just ignore it.
- There will be two groups of undead patrolling to your left. Kill the one that patrols along where the Keymaster of Murakai goes.
- Follow the Keymaster of Murakai until you get to a group of undead, which you will then kill. If you cannot see the Keymaster of Murakai, move in the direction it was going until you get to the area with the enchanted. Before entering the enchanted area, take a right down the corridor.
- After killing that group, loop around and kill the Keymaster of Murakai and a group of undead. Pick up the Dungeon Key.
- Move back slightly, take your first right, and move east until you reach a group of undead, which you should kill.
- Continue down that passage.
- You will see a group of enchanted that are patrolling which can avoided or killed.
- As you continue down the corridor, there will be a group of enchanted with about 8 members. Kill them and return to original course.
- After killing the enchanted, there will be a dungeon lock which will be opened.
- If you are carrying arcane echo, you should use it before entering the area. Move towards Murakai's Steward and activate Spell Breaker as soon as the first creature pops up.
- Kill Murakai's Steward and creatures around him that the killing of may be fun and grab the boss key.
- Exit the Murakai's Steward's chamber and take the first two lefts. There will be two groups of undead that should be killed.
- The group will then be facing the flame dart area.
- The 600 monk should maintain Spirit Bond on him/herself and Protective Spirit, Spirit Bond, and Shield of Absorption on the smiter as they make their way across the multitude of flame darts. Enter the stairs form the left/eastern side. At the top of the stairs there will be a boss lock to open.
- While crossing the pit, it is important for both people to move in a zig-zag way to limit the number of hits dealt to them.
- The group will now be in Murakai's chamber.
- Choose a side and kill the undead on that side. They are easy and do not require Spell Breaker.
- While facing Murakai, maintain Spell Breaker as much as possible. Unless there are Servants of Murakai that have been summoned, do not use Shield of Absorption. Maintain Spirit Bond at all times that Shield of Absorption is not up.
- When Murakai is dead, collect the chest reward.
Time
- For the first area, a good time is 7-8 minutes.
- For the second, it is 8-10 minutes.
- For the third, it is 15-17.
- For the entire run, 30-35 is a good time.
- Death will usually cause a 1-2 minute delay.
- People who are new to this build should expect a time of 40-45 minutes, if not longer. Although this decreases quite quickly as it is a relatively simple build.
Counters
- Not having spell breaker up when needed.
- Interruption from Enchanted Daggers or Crypt Ghouls.
- Rarely, enchanted will be able to kill you in ~1 second, before you activate spirit bond.
- These are only minor counters as deaths are not as bad as they are in say the UW, as the party will get ressurected.
Rewards


A screen of a VERY profitable run
- In terms of how much money will be made per run, approximately 5-8k will be made, guaranteed.
- In terms of Deldrimor points, this is a great and profitable way to farm them. In about 35 minutes, about 2000-2500 Deldrimor points can be accumulated.
- Locked Chests are not necessarily a reward, but they do hold rewards. There usually are 5-6 locked chests along the path over the course of the entire run. Come well equipped with lockpicks if you feel it is good.
- Light of Deldrimor chests. There are about 2 per level along the course of the run. On the first level, about 75 gold per chest can be accumulated. On the second level, 225 gold per chest and a ~25% chance of a rare crafting material. On the third level, 225 gold and a ~40% of a rare crafting material. LoDing can add about 1-2k per run, but can add up to 5 extra minutes.
Runs
- Since the creation of this guide, "Temple of the Damned Runs" or "temple runs" have become popular. These are people who will do the dungeon with 6 other members of their party and a hero smiter. This allows for the other members of the party to get drops, LoD chests, and end-dungeon items in exchange for a sum of money.
- These runs are profitable for both the runner and the people getting ran, but much more for the runner due to the fact that he receives small amounts of money for each person he runs.
- Because of these runs, many items specific to The Temple of the Damned have gone down in price because of the mass numbers of them entering the economy (supply goes up and demand stays the same, price goes down).
See Also
- Build:Team - 600/Smite - Original build formatted for UW
- Build:Team - Dual FoW Smite - Above build formatted for FoW
- Build:Team_-_600Rt/Smite_Temple_HM - 600/Smite variant using a Ritualist Primary
- YouTube Video of 600/Smite CoF 600/Smiter CoF