Balistic Pve (talk | contribs) m (→Usage) |
|||
| Line 25: | Line 25: | ||
===Usage=== |
===Usage=== |
||
| − | *Generally use Protective Spirit |
+ | *Generally use Protective Spirit → Deadly Paradox → Shadow Form → engage → spam Spirit Bond. Recast DP → SF and keep your enchantments up. |
| − | *If Oni's pop up, cast Deadly Paradox |
+ | *If Oni's pop up, cast Deadly Paradox → Shadow Form immediately, then the usual. |
*If stuck against one or two menders and/or dreamweavers, consider temporarily removing your Essence Bond to help with Energy. |
*If stuck against one or two menders and/or dreamweavers, consider temporarily removing your Essence Bond to help with Energy. |
||
Revision as of 17:29, 16 June 2010
|
The PvXwiki community finds this to be an excellent build. If you disagree with this rating, please discuss it on the build's talk page. This build has been designed for the following use: |
| This build is part of the current PvE meta. Remove this tag if it is no longer used in the current PvE meta. |
This farm uses four teams, each with one 600HP tank and one smiter to quickly vanquish Drazach Thicket for Kurzick faction, starting from The Eternal Grove. It is also commonly known as DSC. The run will give, on average, 17k kurzick faction and takes around 20-35 minutes. Groups are commonly formed in the European, French District of The Eternal Grove. Experienced groups can complete the run in as little as 13 minutes (11 with cons).
SF/HW Way
Overview
This party consists of:
- 4
 /
/ 600 SF Tanks
 - 4
 SoJ Smiters
600 Build
<pvxbig> [build prof=Mo/A Protection=12+1+3 Shadow=12 Deadly=3][Protective Spirit][Spirit Bond][Shield of Absorption][Deadly Paradox][Shadow Form][Ebon Vanguard Assassin Support]["Finish Him!"][Essence Bond][/build] </pvxbig>
Equipment
- Armor with lowest AL possible(Max:15), only head, legs and feet
- 20% enchantment.
- Do NOT use a shield, this will increase overall armor.
Usage
- Generally use Protective Spirit → Deadly Paradox → Shadow Form → engage → spam Spirit Bond. Recast DP → SF and keep your enchantments up.
- If Oni's pop up, cast Deadly Paradox → Shadow Form immediately, then the usual.
- If stuck against one or two menders and/or dreamweavers, consider temporarily removing your Essence Bond to help with Energy.
Smite Build
<pvxbig> [build prof=Mo/? Protection=11+3 Smiting=12+1+3 Divine=6+3][Blessed Signet][Shield Of Judgment][Holy Wrath][Retribution][Balthazar's Spirit][Vital Blessing][Essence Bond][Rebirth][/build] </pvxbig>
Equipment
- 2x Halves skill recharge of Smiting Prayers.
- 20% longer enchantments for when casting SoJ.
Usage
- Always try and pre-cast Holy Wrath before the 600 goes in.
- Repeatedly cast Holy Wrath on the 600 when it is safe to go in.
- Prioritise SoJ on double pulls and Oni as the 600 may need it to stay alive.
- Wait until the Oni are hitting the 600 first to make sure he has energy.
- Don't use SoJ on packs that primarily consist of menders and dreamweavers.
- Cast Blessed Signet whenever you can.
- If you have Ebon Vanguard Asssassin, use it to help the 600 kill menders and on any mobs that try to chase you.
Variants
- Echo instead of Shield of Judgement.
- "By Ural's Hammer" instead of Blessed Signet.
- Ebon Vanguard Assassin Support instead of Essence Bond.
Alternative VwK/SB Way
Overview
This party consists of:
- 4 / 600 VwK Tanks
- 4 / SB Smiters
600 Build
Alternative Build <pvxbig> [build prof=Mo/Rt Protection=12+3+1 Divine=3+1 Restoration=12][Spirit Bond@16][Protective Spirit@16][Vengeful was Khanhei@12][Vengeful Weapon@12][Ebon Vanguard Assassin Support]["Finish Him!"][Vital Blessing@16][Essence Bond][/build] </pvxbig>
Ritualist Variant
<pvxbig> [build prof=Rt/Mo Protection=12 Spawning=3 Restoration=12+3+1][Spirit Bond@12][Protective Spirit@12][Vengeful was Khanhei@16][Vengeful Weapon@16][Ebon Vanguard Assassin Support]["Finish Him!"][Vital Blessing@12][Essence Bond][/build] </pvxbig>
Equipment
- Armor with lowest AL possible(Max:15), only head, legs and feet
- 20% enchantment.
- Do NOT use a shield, this will increase overall armor.
- Rits use full set of survivor armor (15AL or lower) With runes of vitae and best vigor rune you can afford
Smite Build
<pvxbig> [build prof=Mo/? Smiting=12+1+3 Divine=12+1+3][Blessed Signet][Spell breaker][Holy Wrath][Retribution][Balthazar's Spirit][Blessed Aura][Essence Bond][Rebirth][/build] </pvxbig>
Equipment
- 2x Halves skill recharge of Smiting Prayers.
- 20% longer enchantments for when casting SB.
Variants
- "By Ural's Hammer" instead of Blessed Signet.
- Ebon Vanguard Assassin Support instead of Essence Bond.
Usage
- Always try and pre-cast Holy Wrath before the 600 goes in.
- Repeatedly cast Holy Wrath on the 600 when he has the mobs blocked.
- Cast SB when the 600 asks for it.
- Cast Blessed Signet whenever you can.
Walkthrough
Starting
- Once zoned in (from the Eternal Grove), smiters cast enchantments on the 600's and everybody takes the blessing from the Kurzick Priest.
- Once the path opens up (after a turn north), you will see several plant mobs and a few Mantis in the river. The 600s should split the work of killing these mobs as Bezzr Wingstorm and the pop-ups around him can be too much pressure for one tank. Sometimes, a Skill Hungry Gaki with Disenchantment will spawn with the plant mobs, which goes through Spell Breaker/Shadow Form. To easily overcome this, make sure you run past it and out of aggro range before the spirit is made.
- After these mobs are defeated, continue north until you come to a flat area with a Warden mob that has 3 separate paths to take. The four teams (Left, MidLeft, MidRight, and Right) split up here. The Left group goes directly left here and the MidLeft team takes the upwards route straight ahead and over a bridge. The MidRight and Right teams both head up that little hill to the right, but the Right team keeps following the river and the MidRight team heads north up the next available turn.
- Use "Finish Him!" and Ebon Vanguard Assassin Support to easily kill off any Mantis Menders, or Wardens of the Seasons/Summer. If Maelstrom is cast on you by the Mantis Stormcallers, quickly step out of its small range before casting anything.
- If any Oni are encountered, hope that you either have Shadow Form on you or you can cast it right away, because their Shadow Shroud is lethal to 600s. In the all-too-common chance that they do cast it on you, walk a little bit towards your smite so that they can rez you right away without having to aggro them. Otherwise, they will die very quickly because of their 100% double-strike chance and fast attack speed.
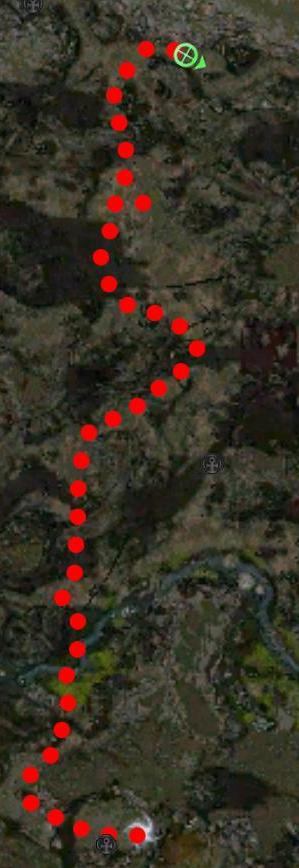
The Routes
- The Left team heads west along the river, killing Mantis until they reach Bezzr Icewing who stands alone in the river. The smiter must stay back as there are many pop-ups around him as you get near and sometimes there are more against the wall behind him that don't appear until after he is defeated. Then, they head northwest up the hill (watch out for Oni pop-ups from this point on) and keep heading north, killing a mix of Mantis and Warden from this point on.
- The MidLeft squad heads upwards immediately, killing any Warden encountered.
- The MidRight group heads up the same hill the East team takes, then heads north as soon as possible.
- Both of these teams will be mostly zig-zagging upwards killing the Warden that populate the middle of the map. As you reach the top of the map, you may encounter the other teams. Simply try to spread out and cover as much ground as possible. While neither of these routes are particularly difficult, a beginner might have trouble going in the right direction. Groups with more than one Warden Ritualist can be a pain, too, although with the PvE skills, they can be killed.
- The Right team heads east along the river (even when it curves) and kills Mantis and a few Kirin until they reach the waterfall. Pull the Plants in front of the Ritualist Bosses and kill them before you aggro the bosses. The bosses are not hard in themselves, but the Skill Eater's spirits can be a pain. To kill him, always keep him targeted and simply back up every time he casts either Dissonance or Disenchantment to not aggro the spirits. After they are dead, head around the little loop and kill any other Kirin/plants behind them before heading up the stone bridge to the north. You will come to a wide area infested with Plants and possibly Gaki. They are not hard in themselves, but be careful not to become overwhelmed. After they are dead, go east around the big building thing towards the entrance to The Brauer Academy then head north. From there, it is mostly north besides one or two Warden mobs up a side branch (see map). This is generally considered the hardest route, because of the Bosses and the large cluster of plants that you have to face.
- Once you have finished your route, go and assist slower teams with their routes.
- If everybody finishes their routes and the map is not vanquished, backtrack to try to find the enemies you missed.
| Left | Mid-Left | Mid-Right | Right |
|---|---|---|---|
  Click to enlarge |
  Click to enlarge |
  Click to enlarge |
  Click to enlarge |
Counters
- Knockdowns from Wardens of the Tree and Forest.
- Oni spawns.
- If the Smite dies
- Missing a mob and having to backtrack.
Notes
- Practice makes perfect.
- When forming groups, though it may not be necessary, try and stick to the listed secondary professions as it helps avoid confusion.
- Beginners should start with the Left route, and learn all routes from an experienced 600 before trying yourself.
- People generally reorder so the smiters are together, and the 600s are together. In this case, the top smiter goes with the top 600, the second smiter with the second 600, etc.
- Using Essence of Celerity can reduce time to 14 minutes and possibly even less, in good teams.
- Instead of selling your drops in town, you should use the Kurzick Merchant next to the Priest in the explorable area.
- To form a group you should do so either in your guild/alliance or the common place is Eternal Grove European French District 1
Video and Texmod overlay of Paths
- 600 smite DTSC FFF (Before Feb 25 2010 update)
- Paths for DTSC (MediaFire link)
- DTSC MR (made in june 10, 2010)