Athrun Feya (talk | contribs) m (→See Also) |
Balistic Pve (talk | contribs) m (→Terra #1) |
||
| Line 36: | Line 36: | ||
*Use [[Mental Block] instead of [[Glyph of Concentration]. This makes killing the Priest of Menzies easier, and works well with the use of a birthday cupcake/rock candies, so that you can outrun the Dragon Lich and not worry about being interrupted. |
*Use [[Mental Block] instead of [[Glyph of Concentration]. This makes killing the Priest of Menzies easier, and works well with the use of a birthday cupcake/rock candies, so that you can outrun the Dragon Lich and not worry about being interrupted. |
||
*Use [[Glyph of Lesser Energy] instead of [[Glyph of Concentration]. Blue rocks or pie is recommended to avoid interrupts. |
*Use [[Glyph of Lesser Energy] instead of [[Glyph of Concentration]. Blue rocks or pie is recommended to avoid interrupts. |
||
| + | </pvxbig> |
||
| − | |||
== Terra #2== |
== Terra #2== |
||
<pvxbig> |
<pvxbig> |
||
Revision as of 07:22, 13 April 2010
|
The PvXwiki community finds this to be an excellent build. If you disagree with this rating, please discuss it on the build's talk page. This build has been designed for the following use: |
| |
This build requires Consumables to operate properly. |
| This build is part of the current PvE meta. Remove this tag if it is no longer used in the current PvE meta. |
This build is to complete Fissure of Woe after nerf in the quickest time possible by using two Shadow Form Assassins to split. The main team uses two Hundred Blades Warriors which have Whirlwind Attack and a MoP nuker to spike groups of foes. It requires a full consumable set to work.
Overview
- 2x
 /
/ Terra
Terra - 1x/ MT
- 2x/ Manly Hundred Blades Warriors
- 1x/ MoP Nuker
- 1x/ EoE Utility Ritualist
- 1x/ Healing Monk
Terras
Terra #1
<pvxbig> [build prof=A/E ear=12 sha=12+1+3][Glyph of Concentration@0][Shadow Form@17][Optional][Shroud of Distress@17][Ebon Battle Standard of Honor][Sliver Armor@13]["I Am Unstoppable!"][Death's Charge@17][/build] </pvxbig>
Equipment
- Weapons: Single handed 20% enchantment weapon, +10AL vs Fire shield
- Armor: Full Radiant insignias, Runes of Attunement and a Superior Vigor rune and Blessed Insignia set for Burning Forest.
Usage
<pvxbig>
- Maintain [[Shadow Form@17] and [[Stoneflesh Aura@13]. This only works when Essence of Celerity is up. Also maintain [[Shroud of Distress@17].
- Use [["I Am Unstoppable!"] for Abyssals, and Shadow Warriors (If your health is below 50%).
- Use [[Death's Charge@17] as a self-heal or a method for getting unstuck.
- Use [[Glyph of Concentration@0] before activating [[Shadow Form@17] when dealing with Skeletal Impalers, and after being Dazed by Deafening Roar. </pvxbig>
Variants
<pvxbig>
- Use [[Armor of Earth@13] instead of [[Stoneflesh Aura@13] for easier energy management, but this requires personal consumables such as Birthday Cupcakes and/or Rock Candies to offset the movement speed penalty.
- Use [[Dwarven Stability] instead of [["I Am Unstoppable!"]. Remember to bring Alcohol.
<pvxbig>
- Use [[Mental Block] instead of [[Glyph of Concentration]. This makes killing the Priest of Menzies easier, and works well with the use of a birthday cupcake/rock candies, so that you can outrun the Dragon Lich and not worry about being interrupted.
- Use [[Glyph of Lesser Energy] instead of [[Glyph of Concentration]. Blue rocks or pie is recommended to avoid interrupts.
</pvxbig>
Terra #2
<pvxbig> [build prof=A/E ear=12 sha=12+1+3][Shroud of Distress@17][Shadow Form@17][Glyph of Concentration][Optional][Sliver Armor@13]["By Ural's Hammer!"]["I Am Unstoppable!"][Death's Charge@17][/build] </pvxbig>
Equipment
- Weapons: single handed 20% enchantment weapon, +10AL vs Slashing Shield.
- Armor: Full Radiant or Blessed insignias, Runes of Attunement and a Superior Vigor rune.
Usage
<pvxbig>
- Maintain [[Shadow Form@17] and [[Stoneflesh Aura@13]. This only works when Essence of Celerity is up. Also maintain [[Shroud of Distress@17].
- Use [["I Am Unstoppable!"] for Abyssals, and Shadow Warriors (If your health is below 50%).
- Use [[Death's Charge@17] as a self-heal or a method for getting unstuck.
- Use [[Glyph of Concentration@0] before activating [[Shadow Form@17] while in the spider cave. </pvxbig>
Main Team
Main Tank
<pvxbig> [build prof=A/E earth=12 sha=12+1+3][Death's Charge@17][Shroud of Distress@17][Shadow Form@17][Optional][Optional][Glyph of Concentration][Ebon Battle Standard of Honor][Sliver Armor@13][/build]
- [["I am Unstoppable!"] or [[Dwarven Stability]
- [[Stoneflesh Aura@13] or [[Armor of Earth@13]
</pvxbig>
Equipment
- Armor: full Radiant or Blessed insignias, Runes of Attunement and a Superior Vigor rune.
- Weapons: Caster shield and 20% enchanting weapon. High Energy staff with 20% enchanting, to swap to if low on energy.
Usage
<pvxbig>
- Maintain Shadow Form and Stoneflesh Aura. This only works when Essence of Celerity is up.
- Use I Am Unstoppable! for Abyssal .
- Use Death's Charge as a self heal.
- Use Ebon Battle Standard of Honor on all spikes, so the warriors do extra damage.
- Call Ebon Battle Standard of Honor after you finish balling mobs to signal the rest of the team that you ready. </pvxbig>
Manly Hundred Blades Warrior
<pvxbig> [build prof=Warrior/Assassin sword=12+1+1 strength=11+1 Tactics=5 shadow=4][Air of Superiority]["For Great Justice!"]["I Am Unstoppable!"][Hundred Blades@14][Death's Charge@5]["To The Limit!"@6][Whirlwind Attack][Optional][/build]
- [[Death's Retreat] to trigger traps, do retreat spikes, and speed up the run.
- [[Sun and Moon Slash] if your EoE doesn't know what Splinter Weapon is.
</pvxbig>
Equipment
- Weapons: Zealous sword for better energy management (Vampiric can also be taken), +20% damage versus Skeletons or Undead can help. +30hp Strength shield.
- Armor: Knights or Survivor Insignia with a Rune of Clarity and Rune of Superior Vigor.
Usage
<pvxbig>
- Maintain [[Air of Superiority]
- On spikes, use [[Air of Superiority] →[[For Great Justice!] →[["I am Unstoppable"@10] → [[Hundred Blades@15] → [[Death's Charge@5] → [[To the Limit@5] → [[Whirlwind Attack] → [[Sun And Moon Slash] </pvxbig>
MoP Necro
<pvxbig> [build prof=Necromancer/Assassin curses=12+1+3 soul=10+1 deadly=8][Assassin's Promise@9][Mark of Pain@17][Foul Feast@12][Optional][Barbs@17]["By Ural's Hammer!"][Ebon Vanguard Assassin Support]["Finish Him!"][/build] </pvxbig>
Variants
<pvxbig>
- [[Defile Defenses@17] for additional damage against Rock Borer Worms.
- [[Insidious Parasite@17] </pvxbig>
Equipment
- Weapon: does not matter, Assassin's Promise makes HRT redundant.
- Armor: Full Survivor Insignia with a Superior Vigor.
Usage
<pvxbig>
- When choosing a target do not choose the nearest target by pressing 'c' or '|'. Select a target in the centre of the group of balled foes, ensuring it is not a monk.
- For most spikes, cast [[Mark of Pain@17], [["By Ural's Hammer!"] then [[Assassin's Promise@9].
- For leftovers or single foes, cast [[Barbs@17], [[Ebon Vanguard Assassin Support], [[Assassin's Promise@9].
- Use [[Foul Feast@12] to remove Blind from the warriors.
- Use Ebon Vanguard Assassin to clear traps away so warriors do not get blinded, crippled or take damage from the traps.</pvxbig>
EoE Utility Ritualist
<pvxbig> [build prof=Rt/R Channeling=12+1+3 beast=12 Spawning=3][Signet of Spirits@17][Splinter Weapon@17][Summon Spirits][Ancestor's Rage@17]["You Move Like a Dwarf!"][Technobabble][Edge of Extinction@13][Flesh of My Flesh@1][/build]</pvxbig>
Variants
<pvxbig>*[[Bloodsong@17] additional spirit damage.
- [[Agony@17] additional spirit damage.
- [[Mend Body and Soul] as additional condition removal: 4 conditions are removed if all the spirits are within earshot. Raise Restoration Magic slightly if you want to improve healing.</pvxbig>
Equipment
- Armor: Full Survivor Insignia with Superior Vigor
- Weapons: 40/40 Channeling wand and offhand, defensive set for forge and forest (caster weapon and a shield)
Usage
<pvxbig>
- Should maintain [[Splinter Weapon@17] on both warriors.
- Use [[Summon Spirits] to ensure [[Edge of Extinction@13] is in range, on spikes.
- Use Ritualist spirits to absorb damage, cause extra damage and kill leftover enemies after spikes in forest/parts of forge. Spirits can also block the door in front of Rastigan. If EoE is recharged, put spirits in front of door, and then cast EoE back a bit.</pvxbig>
Healing Monk
<pvxbig> [build prof=Monk/Any heal=11+1+1 divine=11+1 prot=8+1][Dwayna's Kiss@15][Patient Spirit@15][Cure Hex@15][Seed of Life][Heal Party@15][Unyielding Aura@14][Balthazar's Spirit][Life Bond][/build]
- [[Great Dwarf Weapon] to assist in killing leftovers and clearing skeletal groups during Gift of Griffons in the absence of the rit.</pvxbig>
Usage
<pvxbig>
- Remove [[Spiteful Spirit] and other hexes with [[Cure Hex@15]
- Maintain Life Bond on the Main Tank.
- Maintain Balthazar's Spirit on yourself for energy.
- Optional: Maintain Balthazar's Spirit also on the Main Tank for his energy. He will be grateful.</pvxbig>
Equipment
- Armor: Survivor or Radiant Insignias a Rune of Superior Vigor and Runes of Vitae.
- Weapons: +20% enchantments weapon
Usage
Terra #1

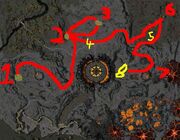
Terra One Route
- Start
- Run here and kill the Shadow Priest, 3 Rangers and Beast. The ghosts will pop, take both quests. Skeletons can no longer kill the ghosts if they are aggroed.
- Run to 3, getting as much aggro as possible. Pull the Skeleton casters so they are just below the Priest of Menzies, but make sure the Priest of Menzies doesn't start running round. Death's Charge up to the Priest. The Warriors will start running round, but the casters will keep wanding, so Sliver Armor can kill Menzies before any Warriors steal Sliver's target. Once the Priest is dead, recast Shadow Form and pick up the book. Run round (do not use Death's Charge or the book will be left up the top) and take the book back to the ghosts. Do not forget to drop the book before recasting Shadow Form or it will run out early due to lack of +20% enchantment. Dragon Liches can interrupt through Shadow Form with Deafening Roar. If you have aggroed one, stop a few seconds before casting Shadow Form as to waste Deafening Roar.
- Once the book is back, run to the Shard Wolf in the middle of the battlefield and kill it.
- Run to burning forest (check the quest log to see if Terra 2 took the quest from Miko the Unchained before going in. If they have not taken it, take it yourself, shout at them a bit and go into forest). Mahgo Hydras will try to follow you, and use inferno which hit for 190 damage without the right equipment. Run to (5) and recast Shadow Form. Glyph of Lesser Energy and Death's Charge towards the Shard Wolf and kill it. If you are not moving, keep Feigned Neutrality up to reduce the hydra's damage and heal–you should only be standing still while Sliver Armor is up. One Sliver should kill the wolf and most hydras. Run on to (6)
- There are 4 Shadow Overlords you need to kill, they don't pull far so you need to stand around the middle of them all after aggroing. There are lots of Hydras, so keep moving until you've just recast SF, then charge something that is alone and use sliver. If done right, all Shadow overlords should die in one go, if not find the last few and kill them off. By then most hydras should be dead so it will be easy. Run on to (7)
- Tower of Strength - there should be lots of Shadow Patrols, Abyssals, Mesmers, and Rangers. Kill all the shadow patrols and rangers, leaving any mesmers alive. It is easy to split the rangers from mesmers as they have different weapon ranges. When they are all dead, ask where Terra two is. If they are still doing Khobey, then run to forge and get the mage (just run into minimap range and he will start running) (this shouldn't be the case). Terra two should have finished long ago, and should be waiting near forge to trigger mage. Either way, you have time to kill the shard wolf at(8) before he turns up (Pull the wolf towards the tower so the monks do not heal him). Once the mage opens the tower, kill the nightmare and wait for main team.
- Kill the wolf if he isn't already dead.
Terra #2


Terra Two Route
- Start
- Grab quest from Miko the Unchained on your way past
- Take quest from
 Nimros the Hunter
 - Kill this
 Shard Wolf. Lots of monks heal him so you might want to try pulling him into cave.
 - Kill the Beach Wolf, try not to aggro the warrior guys
- Wait at beach for the main team to take the quest Restore the Temple of War. Work though the cave killing the
 Seeds of Corruption.
 - ●●● - This is path where the Seeds of Corruption are. If you had trouble with the first wolf then ask where T1 currently is. If he is almost finished at Tower of Strength, wait outside forge so you can trigger the Tower Mage straight away.
- ●●● - Follow the yellow line to
 Lord Khobay. To kill, pull the drakes by the Giant Wurm with you, so you can get more aggro. Be careful not to let the drakes bodyblock the exit, then walk pass the Giant Wurm by Khobay. Death Charge to Khobay and sliver him to death. Now trigger mage if you have not already done so.
Main Team
How to spike: Perma balls groups tightly and pings EBSoH. The necro selects a non-monk target within the ball, and pings that they're casting MoP on this target and warriors Death's Charge towards it, using Hundred Blades and Whirlwind Attack as soon as possible.
- Clear the way to the Tower of Courage and complete Rastigan's quest. Only take Rastigan's quest once you are at the Tower of Courage and have cleared the surrounding area. Most likely, one 100b, the Rit and the UA will stay back to complete the quest while the rest continues ahead.
- Clear the way to the Temple of War and clear it so the Eternal Forgemaster appears. Terra 1 takes the quests so you can go directly to the Temple of War.
- Take the first quest once the Perma is waiting on the south side of the forge. Pull them towards the middle and kill. Once they are dead, the sin and two warriors should stand on the corpses to kill so the new Beast's that spawn don't jump around. Do the same for the North side.
- Before leaving the Temple of War, make sure all three quests are taken - Khobay the Betrayer, Restore the Temple of War and Tower of Strength from Eternal Lord Taeres. Usually the Rit will stay back to take the quests while the rest of the team continues ahead.
- Head to the Wailing Forest, clear all foes to the wailing lord. Do not kill the Wailing Lord.
- The perma should pull and kill the nearby Shard Wolf, using Sliver Armor.
- The Ritualist is the quest taker. Wait until everyone else is off the map (their names are grayed out) and the Main Tank says ready, then take the quest from the Wailing Lord. Wait until you are called by the main team. After being asked to bring the Griffons by the main team you should ping enemies; this will ensure the Griffons follow you instead of any other moving player.
- The main team should clear the way back to the Tower of Courage. Once you are almost there, tell the Ritualist they can come with Griffins.
- Pull and kill the last Shard Wolf. Wait in the Tower until the griffins get there, then head to forge for your reward.
See Also
11 minute run (pre-SF nerf)
15 minute run pre-SF nerf)
Necro Damage
Full Video Guide