Balistic Pve (talk | contribs) No edit summary |
Balistic Pve (talk | contribs) (pug = pick-up-group, so PUG groups = pick up group group.) |
||
| Line 94: | Line 94: | ||
== Healing Monk == |
== Healing Monk == |
||
| − | A number of builds can be used for this, a few suggestions are shown below. Note that [[gw:Unyielding Aura|UA]] is more preferable for |
+ | A number of builds can be used for this, a few suggestions are shown below. Note that [[gw:Unyielding Aura|UA]] is more preferable for PUGs. |
===Blessed Light Healing=== |
===Blessed Light Healing=== |
||
Revision as of 23:43, 25 November 2009
|
The PvXwiki community finds this to be an excellent build. If you disagree with this rating, please discuss it on the build's talk page. This build has been designed for the following use: |
| This build is part of the current PvE meta. Remove this tag if it is no longer used in the current PvE meta. |
| |
This build requires Consumables to operate properly. |
This build is to complete FoW in the quickest time possible by using 2 Shadow Form Assassins to split. The mainteam uses two Hundred Blades warriors and a MoP nuker to spike groups of foes. It requires a full conset to work.
Overview
- 2x
 /
/ Terra
Terra - 1x/ Main Tank Perma
- 2x/ Manly Hundred Blades Warriors
- 1x/ MoP Nuker
- 1x/ EoE Utility Rit
- 1x/ Healing Monk
Terra #1
<pvxbig> [build prof=A/E ear=12 dead=3 sha=12+1+3][Deadly Paradox][Shadow Form][Glyph of Lesser Energy][Ebon Battle Standard of Honor][Sliver Armor]["By Ural's Hammer!"][Feigned Neutrality][Death's Charge][/build] </pvxbig>
Equipment
- +10AL vs Fire shield
- 20% enchantment weapon
Terra #2
<pvxbig> [build prof=A/E ear=12 dead=3 sha=12+1+3][Deadly Paradox][Shadow Form][Glyph of Lesser Energy][Ebon Battle Standard of Honor][Sliver Armor]["Finish Him!"]["By Ural's Hammer!"][Death's Charge][/build] </pvxbig>
Equipment
- +10AL vs Slashing shield
- 20% enchantment weapon
Variants
- Use Feigned Neutrality over "Finish Him!" for extra self defense and the ability to cover for Terra #1 if needed in the Burning Forest.
Video
Main Team
Main Tank
<pvxbig> [build prof=A/Me ins=12 dead=3 sha=12+1+3][Deadly Paradox][Shadow Form]["I Am Unstoppable!"][Feigned Neutrality][Ebon Battle Standard of Honor][Channeling][Death's Charge][Ebon Escape][/build] </pvxbig>
Equipment
- Full Radiants or Blessed insignias
- Full Attunement Runes, other than Superior Shadow on shadow headpiece.
- Caster Shield and 20% enchanting weapon
- High Energy staff with 20% enchanting, to swap to if low on energy.
Manly Hundred Blades Warrior
<pvxbig> [build prof=Warrior/Assassin sword=12+1+1 strength=11+1 Tactics=5 shadow=4][Death's Charge]["For Great Justice!"][Hundred Blades]["To The Limit!"][Whirlwind Attack]["I Am Unstoppable!"][Air of Superiority][Death's Retreat][/build] </pvxbig>
- Death's Retreat is for after the Wolf in forest, warriors can quickly get back down to the rest of the mainteam
- Zealous sword for better energy management
MoP Necro
<pvxbig> [build prof=Necromancer/Assassin curses=12+3+1 soul=10+1 deadly=8][Assassin's Promise][Mark of Pain][Foul Feast][Defile Defenses][Barbs]["By Ural's Hammer!"][Ebon Vanguard Assassin Support]["Finish Him!"][/build] <pvxbig>
- For most spikes, cast MoP, "By Ural's Hammer!" then Assassin's Promise.
- For leftovers or single foes, cast Barbs, Ebon Vanguard Assassin and Assassin's Promise.
- Use Foul Feast to remove Blind on the warriors.
- Use Defile Defenses on Rock Borer Worms.
- Use Ebon Vanguard Assassin to clear traps away so warrior do not get blinded, crippled or take damage from the traps.
Variants
- Insidious Parasite over Defile Defenses (In FoW, only Rock Borer Worms from the Forest of the Wailing Lord can block).
EoE Spirit Spammer Rit
Kurzick Template: <pvxbig> [build prof=Rt/R Channeling=12+3+1 beast=12 Spawning=3+1][Splinter Weapon][Signet of Spirits][Bloodsong][Technobabble]["You Move Like a Dwarf!"][Edge of Extinction][Summon Spirits (Kurzick)][Flesh of My Flesh][/build] </pvxbig> Luxon template:
|
|---|
- Should maintain Splinter on both warriors.
- Use Summon Spirits to carry EoE and around for extra damage in spikes.
- Use Ritualist spirits to absorb damage, cause extra damage, and kill leftover enemies after spikes in forest/parts of forge, and to block the door in front of Rastigan. If EoE is recharged, put spirits in front of door, and then cast EoE back a bit. Recast spirits as needed.
- Can bring GDW instead of You Move Like a Dwarf!" or Technobabble
Variants
- Mend Body and Soul as additionnal condition removal, since the Necromancer can't spam Foul Feast on both warriors.
Healing Monk
A number of builds can be used for this, a few suggestions are shown below. Note that UA is more preferable for PUGs.
Blessed Light Healing
|
|---|
UA Healer
|
|---|
Usage
Terra #1
- Keep up Shadow form with deadly paradox or glyph of swiftness (see first paragraph on the page)
- Use glyph of lesser energy before activating the Battle Standard -> Sliver armor chain, and only use "Finish Him!" in a situation where you wouldn't be able to kill otherwise. Try to aggro as many monsters as possible, as the using of "Finish Him!" puts a drain on your energy and you may find yourself in a situation where you run out of energy.
- Use feigned neutrality right before--rarely--your shadow form drops due to a lack of 25 or 15 energy.
- Use death's charge as a heal or a method of getting out of a bodyblock.

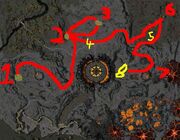
Terra One Route
- 1) Start
- 2) Run here and kill the Shadow Priest, 3 Rangers and Beast. The ghosts will pop, take both quests. Don't worry about the Skeletons aggroing the ghosts, - they no longer kill them.
- 3) Run to 3, getting as much aggro as possible. Pull the Skeleton casters so they are just below the priest of menzies, but make sure the priest of menzies doesn't start running round. Deaths Charge up to menzies. The warriors will start running round but the casters will keep wanding, so sliver armor can kill menzies before any warriors steal Sliver's target. Once menzies is dead, recast SF and pick up the book. Run round (don't death's charge down or the book will be left up the top) and take the book back to the ghosts. Don't forget to drop the book before recasting shadow form, or it will run out early (enchanting weapon not out). Dragon lich's can interrupt through shadow form with deafening roar, so if you have aggroed one, stop a few seconds before you need to cast so it can waste it before you try to cast.
- 4) Once the book is back, run to the Shard wolf in the middle of the battlefield and kill it.
- 5) Run to burning forest (check the quest log to see if Terra 2 took the quest off Miko The Unchained before going in. If they didn't take it, take it yourself, shout at them a bit and go into forest). Mahgo Hydra's will try to follow you, and use inferno which hits for 190 without the right equipment. Run to (5) and recast SF, GoLE and Charge the Shard wolf, and kill. If you aren't moving, then keep feigned neutrality up, to reduce the hydra's damage and heal - you should only be standing still while Sliver Armor is up. One Sliver should kill the wolf and most hydras. Run on to (6)
- 6) There are 4 Shadow Overlords you need to kill, they don't pull far so you need to stand around the middle of them all after aggroing. There are lots of Hydras, so keep moving until you've just recast SF, then charge something that is alone and use sliver. If done right, all Shadow overlords should die in one go, if not find the last few and kill them off. By then most hydras should be dead so it will be easy. Run on to (7)
- 7) Tower of Strength - there should be lots of Shadow Patrols, Abyssals, mesmers and Rangers. Kill all the shadow patrols and rangers, leaving any mesmers alive. It is easy to split the rangers from mesmers as they have different weapon ranges. When they are all dead, ask where Terra two is. If they are still doing Khobey, then run to forge and get the mage (just run into minimap range and he will start running) (this shouldn't be the case). Terra two should have finished long ago, and should be waiting near forge to trigger mage. Either way, you have time to kill the shard wolf at(8) before he turns up (Pull the wolf towards the tower so the monks do not heal him). Once the mage opens the tower, kill the nightmare and wait for main team.
- 8) Kill the wolf if he isn't already dead.
Terra #2
Usage
- Keep up Shadow form with deadly paradox or glyph of swiftness (see first paragraph on the page)
- Use glyph of lesser energy before activating the Battle Standard -> Sliver armor chain, and only use "Finish Him!" in a situation where you wouldn't be able to kill otherwise. Try to aggro as many monsters as possible, as the using of "Finish Him!" puts a drain on your energy and you may find yourself in a situation where you run out of energy.
- Use feigned neutrality right before--rarely--your shadow form drops due to a lack of 25 or 15 energy.
- Use death's charge as a heal or a method of getting out of a bodyblock.

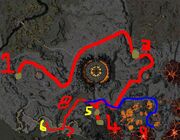
Terra Two Route
- 1) Start
- 3)Grab quest from Miko The Unchained on your way past
- 4)Take quest from Nimros The Hunter
- 5) Kill this Shard wolf. Lots of monks heal him so you might want to try pulling him into cave. (Also annoying as there is such a steep slope he loses aggro if you go too fast)
- 6) Kill the beach Wolf, try not to aggro the warrior guys
- 7) Wait at beach for the main team to take the quest Restore The Temple Of War. Work though the cave killing the Seeds of Corruption
- 8) Where the Seeds of Corruption are :p If you're slow, (because of trouble with the first wolf) then ask where the other terra is. If he is almost finished at tower of strength, wait outside forge so you can trigger mage straight away, then go on to (8)
- 9)Follow Blue line to Khobay The Betrayer. If your struggling to kill, pull him out of his cave and to the left so you can get more aggro. Once you reach the bottom of the "bridge", Khobay will run out ahead of all the others. Once this is done, if you haven't already, wait outside forge to trigger mage. (If your fast then you will)
Youtube Tutorial [1]
Main Team
How to spike: Perma balls groups tightly and pings EBoH. The necro selects a non-monk target within the ball, and pings that they're casting MoP on this target and warriors Death's Charge towards it, using 100b and Whirlwind Attack as soon as possible.
- Clear the way to the Tower of Courage and complete Rastigan's quest.
- Clear the way to the Temple of War and clear it so the Forgemaster appears. Terra 1 takes the quests so you can go directly to the Temple of War.
- Take the first quest once the Perma is waiting on the south side of the forge. Pull them towards the middle and kill. Once they are dead, the sin and two warriors should stand on the corpses to kill so the new Beast's that spawn don't jump around. Do the same for the North side.
- Before leaving the Temple of War, make sure all three quests are taken - Khobay the Betrayer, Restore the Temple of War and Tower of Strength from Eternal Lord Taeres.
- Head to the Wailing Forest, clear all foes to the wailing lord. Do not kill the Wailing Lord.
- Pull and kill the nearby wolf. The perma and warrior will need to Death Retreat back to the rest of the team.
- The Ritualist is the quest taker. Wait until everyone else is off the map and ready, then take the quest from the Wailing Lord. Wait until you are called by the main team.
- If you were far enough away, the griffins will not have followed you. Clear the way back to the Tower of Courage. Once you are almost there, tell the Ritualist they can come with Griffins.
- Pull and kill the last Wolf. Wait in the Tower until the griffins get there, then head to forge for your reward.
See Also
EoE should ping (target) an enemy when they start to run the griffons, and nobody else should ping any other target until the griffons are with Rastigan. Doing this will ensure that the griffons don't follow any other moving player on the map, allowing the EoE to be sure they will follow their path.
15 minute run
Necro Damage