(→Usage) |
|||
| (32 intermediate revisions by 6 users not shown) | |||
| Line 1: | Line 1: | ||
| + | {{Untested-Testing|PvE team|SC}} |
||
| ⚫ | |||
| + | {{Requires-Cons}} |
||
| + | {{TOCright}} |
||
| + | |||
| + | The Fissure of Woe is an Elite Mission Area that consists of multiple quests that must be completed before you are rewarded the '''Chest of Woe''' and you are also rewarded a statue for your ''''''Hall of Monuments'''''' named '''Conqueror of the Fissure of Woe''' (The Most Valuable Item out of the Chest of Woe is the '''Obsidian Edge''' and can only be aquired from this chest. With this build, the team should split up into 4 teams. T1, T2, T3, and Main Team. |
||
| ⚫ | |||
| + | |||
| ⚫ | |||
| + | *2x {{a}}/{{e}}Terra 1/2{{Mini skill bar|Shadow Form|Shroud of Distress|Optional|Armor of Earth|Optional|Ebon Battle Standard of Honor|Sliver Armor|Death's Charge}} |
||
| + | *1x {{a}}/{{e}}Terra 3{{Mini skill bar|Shadow Form|Shroud of Distress|Glyph of Concentration|"Finish Him!"|"I Am Unstoppable!"|Death's Charge|Ebon Battle Standard of Honor|Sliver Armor}} |
||
| ⚫ | |||
| + | *1x {{a}}/{{p}}Main Tank{{Mini skill bar|Shadow Form|Shroud of Distress|"Fall Back!"|"We Shall Return!"|"I Am Unstoppable!"|Mental Block|Unseen Fury|Death's Charge}} |
||
| + | *1x {{Rt}}/{{R}}EoE{{Mini skill bar|Signet of Spirits|Vampirism|Bloodsong|Painful Bond|Rupture Soul|Edge of Extinction|Summon Spirits (Luxon)|Flesh of My Flesh}} |
||
| + | *1x {{Me}}/{{E}}Snare Caller{{Mini skill bar|Stolen Speed|Deep Freeze|Glyph of Lesser Energy|Mistrust|Cry of Pain|Signet of Disenchantment|Wastrel's Demise|Wastrel's Worry}} |
||
| + | *2x {{E}}/{{N}}Group Nukers{{Mini skill bar|Intensity|Glyph of Lesser Energy|Rodgort's Invocation|Searing Flames|Meteor|Necrosis|Elemental Lord (Kurzick)|Fire Attunement}} |
||
== Terra 1 (T1) == |
== Terra 1 (T1) == |
||
<pvxbig> |
<pvxbig> |
||
| − | [build prof= |
+ | [build prof=A/E sha=12+1+3 ear=12][Shadow Form][Shroud of Distress][Mental Block][Armor of Earth]["I Am Unstoppable!"][Ebon Battle Standard of Honor][Sliver Armor][Death's Charge][/build] |
</pvxbig> |
</pvxbig> |
||
| ⚫ | |||
| − | * Suggest a few optional skill(s) if you included an Optional slot in the skill bar. |
||
| − | "Finish Him!" instead of Armor of Earth (If Expierenced) |
||
| ⚫ | |||
| ⚫ | |||
| − | |||
| ⚫ | |||
* All Blessed Insignias and Runes of Attunement (Superior Shadow Arts on Head) |
* All Blessed Insignias and Runes of Attunement (Superior Shadow Arts on Head) |
||
* Weapon with +5e and Enchantments Last 20% longer. Shields- (Armor +10 vs. Fire + Piercing Damage) |
* Weapon with +5e and Enchantments Last 20% longer. Shields- (Armor +10 vs. Fire + Piercing Damage) |
||
| Line 16: | Line 27: | ||
You will need a Zealous Spear while slivering Skeletal Beserkers |
You will need a Zealous Spear while slivering Skeletal Beserkers |
||
And also a Zealous Scythe for Energy Maintanence for ToS |
And also a Zealous Scythe for Energy Maintanence for ToS |
||
| + | == '''USAGE''' == |
||
| − | |||
| ⚫ | |||
Maintain Shadow Form and Shroud of Distress. Keep up Armor of Earth on battle field. Use EBSOH and Sliver Armor to kill what you need to. |
Maintain Shadow Form and Shroud of Distress. Keep up Armor of Earth on battle field. Use EBSOH and Sliver Armor to kill what you need to. |
||
| Line 28: | Line 38: | ||
4.Pop tent, get quests, keep aggro and go to menzies. Pull down Shadow Monk sliver him down. Then pull Menzies down, and Sliver him. |
4.Pop tent, get quests, keep aggro and go to menzies. Pull down Shadow Monk sliver him down. Then pull Menzies down, and Sliver him. |
||
| − | 5.Run To Burning Forest, and in the back of forest Sliver down Shadow Overlords. '''EQUIP FIRE SHIELD''' |
+ | 5.Run To Burning Forest, Going towards the back of forest, sliver down all the hydra you may have aggroed. To do so... Pull the hydra out of range of the Smoke Walkers, and the Hydra will die pretty quick. '''(MAKE SURE YOU HAVE FIRE SHIELD EQUIPPED!! ESPECIALLY FOR THIS!!)'''. and in the back of forest Sliver down Shadow Overlords. '''EQUIP FIRE SHIELD''' |
| − | 6.Go to ToS, wait for the Tower of Strength quest. Aggro all Shadow Patrol groups. '''(DON'T FORGET TO USE IAU BEFORE CASTING SHADOW FORM!!!)''' Sliver them down. After Shadow Patrols, Sliver down Shadow Rangers, keep Shadow Mesmers alive. Use them to Sliver down Shard Wolf, and Shadow Lord in ToS. |
+ | 6.Go to ToS, wait for the Tower of Strength quest. Aggro all Shadow Patrol groups (If you are unexperienced try only 2 groups at a time). '''(DON'T FORGET TO USE IAU BEFORE CASTING SHADOW FORM!!!)''' Sliver them down. After Shadow Patrols, Sliver down Shadow Rangers, keep Shadow Mesmers alive. Use them to Sliver down Shard Wolf, and Shadow Lord in ToS. |
7. Return to Forge to open Chest of Woe (Good Luck on Chest!!) |
7. Return to Forge to open Chest of Woe (Good Luck on Chest!!) |
||
| + | http://images1.wikia.nocookie.net/__cb20100913181914/pvx/images/5/58/FoWSC_T1.jpg |
||
| ⚫ | |||
| ⚫ | |||
| ⚫ | |||
| ⚫ | |||
| − | == |
+ | == '''Counters''' == |
| ⚫ | |||
| ⚫ | |||
| + | |||
| ⚫ | |||
| + | |||
| ⚫ | |||
| + | |||
| ⚫ | |||
| ⚫ | |||
http://www.youtube.com/user/ginnidorka#p/u/48/GmtxjRGWTQU |
http://www.youtube.com/user/ginnidorka#p/u/48/GmtxjRGWTQU |
||
| + | |||
== Terra 2 (T2) == |
== Terra 2 (T2) == |
||
<pvxbig> |
<pvxbig> |
||
| − | [build prof=Assassin/Elementalist |
+ | [build prof=Assassin/Elementalist sha=12+1+3 ear=12 crit=3][Shadow Form][Shroud of Distress][Armor of Earth][Glyph of Concentration]["I Am Unstoppable!"][Death's Charge][Ebon Battle Standard of Honor][Sliver Armor][/build] |
</pvxbig> |
</pvxbig> |
||
| − | * "Finish Him!" instead of Glyph of Concentration |
+ | * {{skill icon|"Finish Him!"}} instead of {{skill icon|Glyph of Concentration}} '''(Only If Exp)''' |
| + | * {{skill icon|Dwarven Stability}} instead of {{skill icon|"I Am Unstoppable!"}} |
||
| − | == Equipment == |
+ | == '''Equipment''' == |
| + | * All Blessed Insignias and Runes of Attunement (Superior Shadow Arts on Head) |
||
| ⚫ | |||
| + | * Weapon with +5e and Enchantments Last 20% longer. Shield = (Armor +10 vs.Piercing Damage) |
||
| ⚫ | |||
| − | == Usage == |
+ | == '''Usage''' == |
| − | Describe how to use the build. |
||
| + | *Keep Up Shadow Form and Shroud of Distress run through ToC. |
||
| ⚫ | |||
| + | *Stay to right wall of Battlefield and aggro the two group near entrance to forge. Take them to the Undead coming from down the road. |
||
| ⚫ | |||
| + | *Keep going down the road into the Burning Forest. Talk to '''''Miko The Unchained''''' to obtain the quest '''Slaves of Menzies'''. |
||
| ⚫ | |||
| + | *Keep running along the same path, once you exit the Burning Forest area, take a left. There should be a lava pit, run through it. |
||
| + | *Keep following the road past ToS, once you reach the end of path (near back of forge), take a left (avoid as much aggro as possible). In the back should be '''''Nimros The Hunter''''' talk to him to obtain the quest '''The Hunt'''. |
||
| + | *When you take the quest, you should run down the hill... Into the cave '''(HEAVY INTERRUPTS HERE)''' run through cave, onto beach. KILL THE SHARD WOLF and come back through keeping the aggro of Doubter's Dryders to kill Wolf outside of cave ( THIS WOLF IS QUITE DIFFICULT, IT IS OKAY IF YOU CANNOT KILL HIM, JUST INFORM MAIN TEAM!!!). |
||
| + | *Wait for Main Team to pop forge and take your 2 quests. '''Khobay The Betrayer''' and '''Restore the Temple of War'''. |
||
| + | *Run back to where you came. Before you get to ToS. There should be a cut off to the left. Keep Aggro of Obsidian Flame Drakes. You need them to Sliver down Khobay. KHOBAY CAN BE DIFFICULT FOR STARTERS. |
||
| + | *Now run back into the Cave and Sliver down all '''Seeds of Corruption!!!''' |
||
| + | *You have now finished you job return to Forge for you chest. GL! |
||
| + | http://images2.wikia.nocookie.net/__cb20100220221533/pvx/images/d/d5/FoWSC_T2.jpg |
||
| − | == Variants == |
||
| − | List the major variants. |
||
| − | == |
+ | == '''Counters''' == |
| − | Add any additional notes pertaining to your build. Omit this section if it is not needed. |
||
| ⚫ | |||
| ⚫ | |||
| + | |||
| − | Link to any articles that are related to your build. Omit this section if it is not needed.Describe the build. |
||
| ⚫ | |||
| + | |||
| + | http://www.youtube.com/watch?v=v8Mzmzyc9BI |
||
== Terra 3 (T3) == |
== Terra 3 (T3) == |
||
<pvxbig> |
<pvxbig> |
||
| − | [build prof=Assassin/Elementalist |
+ | [build prof=Assassin/Elementalist sha=12+1+3 ear=12 crit=3][Shadow Form][Shroud of Distress][Glyph of Concentration]["Finish Him!"]["I Am Unstoppable!"][Death's Charge][Ebon Battle Standard of Honor][Sliver Armor][/build] |
</pvxbig> |
</pvxbig> |
||
| + | == '''Equipment''' == |
||
| − | * Suggest a few optional skill(s) if you included an Optional slot in the skill bar. |
||
| + | * Full Blessed Insignias and Rune of Attunement. |
||
| + | * 20% enchant weapon with shield with (+10 vs Slashing) |
||
| − | == |
+ | == '''Usage''' == |
| + | Your job as T3 is to clear everything in Whailing Forest for Griffon Quest that needs to be killed. |
||
| − | * Armor |
||
| − | * Weapons |
||
| + | *First you are going to run past ToC. And head to battlefield. You are going to follow the road, and take a left on the fork. |
||
| + | *You will begin with gathering the Spirit Sheperds for aggro. First sliver down the Cave Spiders that will pop. Then the Worms in beginning of Forest. And lastly Spirit Woods. |
||
| + | *Easy thing to do is, run down the road in the middle. When you reach the spirit woods on the hill by bridge, death's charge up to them. Go to the back and sliver down your Shard wolf. |
||
| + | *After that take your aggro up to front of hill and aggro 1st 2 groups of Beserkers. Sliver them down. THIS NEXT PART IS IMPORTANT. You are going to Death's Charge down to Skeletal Impaler in front of bridge. '''MAKE SURE TO USE IAU BEFORE YOU DEATH'S CHARGE!!!'''. |
||
| + | *Walk onto bridge. Stay on the 1st half of the bridge. Pull all banshees with a bow and sliver them down. Now, Run in talk to Whailing Lord, and take his quest. After that run back to front of Forest aggro 1st group of Skeletals and sliver them down. |
||
| + | *Now, Ball up ALL Spirits Sheperds near spawn of Griffons, and front of forest. Wait till Main Team comes and spikes them. |
||
| + | *Now all you have left to do, is escort the griffons to ToC. You are finished! |
||
| ⚫ | |||
| + | '''Interrupts in Whailing Forest by Worms, Spiders, and Impalers.''' |
||
| + | |||
| + | '''Make Sure to use rock candy of some sort.''' |
||
| + | |||
| ⚫ | |||
| + | <pvxbig> |
||
| + | [build prof=A/P sha=12+1+3 command=12][Shadow Form][Shroud of Distress]["Fall Back!"]["We Shall Return!"][Mental Block]["I Am Unstoppable!"][Unseen Fury][Death's Charge][/build] |
||
| + | </pvxbig> |
||
| + | |||
| + | == Equipment == |
||
| ⚫ | |||
| ⚫ | |||
== Usage == |
== Usage == |
||
| + | *Your job as MT is to set up balls for the Main Team to spike. |
||
| − | Describe how to use the build. |
||
| + | *First when you enter the Fissure of Woe, you will ball 3 groups to the right of Rastigan. You will pull them on the 1st hill (on right closest to Rastigan). Make sure you get the Elementals, They will break sometimes. (To avoid this, let them patrol up the hill) '''DO NOT USE MENTAL BLOCK HERE, YOU CAN BUT NOT RECOMMENDED. WILL CAUSE ADDITIONAL KD (KNOCK DOWNS).''' |
||
| + | *Next Is the hardest part you will do. Balling all the Shadow Rangers and Abyssals surrounding the Tower of Courage. This is easily done if you chain your skills, Unseen Fury for blinding when health gets low (Generally you only need Unseen Fury when all the abbyssals and rangers are attacking you). Shouldn't have much of a problem. |
||
| + | *Next the EoE will solo the ToC '''(I would stay behind to make sure if he is not experienced.)''' |
||
| + | *If the EoE is experienced, while she/he is soloing the ToC, you should run down further down the hill, and ball the Shadow Army group for spike, (1 monk, 3 melee, real easy ball). Then the Spikers will do their thing. |
||
| + | *After this group is done, Run down to battlefield there should be a group of skeletals. You have two choices. I usually ball them on the big rock before the hill decends. Other way, you can bring these skeletals down further into the two groups ahead (1 patrol, 1 stationary) and ball. (This way only works if the main team does not move and you move slowly with your character while bringing the groups down.) The spikers will spike it. |
||
| + | *This is only a semi spike you'll usually do. Following the road will lead you to a fork (1 leading to Wailing Forest, and the other running towards the Forge and Burning Forest). There will be a group of skeletals patrolling the fork. Pull that group (or wait for them to patrol back towards you, allowing for less of a chance of them breaking) and a group to the left and ball them for a spike. |
||
| + | *Okay, now follow the road that leads to the forge, if the T2 didn't make groups fight properly, ball the group of mesmers so they can be spiked to open the forge. Now inside the forge, you will be going counter-clockwise around the forge. '''(ONLY PULL ONE OR TWO GROUPS OF ABYSSALS ONTO ONE GROUP OF MESMERS/MONKS AND HAVE THEM SPIKED. SAME FOR ALL GROUPS) |
||
| + | *After forge is done, the MT should be standing to the back entrance of the forge (Closest to the cave), pop the quest '''Defending The Temple of War''' and ball the group of abyssals/shadow beasts. After these are spiked, and more shadow beasts pop-up, do not aggro '''the EoE will solo them!''. |
||
| + | *Okay after this, you will split from you're spikers'''(THEY WILL COME BACK TO YOU AFTER THEY SPIKE THE T3's GROUP OF SPIRIT SHEPERDS!!)''' and go back up the hill and ball the shadow army. After you ball all shadow army and spikers spiking them all the way up to ToC, you will instruct the T3 to begin bringing griffs to ToC. Head back to the forge. You are now Finished. |
||
== Counters == |
== Counters == |
||
| + | *KNOCK DOWNS ON SHADOW FORM and/or SHROUD OF DISTRESS |
||
| − | Describe important counters. |
||
| + | USE PCONS !! |
||
| − | == Variants == |
||
| − | List the major variants. |
||
| + | http://www.youtube.com/watch?v=vlBYi6mY6HU |
||
| − | == Notes == |
||
| − | Add any additional notes pertaining to your build. Omit this section if it is not needed. |
||
| − | == |
+ | == Snare Caller == |
| − | Link to any articles that are related to your build. Omit this section if it is not needed.<nowiki><nowiki>Insert non-formatted text here</nowiki><nowiki><nowiki>Insert non-formatted text here</nowiki></nowiki></nowiki>Describe the build. |
||
| − | |||
| − | == Attributes and Skills == |
||
<pvxbig> |
<pvxbig> |
||
| − | [build prof= |
+ | [build prof=Me/E FastCast=12+1+3 Domination=12 wat=3][Glyph of Lesser Energy][Deep Freeze][Stolen Speed][Cry of Pain][Mistrust][Signet of Disenchantment][Wastrel's Demise][Wastrel's Worry][/build] |
</pvxbig> |
</pvxbig> |
||
| − | |||
| − | * Suggest a few optional skill(s) if you included an Optional slot in the skill bar. |
||
== Equipment == |
== Equipment == |
||
| + | * Fast Casting Mask with +3 Fast Cast rune |
||
| − | * Armor |
||
| + | * A set of 20/20 or 40/40 for domination is best, but not required. |
||
| − | * Weapons |
||
== Usage == |
== Usage == |
||
| + | * Follow Around the Main Tank and Snare group balls for spiking. |
||
| − | Describe how to use the build. |
||
| + | *After you finish forge, spike towards Whailing Forest and T3 should have a group of Spirit Sheperds ready to be spiked. |
||
| + | '''USE THE SKILLS IN ORDER THAT THE BUILD IS IN !!''' |
||
| + | '''MAKE SURE TO CALL WITH DEEP FREEZE!!''' |
||
== Counters == |
== Counters == |
||
| + | '''TAKING AGGRO BEFORE THE SPIKERS HAVE ENOUGH TIME TO SPIKE THE GROUP''' |
||
| − | Describe important counters. |
||
| − | == |
+ | == Ele Nukers == |
| + | <pvxbig> |
||
| − | List the major variants. |
||
| + | [build prof=E/N Fire=12+1+3 Ener=12][Intensity][Glyph of Lesser Energy][Rodgort's Invocation][Searing Flames][Meteor][Necrosis][Optional][Fire Attunement][/build] |
||
| + | </pvxbig> |
||
| + | * {{skill icon|Elemental Lord (Kurzick)}} or {{skill icon|Elemental Lord (Luxon)}} |
||
| − | == Notes == |
||
| + | |||
| − | Add any additional notes pertaining to your build. Omit this section if it is not needed. |
||
| + | == Equipment == |
||
| + | * Fire Headpiece with +3 Fire Magic equipped |
||
| + | * A set of 20/20 or 40/40 for Fire Magic is Recommended but NOT required. |
||
| ⚫ | |||
| + | *Follow the Main Tank and spike groups that he/she balls together. '''( WAIT FOR MESMERS(Snare)'S CALL BEFORE SPIKING!!)''' |
||
| + | *After you finish spiking Forge. Go back to the fork, from which you came. Only this time you are going to take a left towards Whailing Forest. T3 will have a group of Spirit Sheperds waiting to be spiked. |
||
| − | == See also == |
||
| − | Link to any articles that are related to your build. Omit this section if it is not needed.{{build-stub}} |
||
Describe the build. |
Describe the build. |
||
| − | == |
+ | == EoE/SoS Ritualist == |
<pvxbig> |
<pvxbig> |
||
| − | [build prof= |
+ | [build prof=Rt/R Channeling=12+1+3 Spawn=9+1 Beast=9][Signet of Spirits][Vampirism][Bloodsong][Painful Bond][Rupture Soul][Edge of Extinction][Summon Spirits][Flesh of My Flesh][/build] |
</pvxbig> |
</pvxbig> |
||
| + | * {{skill icon|Destruction}} instead of {{skill icon|Painful Bond}} |
||
| − | * Suggest a few optional skill(s) if you included an Optional slot in the skill bar. |
||
== Equipment == |
== Equipment == |
||
| + | * Channeling Magic Headpiece with +3 Channeling rune equipped and +1 spawning rune on armor would help. (NOT REQUIRRED) |
||
| − | * Armor |
||
| + | * a 20/20 or 40/40 set '''(20/20 Atleast)'''. For Channeling. |
||
| − | * Weapons |
||
== Usage == |
== Usage == |
||
| + | *Follow (MAIN TEAM) keep up EoE, and Summon Spirits for backup for spikers. |
||
| − | Describe how to use the build. |
||
| + | *After the 1st 2 spikes at Rastigan and ToC... you will then '''SOLO''' the ToC quest. Making sure to keep up spirits and use Rupture soul '''(I would advice using it on EoE spirit. Since it is not a spike. If you are using Painful Bond... make sure to wait until the Abyssals and Shadow Lord is balled on spirits b4 casting.)''' '''MAKE SURE TO KEEP ABYSSALS BLINDING TO THE BEST OF YOUR ABILITY. JUST DON'T SPAM RUPTURE SOUL!!!!''' |
||
| + | *All spikes are the same as the 1st 2. |
||
== Counters == |
== Counters == |
||
| + | NOT KEEPING UP EOE ON SPIKES. |
||
| − | Describe important counters. |
||
| + | '''SPAMMING RUPTURE SOUL TOO MUCH AT TOC QUEST!!!''' |
||
| − | |||
| − | == Variants == |
||
| − | List the major variants. |
||
| − | |||
| − | == Notes == |
||
| − | Add any additional notes pertaining to your build. Omit this section if it is not needed. |
||
| − | |||
| − | == See also == |
||
| − | Link to any articles that are related to your build. Omit this section if it is not needed. |
||
Latest revision as of 22:37, 7 August 2011
|
This build requires a rating. Please apply the appropriate tag based upon consensus. This build has been designed for the following use: |
| |
This build requires Consumables to operate properly. |
The Fissure of Woe is an Elite Mission Area that consists of multiple quests that must be completed before you are rewarded the Chest of Woe and you are also rewarded a statue for your 'Hall of Monuments' named Conqueror of the Fissure of Woe (The Most Valuable Item out of the Chest of Woe is the Obsidian Edge and can only be aquired from this chest. With this build, the team should split up into 4 teams. T1, T2, T3, and Main Team. This build is used to clear the Fissure of Woe in 15-30 minutes.
Overview
- 2x
 /
/ Terra 1/2
- 1x
 /Terra 3
Main Team
- 1x /Main Tank
- 1x /EoE
- 1x /Snare Caller
- 2x /Group Nukers
Terra 1 (T1)
<pvxbig> [build prof=A/E sha=12+1+3 ear=12][Shadow Form][Shroud of Distress][Mental Block][Armor of Earth]["I Am Unstoppable!"][Ebon Battle Standard of Honor][Sliver Armor][Death's Charge][/build] </pvxbig>
- Dwarven Stability instead of "I Am Unstoppable!" (With Alcohol)
Equipment
- All Blessed Insignias and Runes of Attunement (Superior Shadow Arts on Head)
- Weapon with +5e and Enchantments Last 20% longer. Shields- (Armor +10 vs. Fire + Piercing Damage)
You will need a Zealous Spear while slivering Skeletal Beserkers And also a Zealous Scythe for Energy Maintanence for ToS
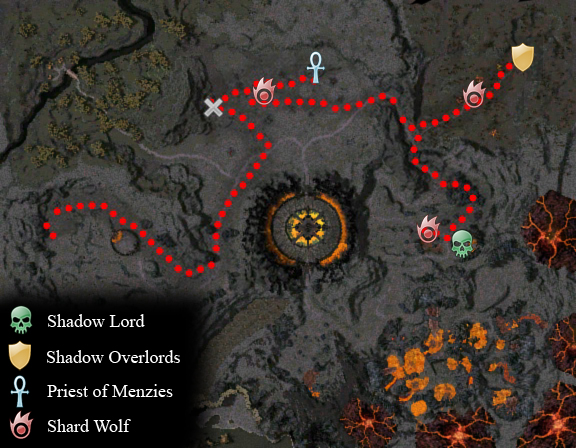
USAGE
Maintain Shadow Form and Shroud of Distress. Keep up Armor of Earth on battle field. Use EBSOH and Sliver Armor to kill what you need to.
1. Run through ToC (Tower of Courage).
2.On Battlefield, grab 2 groups of undead, casters and melee. (usually together).Other group down from north.
3.Aggro Shadows, Sliver down Skeletal Beserkers. Then Sliver down Monk first then Rangers(Shadow Army).
4.Pop tent, get quests, keep aggro and go to menzies. Pull down Shadow Monk sliver him down. Then pull Menzies down, and Sliver him.
5.Run To Burning Forest, Going towards the back of forest, sliver down all the hydra you may have aggroed. To do so... Pull the hydra out of range of the Smoke Walkers, and the Hydra will die pretty quick. (MAKE SURE YOU HAVE FIRE SHIELD EQUIPPED!! ESPECIALLY FOR THIS!!). and in the back of forest Sliver down Shadow Overlords. EQUIP FIRE SHIELD
6.Go to ToS, wait for the Tower of Strength quest. Aggro all Shadow Patrol groups (If you are unexperienced try only 2 groups at a time). (DON'T FORGET TO USE IAU BEFORE CASTING SHADOW FORM!!!) Sliver them down. After Shadow Patrols, Sliver down Shadow Rangers, keep Shadow Mesmers alive. Use them to Sliver down Shard Wolf, and Shadow Lord in ToS.
7. Return to Forge to open Chest of Woe (Good Luck on Chest!!)
Counters
- Dropping Shadow Form
- Being Knockdown by Abyssals while casting Shadow Form
- Being Interrupted by Skeletal Impalers on Battlefield (By Tent, and Menzies)
DON'T FORGET TO KILL ALL OF YOUR SHARD WOLVES ON BATTLEFIELD, BURNING FOREST, AND TOWER OF STRENGTH!!
http://www.youtube.com/user/ginnidorka#p/u/48/GmtxjRGWTQU
Terra 2 (T2)
<pvxbig> [build prof=Assassin/Elementalist sha=12+1+3 ear=12 crit=3][Shadow Form][Shroud of Distress][Armor of Earth][Glyph of Concentration]["I Am Unstoppable!"][Death's Charge][Ebon Battle Standard of Honor][Sliver Armor][/build] </pvxbig>
- "Finish Him!" instead of Glyph of Concentration (Only If Exp)
- Dwarven Stability instead of "I Am Unstoppable!"
Equipment
- All Blessed Insignias and Runes of Attunement (Superior Shadow Arts on Head)
- Weapon with +5e and Enchantments Last 20% longer. Shield = (Armor +10 vs.Piercing Damage)
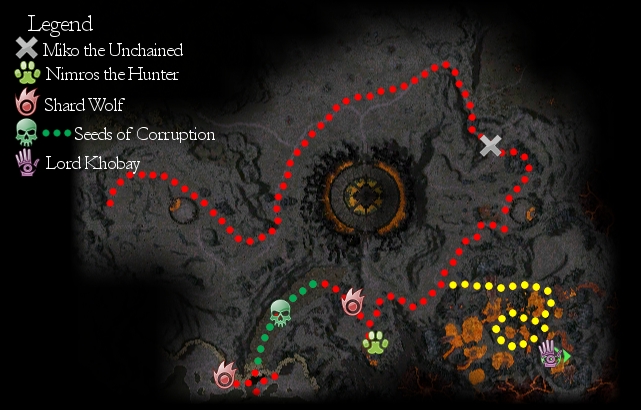
Usage
- Keep Up Shadow Form and Shroud of Distress run through ToC.
- Stay to right wall of Battlefield and aggro the two group near entrance to forge. Take them to the Undead coming from down the road.
- Keep going down the road into the Burning Forest. Talk to Miko The Unchained to obtain the quest Slaves of Menzies.
- Keep running along the same path, once you exit the Burning Forest area, take a left. There should be a lava pit, run through it.
- Keep following the road past ToS, once you reach the end of path (near back of forge), take a left (avoid as much aggro as possible). In the back should be Nimros The Hunter talk to him to obtain the quest The Hunt.
- When you take the quest, you should run down the hill... Into the cave (HEAVY INTERRUPTS HERE) run through cave, onto beach. KILL THE SHARD WOLF and come back through keeping the aggro of Doubter's Dryders to kill Wolf outside of cave ( THIS WOLF IS QUITE DIFFICULT, IT IS OKAY IF YOU CANNOT KILL HIM, JUST INFORM MAIN TEAM!!!).
- Wait for Main Team to pop forge and take your 2 quests. Khobay The Betrayer and Restore the Temple of War.
- Run back to where you came. Before you get to ToS. There should be a cut off to the left. Keep Aggro of Obsidian Flame Drakes. You need them to Sliver down Khobay. KHOBAY CAN BE DIFFICULT FOR STARTERS.
- Now run back into the Cave and Sliver down all Seeds of Corruption!!!
- You have now finished you job return to Forge for you chest. GL!
Counters
- Interrupts on Shadow Form (Heavy Interrupts in Cave, Make sure to cover Shadow Form and Shroud of Distress with Glyph of Concentraction)
- Knock Downs (Make Sure to cover with I AM UNSTOPPABLE)
http://www.youtube.com/watch?v=v8Mzmzyc9BI
Terra 3 (T3)
<pvxbig> [build prof=Assassin/Elementalist sha=12+1+3 ear=12 crit=3][Shadow Form][Shroud of Distress][Glyph of Concentration]["Finish Him!"]["I Am Unstoppable!"][Death's Charge][Ebon Battle Standard of Honor][Sliver Armor][/build] </pvxbig>
Equipment
- Full Blessed Insignias and Rune of Attunement.
- 20% enchant weapon with shield with (+10 vs Slashing)
Usage
Your job as T3 is to clear everything in Whailing Forest for Griffon Quest that needs to be killed.
- First you are going to run past ToC. And head to battlefield. You are going to follow the road, and take a left on the fork.
- You will begin with gathering the Spirit Sheperds for aggro. First sliver down the Cave Spiders that will pop. Then the Worms in beginning of Forest. And lastly Spirit Woods.
- Easy thing to do is, run down the road in the middle. When you reach the spirit woods on the hill by bridge, death's charge up to them. Go to the back and sliver down your Shard wolf.
- After that take your aggro up to front of hill and aggro 1st 2 groups of Beserkers. Sliver them down. THIS NEXT PART IS IMPORTANT. You are going to Death's Charge down to Skeletal Impaler in front of bridge. MAKE SURE TO USE IAU BEFORE YOU DEATH'S CHARGE!!!.
- Walk onto bridge. Stay on the 1st half of the bridge. Pull all banshees with a bow and sliver them down. Now, Run in talk to Whailing Lord, and take his quest. After that run back to front of Forest aggro 1st group of Skeletals and sliver them down.
- Now, Ball up ALL Spirits Sheperds near spawn of Griffons, and front of forest. Wait till Main Team comes and spikes them.
- Now all you have left to do, is escort the griffons to ToC. You are finished!
Counters
Interrupts in Whailing Forest by Worms, Spiders, and Impalers.
Make Sure to use rock candy of some sort.
Main Tank
<pvxbig> [build prof=A/P sha=12+1+3 command=12][Shadow Form][Shroud of Distress]["Fall Back!"]["We Shall Return!"][Mental Block]["I Am Unstoppable!"][Unseen Fury][Death's Charge][/build] </pvxbig>
Equipment
- Same as Terra 1
- Same as Terra 1
Usage
- Your job as MT is to set up balls for the Main Team to spike.
- First when you enter the Fissure of Woe, you will ball 3 groups to the right of Rastigan. You will pull them on the 1st hill (on right closest to Rastigan). Make sure you get the Elementals, They will break sometimes. (To avoid this, let them patrol up the hill) DO NOT USE MENTAL BLOCK HERE, YOU CAN BUT NOT RECOMMENDED. WILL CAUSE ADDITIONAL KD (KNOCK DOWNS).
- Next Is the hardest part you will do. Balling all the Shadow Rangers and Abyssals surrounding the Tower of Courage. This is easily done if you chain your skills, Unseen Fury for blinding when health gets low (Generally you only need Unseen Fury when all the abbyssals and rangers are attacking you). Shouldn't have much of a problem.
- Next the EoE will solo the ToC (I would stay behind to make sure if he is not experienced.)
- If the EoE is experienced, while she/he is soloing the ToC, you should run down further down the hill, and ball the Shadow Army group for spike, (1 monk, 3 melee, real easy ball). Then the Spikers will do their thing.
- After this group is done, Run down to battlefield there should be a group of skeletals. You have two choices. I usually ball them on the big rock before the hill decends. Other way, you can bring these skeletals down further into the two groups ahead (1 patrol, 1 stationary) and ball. (This way only works if the main team does not move and you move slowly with your character while bringing the groups down.) The spikers will spike it.
- This is only a semi spike you'll usually do. Following the road will lead you to a fork (1 leading to Wailing Forest, and the other running towards the Forge and Burning Forest). There will be a group of skeletals patrolling the fork. Pull that group (or wait for them to patrol back towards you, allowing for less of a chance of them breaking) and a group to the left and ball them for a spike.
- Okay, now follow the road that leads to the forge, if the T2 didn't make groups fight properly, ball the group of mesmers so they can be spiked to open the forge. Now inside the forge, you will be going counter-clockwise around the forge. (ONLY PULL ONE OR TWO GROUPS OF ABYSSALS ONTO ONE GROUP OF MESMERS/MONKS AND HAVE THEM SPIKED. SAME FOR ALL GROUPS)
- After forge is done, the MT should be standing to the back entrance of the forge (Closest to the cave), pop the quest Defending The Temple of War' and ball the group of abyssals/shadow beasts. After these are spiked, and more shadow beasts pop-up, do not aggro the EoE will solo them!.
- Okay after this, you will split from you're spikers(THEY WILL COME BACK TO YOU AFTER THEY SPIKE THE T3's GROUP OF SPIRIT SHEPERDS!!) and go back up the hill and ball the shadow army. After you ball all shadow army and spikers spiking them all the way up to ToC, you will instruct the T3 to begin bringing griffs to ToC. Head back to the forge. You are now Finished.
Counters
- KNOCK DOWNS ON SHADOW FORM and/or SHROUD OF DISTRESS
USE PCONS !!
http://www.youtube.com/watch?v=vlBYi6mY6HU
Snare Caller
<pvxbig> [build prof=Me/E FastCast=12+1+3 Domination=12 wat=3][Glyph of Lesser Energy][Deep Freeze][Stolen Speed][Cry of Pain][Mistrust][Signet of Disenchantment][Wastrel's Demise][Wastrel's Worry][/build] </pvxbig>
Equipment
- Fast Casting Mask with +3 Fast Cast rune
- A set of 20/20 or 40/40 for domination is best, but not required.
Usage
- Follow Around the Main Tank and Snare group balls for spiking.
- After you finish forge, spike towards Whailing Forest and T3 should have a group of Spirit Sheperds ready to be spiked.
USE THE SKILLS IN ORDER THAT THE BUILD IS IN !! MAKE SURE TO CALL WITH DEEP FREEZE!!
Counters
TAKING AGGRO BEFORE THE SPIKERS HAVE ENOUGH TIME TO SPIKE THE GROUP
Ele Nukers
<pvxbig> [build prof=E/N Fire=12+1+3 Ener=12][Intensity][Glyph of Lesser Energy][Rodgort's Invocation][Searing Flames][Meteor][Necrosis][Optional][Fire Attunement][/build] </pvxbig>
Equipment
- Fire Headpiece with +3 Fire Magic equipped
- A set of 20/20 or 40/40 for Fire Magic is Recommended but NOT required.
Usage
- Follow the Main Tank and spike groups that he/she balls together. ( WAIT FOR MESMERS(Snare)'S CALL BEFORE SPIKING!!)
- After you finish spiking Forge. Go back to the fork, from which you came. Only this time you are going to take a left towards Whailing Forest. T3 will have a group of Spirit Sheperds waiting to be spiked.
Describe the build.
EoE/SoS Ritualist
<pvxbig> [build prof=Rt/R Channeling=12+1+3 Spawn=9+1 Beast=9][Signet of Spirits][Vampirism][Bloodsong][Painful Bond][Rupture Soul][Edge of Extinction][Summon Spirits][Flesh of My Flesh][/build] </pvxbig>
- Destruction instead of Painful Bond
Equipment
- Channeling Magic Headpiece with +3 Channeling rune equipped and +1 spawning rune on armor would help. (NOT REQUIRRED)
- a 20/20 or 40/40 set (20/20 Atleast). For Channeling.
Usage
- Follow (MAIN TEAM) keep up EoE, and Summon Spirits for backup for spikers.
- After the 1st 2 spikes at Rastigan and ToC... you will then SOLO the ToC quest. Making sure to keep up spirits and use Rupture soul (I would advice using it on EoE spirit. Since it is not a spike. If you are using Painful Bond... make sure to wait until the Abyssals and Shadow Lord is balled on spirits b4 casting.) MAKE SURE TO KEEP ABYSSALS BLINDING TO THE BEST OF YOUR ABILITY. JUST DON'T SPAM RUPTURE SOUL!!!!
- All spikes are the same as the 1st 2.
Counters
NOT KEEPING UP EOE ON SPIKES. SPAMMING RUPTURE SOUL TOO MUCH AT TOC QUEST!!!