(→Player) |
m (Updating Video:TITLE links to File:TITLE links) |
||
| (46 intermediate revisions by 21 users not shown) | |||
| Line 1: | Line 1: | ||
| − | {{ |
+ | {{Good-Build|PvE team|hero}} |
{{TOCright}} |
{{TOCright}} |
||
| + | |||
| − | {{PvE-Meta}} |
||
| − | This guide uses heroes and henchmen to quickly and easily complete Curse of the Nornbear, Against the Charr and A Time For Heroes |
+ | This guide uses heroes and henchmen to quickly and easily complete Curse of the Nornbear, Against the Charr, and A Time For Heroes to turn in Hero's Handbooks to earn faction towards Eye of the North title tracks. |
==Overview== |
==Overview== |
||
| − | + | '''Against the Charr''' |
|
| − | + | *{{any}}/{{any}} Any Player |
|
| − | + | *{{e}}/{{p}} Fire/runner hero |
|
| − | + | *{{Rt}}/{{p}} Communing/runner hero |
|
| − | + | *{{rt}}/{{any}} Signet of Spirit/resto hero |
|
| − | + | '''Curse of the Nornbear''' |
|
| − | + | *{{any}}/{{a}} Any Player |
|
| − | + | *{{rt}}/{{x}} Signet of Spirit Healer |
|
| − | + | *{{rt}}/{{x}} Spirit Spammer |
|
| − | + | *{{me}}/{{e}} Ineptitude Spammer |
|
| ⚫ | |||
| ⚫ | |||
| + | *{{any}}/{{a}} MS/DB Spammer |
||
| − | Take the 3 Hero builds mentioned below plus protection henchman and other henchmen of your choice. |
||
| + | *{{mo}}/{{n}} Bonder 1 |
||
| + | *{{mo}}/{{n}} Bonder 2 |
||
| + | *{{mo}}/{{p}} Bonder 3 |
||
| ⚫ | |||
| − | ===Curses/Runner Hero=== |
||
| + | |||
| ⚫ | |||
<pvxbig> |
<pvxbig> |
||
| − | [build prof= |
+ | [build prof=E/P firem=12+1+1 energ=9+1 comma=9][Savannah Heat][Searing Heat][teinai's h][rodgort's inv][glyph of less][aura of rest][Fire Attunement]["Fall Back!"][/build] |
</pvxbig> |
</pvxbig> |
||
| + | |||
==== Equipment ==== |
==== Equipment ==== |
||
| + | * Blessed or Survivor Insignias |
||
| − | * Armor: Radiant insignias, vigor runes of choice. |
||
| − | * |
+ | * 40/40 Fire Magic set |
| − | === |
+ | === Spirit Spammer === |
<pvxbig> |
<pvxbig> |
||
| − | [build prof=Rt/P com= |
+ | [build prof=Rt/P com=12+1+3 spa=9+1 comma=9][Signet of Ghostly Might][Anguish][Pain][Shadowsong][Disenchantment][dissonance][Boon of Creation]["Fall Back!"][/build] |
</pvxbig> |
</pvxbig> |
||
| + | |||
==== Equipment ==== |
==== Equipment ==== |
||
* Armor: Radiant insignias, vigor runes of choice. |
* Armor: Radiant insignias, vigor runes of choice. |
||
* Weapons: Any high energy set or staff will do. |
* Weapons: Any high energy set or staff will do. |
||
| − | === |
+ | === SoS Healer=== |
| − | <pvxbig> |
+ | <pvxbig> |
| − | [build prof= |
+ | [build prof=Ritualist/Any channelingmagic=12+1+3 spawningpower=3+1 restoration=12+1 ][Signet of Spirits][Bloodsong][Painful Bond][Ancestor's Rage][Spirit Siphon][mend body and soul][spirit light][Protective Was Kaolai][/build] |
</pvxbig> |
</pvxbig> |
||
| + | |||
==== Equipment ==== |
==== Equipment ==== |
||
| + | * Survivor Insignias |
||
| − | * Armor: Radiant insignias and vigor runes of choice. |
||
| + | * Restoration Magic set |
||
| − | * Weapons: Any staff will do. |
||
=== Usage === |
=== Usage === |
||
| ⚫ | |||
| ⚫ | |||
| ⚫ | |||
*Starting this mission requires you to run to the helmet. Load your favorite running build to get there. (this takes 1 minute to accomplish) |
*Starting this mission requires you to run to the helmet. Load your favorite running build to get there. (this takes 1 minute to accomplish) |
||
| − | *Once in mission flag your team to point |
+ | *Once in mission flag your team to point C. (shown on map) |
| − | * |
+ | *Aggro the charr coming across the bridge and try to drag them south as they kill you. |
*Once dead, move your team to the different flag points. |
*Once dead, move your team to the different flag points. |
||
| + | *At point J, be careful of the fireshielders. Move your team almost immediately after you engage them as they will cast Meteor Shower. |
||
*When you reach the bosses,spread your heroes out and flag your henchmen to aggro. |
*When you reach the bosses,spread your heroes out and flag your henchmen to aggro. |
||
*Don't forget to display your Vanguard title. |
*Don't forget to display your Vanguard title. |
||
| − | *This mission takes |
+ | *This mission takes 3-5 minutes to complete. |
| − | === |
+ | ===Video Demonstration=== |
| + | [[File:Against_The_Charr_Post_6_310_Nerf|300px]] |
||
| − | [[File:Cotnb_map.jpg|thumb|150px|cotnb flag points]] |
||
| + | {{clear}} |
||
| − | [[File:Flag_3.jpg|thumb|150px]] |
||
| − | [[File:Flag_4.jpg|thumb|150px]] |
||
| ⚫ | |||
| − | *This mission requires you to sacrifice yourself in the beginning. Load [[gww:Blood is Power|Blood is Power]] or [[gww:Illusion of Weakness|Illusion of Weakness]] on a low health armor set. |
||
| + | === Player === |
||
| − | *Mandragor have a chance of spawning at the mouth of the cave. Use the same technique as used for the bosses in Against the Charr. |
||
| + | <pvxbig> |
||
| − | *After the mandragor are dead flag heroes to the numbered points in order. (see map pic) |
||
| + | [build prof=any/a shadow=12][deadly paradox][shadow form][shroud of distress][dwarven stability][dash][heart of shadow][i am unstoppable][pain inverter][/build] |
||
| − | *Nornbear spawns in points 3, 4 and needs to be killed at point 6. |
||
| + | </pvxbig> |
||
| − | *Don't forget to display Norn title. |
||
| − | *This mission takes about 3-4 minutes to complete. |
||
| + | === SoS Healer === |
||
| − | '''''Note''''':In order to spawn the Nornbear but not have to fight him, move to |
||
| + | <pvxbig> |
||
| − | the circled rocks in the 2 corresponding screen shots. Tag them and carry on to the next numbered point. |
||
| + | [build prof=Ritualist/Any channelingmagic=12+1+3 restoration=12+1 spawningpower=3+1][Signet of Spirits][Bloodsong][Painful Bond][Ancestor's Rage][Spirit Siphon][mend body and soul][spirit light][Protective Was Kaolai][/build] |
||
| + | </pvxbig> |
||
| + | === Spirit Spammer === |
||
| + | <pvxbig> |
||
| + | [build prof=Ritualist/any spawningpower=12+1 communing=12+1+3][Signet of Ghostly Might][Shadowsong][Pain][Disenchantment][Anguish][Dissonance][optional][Boon of Creation][/build] |
||
| + | </pvxbig> |
||
| + | === Ineptitude Spammer === |
||
| + | <pvxbig> |
||
| + | [build prof=me/e illusion=12+1+3 fast=10+1 ins=8+1][ineptitude][clumsiness][wandering eye][calculated risk][signet of clum][revealed hex][waste not][glyph of lesser][/build] |
||
| + | </pvxbig> |
||
| + | === Equipment === |
||
| + | *Survivor insignias |
||
| + | *Staff with +15 energy |
||
| + | === Usage === |
||
| + | * Avoid activating the res shrine by hugging the left wall. |
||
| + | * Run your heroes into the Mandragors so they wipe. |
||
| + | * Run to each spawn point using Dash to break aggro. |
||
| + | * Wipe at Nornbear and take him out with your party. |
||
| + | * Another option is to try and run your heroes through and use any survivors to hit the second spawn point. It will shave a few seconds off. |
||
| + | == A Time for Heroes == |
||
| − | |||
| + | === Player === |
||
| − | |||
| − | |||
| − | |||
| − | |||
| ⚫ | |||
| − | |||
| ⚫ | |||
<pvxbig> |
<pvxbig> |
||
| − | [build prof= |
+ | [build prof=any/assas dagger=12][asuran scan][golden phoenix strike][death blossom][moebius strike][you move like a dwarf][i am unstoppable][optional][optional][/build] |
*{{Paragon}}'''Paragons''' take [["Never Surrender!"] and [["Find Their Weakness!"] |
*{{Paragon}}'''Paragons''' take [["Never Surrender!"] and [["Find Their Weakness!"] |
||
| Line 99: | Line 118: | ||
==== Equipment ==== |
==== Equipment ==== |
||
| + | * All sup runes to drop health to 105 (130 for Dervishes because of the innate +25 health). |
||
| − | * Armor: Drop your health as low as possible by adding superior runes. (130 for dervish, 105 for other professions) |
||
| + | * Radiant Insignias |
||
| − | * Weapons: Any daggers will do. |
||
| + | * Vampiric Daggers of Enchanting |
||
| − | ===Bonder 1=== |
+ | === Bonder 1 === |
<pvxbig> |
<pvxbig> |
||
| − | [build prof=Mo/ |
+ | [build prof=Mo/n smi=12+1+3 pro=10+3 blood=8 div=6+3][Essence Bond][Protective Bond][Strength of Honor][Balthazar's Spirit][Life Bond][Blessed Signet][Offering of Blood][Signet of Devotion][/build] |
</pvxbig> |
</pvxbig> |
||
| − | ===Bonder 2=== |
+ | === Bonder 2 === |
<pvxbig> |
<pvxbig> |
||
| − | [build prof=Mo/N blo= |
+ | [build prof=Mo/N blo=11 hea=10+3 pro=9+1+3 div=8+1][Essence Bond][Protective Bond][Mending][Succor][Blessed Signet][offering of blood][Signet of Rejuvenation][Signet of Devotion][/build] |
</pvxbig> |
</pvxbig> |
||
| − | ===Bonder 3=== |
+ | === Bonder 3=== |
<pvxbig> |
<pvxbig> |
||
| − | [build prof=Mo/P pro=12+1+3 div=10+1 comma=8][Essence Bond][Protective Bond][Life Barrier][Watchful Spirit][Blessed Signet][Signet of Devotion][ |
+ | [build prof=Mo/P pro=12+1+3 div=10+1 comma=8][Essence Bond][Protective Bond][Life Barrier][Watchful Spirit][Blessed Signet][Signet of Devotion][optional]["Make Haste!"][/build] |
</pvxbig> |
</pvxbig> |
||
| Line 125: | Line 145: | ||
== Notes == |
== Notes == |
||
| − | *To obtain multiple copies of books, you need to place new books into storage. |
+ | *To obtain multiple copies of books, you need to place new books into storage. You can only receive one book at a time. Credit goes to the first book in your inventory. To save some time, you can swap out your first book to a book that hasn't received credit for the mission. |
| − | *Credit goes to the first book in your inventory. |
||
| − | :*To save some time, you can swap out your first book to a book that hasn't recieved credit for the mission. |
||
==Video== |
==Video== |
||
| Line 133: | Line 151: | ||
== See Also == |
== See Also == |
||
| − | |||
*[[Build:Any/A ATFH Runner]] |
*[[Build:Any/A ATFH Runner]] |
||
| − | *[[Build:A/any |
+ | *[[Build:A/any Speedbooker]] |
Latest revision as of 17:42, 12 December 2014
|
The PvXwiki community finds this to be a good build. If you disagree with this rating, please discuss it on the build's talk page. This build has been designed for the following use: |
This guide uses heroes and henchmen to quickly and easily complete Curse of the Nornbear, Against the Charr, and A Time For Heroes to turn in Hero's Handbooks to earn faction towards Eye of the North title tracks.
Overview
Against the Charr
 / Any Player
 /
/ Fire/runner hero
- / Communing/runner hero
- / Signet of Spirit/resto hero
Curse of the Nornbear
- / Any Player
- / Signet of Spirit Healer
- / Spirit Spammer
- / Ineptitude Spammer
A Time for Heroes
- / MS/DB Spammer
- / Bonder 1
- / Bonder 2
- / Bonder 3
Against the Charr
Nuker
<pvxbig> [build prof=E/P firem=12+1+1 energ=9+1 comma=9][Savannah Heat][Searing Heat][teinai's h][rodgort's inv][glyph of less][aura of rest][Fire Attunement]["Fall Back!"][/build] </pvxbig>
Equipment
- Blessed or Survivor Insignias
- 40/40 Fire Magic set
Spirit Spammer
<pvxbig> [build prof=Rt/P com=12+1+3 spa=9+1 comma=9][Signet of Ghostly Might][Anguish][Pain][Shadowsong][Disenchantment][dissonance][Boon of Creation]["Fall Back!"][/build] </pvxbig>
Equipment
- Armor: Radiant insignias, vigor runes of choice.
- Weapons: Any high energy set or staff will do.
SoS Healer
<pvxbig> [build prof=Ritualist/Any channelingmagic=12+1+3 spawningpower=3+1 restoration=12+1 ][Signet of Spirits][Bloodsong][Painful Bond][Ancestor's Rage][Spirit Siphon][mend body and soul][spirit light][Protective Was Kaolai][/build] </pvxbig>
Equipment
- Survivor Insignias
- Restoration Magic set
Usage

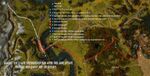
Flag points
- Starting this mission requires you to run to the helmet. Load your favorite running build to get there. (this takes 1 minute to accomplish)
- Once in mission flag your team to point C. (shown on map)
- Aggro the charr coming across the bridge and try to drag them south as they kill you.
- Once dead, move your team to the different flag points.
- At point J, be careful of the fireshielders. Move your team almost immediately after you engage them as they will cast Meteor Shower.
- When you reach the bosses,spread your heroes out and flag your henchmen to aggro.
- Don't forget to display your Vanguard title.
- This mission takes 3-5 minutes to complete.
Video Demonstration

Curse of the Nornbear
Player
<pvxbig> [build prof=any/a shadow=12][deadly paradox][shadow form][shroud of distress][dwarven stability][dash][heart of shadow][i am unstoppable][pain inverter][/build] </pvxbig>
SoS Healer
<pvxbig> [build prof=Ritualist/Any channelingmagic=12+1+3 restoration=12+1 spawningpower=3+1][Signet of Spirits][Bloodsong][Painful Bond][Ancestor's Rage][Spirit Siphon][mend body and soul][spirit light][Protective Was Kaolai][/build] </pvxbig>
Spirit Spammer
<pvxbig> [build prof=Ritualist/any spawningpower=12+1 communing=12+1+3][Signet of Ghostly Might][Shadowsong][Pain][Disenchantment][Anguish][Dissonance][optional][Boon of Creation][/build] </pvxbig>
Ineptitude Spammer
<pvxbig> [build prof=me/e illusion=12+1+3 fast=10+1 ins=8+1][ineptitude][clumsiness][wandering eye][calculated risk][signet of clum][revealed hex][waste not][glyph of lesser][/build] </pvxbig>
Equipment
- Survivor insignias
- Staff with +15 energy
Usage
- Avoid activating the res shrine by hugging the left wall.
- Run your heroes into the Mandragors so they wipe.
- Run to each spawn point using Dash to break aggro.
- Wipe at Nornbear and take him out with your party.
- Another option is to try and run your heroes through and use any survivors to hit the second spawn point. It will shave a few seconds off.
A Time for Heroes
Player
<pvxbig> [build prof=any/assas dagger=12][asuran scan][golden phoenix strike][death blossom][moebius strike][you move like a dwarf][i am unstoppable][optional][optional][/build]
- Paragons take [["Never Surrender!"] and [["Find Their Weakness!"]
- Warriors take [[I Will Survive!] and [[Flail]
- Monks take [[Judge's Insight] and [[Vigorous Spirit]
- Rangers take [[Lightning Reflexes] and [[Shadow Refuge]
- Necromancers take [[Blood Renewal] and [[Life Siphon]
- Mesmers drop [["You Move Like a Dwarf!"] and replace with [[Cry of Frustration], take [[Ether Feast] and [[Drunken Master]
- Ritualists take [[Weapon of Aggression] and [[Nightmare Weapon]
- Assassins drop [["I Am Unstoppable!"] and replace with [[Fleeting Stability], take [[Critical Agility] and [[Mystic Regeneration]
- Dervishes, drop [["I Am Unstoppable!"] and replace with [[Fleeting Stability], take [[Mystic Regeneration] and [[Drunken Master]
- Elementalists take [[Frigid Armor] and [[Conjure Frost] (if you do not want to modify your daggers, just swap conjure for a skill of your choice.)
</pvxbig>
Equipment
- All sup runes to drop health to 105 (130 for Dervishes because of the innate +25 health).
- Radiant Insignias
- Vampiric Daggers of Enchanting
Bonder 1
<pvxbig> [build prof=Mo/n smi=12+1+3 pro=10+3 blood=8 div=6+3][Essence Bond][Protective Bond][Strength of Honor][Balthazar's Spirit][Life Bond][Blessed Signet][Offering of Blood][Signet of Devotion][/build] </pvxbig>
Bonder 2
<pvxbig> [build prof=Mo/N blo=11 hea=10+3 pro=9+1+3 div=8+1][Essence Bond][Protective Bond][Mending][Succor][Blessed Signet][offering of blood][Signet of Rejuvenation][Signet of Devotion][/build] </pvxbig>
Bonder 3
<pvxbig> [build prof=Mo/P pro=12+1+3 div=10+1 comma=8][Essence Bond][Protective Bond][Life Barrier][Watchful Spirit][Blessed Signet][Signet of Devotion][optional]["Make Haste!"][/build] </pvxbig>
Usage
- Make sure you have your delver title displayed.
- Before having the heroes start enchanting you, check for Destroyer of Deeds as they have Punishing Shot.
- Killing the Great Destroyer is still possible with Deeds around, it will just become more difficult.
- Interrupt Lava Wave with "You Move Like a Dwarf!" (or Cry of Frustration for Mesmers)
- This mission can be done in about 1 minute.
Notes
- To obtain multiple copies of books, you need to place new books into storage. You can only receive one book at a time. Credit goes to the first book in your inventory. To save some time, you can swap out your first book to a book that hasn't received credit for the mission.
Video
- Youtube, streaming - using the same concept but different builds.
See Also
- Build:Any/A ATFH Runner
- Build:A/any Speedbooker