(Removing all content from page) |
Skakid9090 (talk | contribs) mNo edit summary |
||
| Line 1: | Line 1: | ||
| + | {{Meta-Build|rating=Great|SC|farming|PvE team}} |
||
| + | {{TOCright}} |
||
| + | The MQSC ([[gw:Mount Qinkai|Mount Qinkai]] Speed Clear) build uses teams of smiters, tanks and a finisher in combination with a runner in order to farm Luxon faction at [[gw:Mount Qinkai|Mount Qinkai]] in Hard Mode from [[gw:Aspenwood Gate|Aspenwood Gate]]. With an average team, faction rewards can come anywhere from 9.5k-11k a run and runs take 7-12 minutes. Groups are normally formed in the European '''German''' districts. |
||
| + | |||
| + | ==Overview== |
||
| + | Party members should split into three teams (Update With Current Meta): |
||
| + | ===='''Yeti Team'''==== |
||
| + | *{{Mo}}/{{Any}} or {{Mo}}/{{E}} ('''''Yeti Smiter''''') |
||
| + | {{mini skill bar|Retribution|Vital Blessing|Life Attunement|Essence Bond|Blessed Signet|Holy Wrath|Shield of Judgment|Rebirth}}{{mini skill bar|Retribution|Essence Bond|Holy Wrath|Shield of Judgment|Air of Superiority|"By Ural's Hammer!"|Intensity|Rebirth}} |
||
| + | |||
| + | *{{Mo}}/{{Rt}} ('''''Yeti Tank''''') |
||
| + | {{mini skill bar|Protective Spirit|Spirit Bond|Vengeful Was Khanhei|Vengeful Weapon|Ebon Vanguard Assassin Support|"Finish Him!"|"I Am Unstoppable!"|Essence Bond|}} |
||
| + | |||
| + | *{{Any}}/{{Mo}} ('''''Yeti Finisher''''') |
||
| + | {{mini skill bar|Optional|Optional|Optional|Ebon Vanguard Assassin Support|"Finish Him!"|Balthazar's Spirit|Essence Bond|Rebirth}} |
||
| + | |||
| + | ===='''Wallow Team'''==== |
||
| + | *{{Rt}}/{{Any}} ('''''Wallow Channeling Ritualist''''') |
||
| + | {{mini skill bar|Ebon Escape|Signet of Spirits|Bloodsong|Agony|Spirit Siphon|Painful Bond|Summon Spirits (Luxon)|Flesh of My Flesh}}{{mini skill bar|Rupture Soul|Signet of Spirits|Bloodsong|Destruction|Spirit Siphon|Painful Bond|Summon Spirits (Luxon)|Flesh of My Flesh}}{{mini skill bar|Finish Him|Signet of Spirits|Bloodsong|Vampirism|Spirit Siphon|Painful Bond|Summon Spirits (Luxon)|Flesh of My Flesh}}{{mini skill bar|Agony|Signet of Spirits|Bloodsong|Vampirism|Spirit Siphon|Painful Bond|Summon Spirits (Luxon)|Flesh of My Flesh}} |
||
| + | |||
| + | |||
| + | *{{Rt}}/{{Any}} ('''''Wallow Communing Ritualist''''') |
||
| + | {{mini skill bar|Signet of Ghostly Might|Pain|Shadowsong|Anguish|Disenchantment|Boon of Creation|Summon Spirits (Luxon)|Flesh of My Flesh}}{{mini skill bar|Ritual Lord|Pain|Shadowsong|Anguish|Disenchantment|Boon of Creation|Summon Spirits (Luxon)|Flesh of My Flesh}}{{mini skill bar|Wanderlust|Pain|Shadowsong|Anguish|Disenchantment|Boon of Creation|Summon Spirits (Luxon)|Flesh of My Flesh}} |
||
| + | |||
| + | ===='''Beach Team'''==== |
||
| + | *{{Mo}}/{{Any}} ('''''Beach Smiter''''') |
||
| + | {{mini skill bar|Essence Bond|Retribution|Vital Blessing|Holy Wrath|Shield of Judgment|"By Ural's Hammer!"|Ebon Vanguard Assassin Support|Rebirth|}} |
||
| + | |||
| + | *{{Mo}}/{{Any}} ('''''Beach Tank''''') |
||
| + | {{mini skill bar|Protective Spirit|Spirit Bond|Vengeful Was Khanhei|Vengeful Weapon|Ebon Vanguard Assassin Support|"Finish Him!"|Balthazar's Spirit|Essence Bond|}} |
||
| + | |||
| + | *{{Any}}/{{P}} or {{A}}/{{Any}} ('''''Runner''''') |
||
| + | {{mini skill bar|"Incoming!"|"Fall Back!"|Enduring Harmony|"We Shall Return!"|"Can't Touch This!"|"I Am Unstoppable!"|Optional|Resurrection Signet|}} |
||
| + | |||
| + | <br> |
||
| + | |||
| + | = Yeti Team = |
||
| + | == Yeti Smite == |
||
| + | === Variant for Less Experienced Tank === |
||
| + | <pvxbig> |
||
| + | [build prof=mo/any smit=12+1+3 prot=12+3 divin=3+3][Retribution][Vital Blessing][Life Attunement][Essence Bond][Blessed Signet][Holy Wrath][shield of judgment][Rebirth][/build] |
||
| + | </pvxbig> |
||
| + | |||
| + | === Equipment === |
||
| + | * Superior Protection and Smiting Headset |
||
| + | * 40/40 Smiting Prayer set |
||
| + | * Enchanting Staff for casting SoJ |
||
| + | * High energy set |
||
| + | |||
| + | === Usage === |
||
| + | <pvxbig> |
||
| + | * Follow the tank and: |
||
| + | ** Cast {{icon|Retribution}} [[Retribution], {{icon|Vital Blessing}} [[Vital Blessing], {{icon|Life Attunement}} [[Life Attunement], {{icon|Essence Bond}} [[Essence Bond]. |
||
| + | ** Use {{icon|Blessed Signet}} [[Blessed Signet] for more energy if needed. |
||
| + | ** Cast {{icon|Holy Wrath}} [[Holy Wrath] as often as possible. |
||
| + | </pvxbig> |
||
| + | |||
| + | === Variant for More Experienced Tank === |
||
| + | <pvxbig> |
||
| + | [build name="y smit 2" prof=monk/eleme smitin=12+1+3 divine=12+1][retribution][essence bond][holy wrath][shield of judgment][air of superiority][by urals hammer][intensity][Rebirth][/build] |
||
| + | </pvxbig> |
||
| + | |||
| + | === Equipment === |
||
| + | * Superior Smiting (Head) + Minor Divine Favor |
||
| + | * 40/40 Smiting Prayer set |
||
| + | * Enchanting Set for casting SoJ |
||
| + | * High energy set |
||
| + | |||
| + | === Usage === |
||
| + | <pvxbig> |
||
| + | * Follow the tank and: |
||
| + | ** Cast {{icon|Retribution}} [[Retribution] + {{icon|Essence Bond}} [[Essence Bond] on the tank. |
||
| + | ** Take the blessing from the priest. |
||
| + | ** Cast {{icon|Air of Superiority}} [[Air of Superiority] + {{icon|Holy Wrath}} [[Holy Wrath] before the tank aggro's a mob. |
||
| + | ** Wait for the tank to take aggro (the Finisher also has to wait). |
||
| + | ** Cast {{icon|"By Ural's Hammer!"}} [["By Ural's Hammer!"] + {{icon|Intensity}} [[Intensity], and {{icon|Holy Wrath}} [[Holy Wrath] when you can (For small groups - You should have enough energy). |
||
| + | ** Cast {{icon|Shield of Judgment}} [[Shield of Judgment] too (For massive groups - You should have enough energy). |
||
| + | ** Always keep {{icon|Air of Superiority}} [[Air of Superiority] on you to recast quickly, remove conditions, gain Health, or gain Energy. The extra experience given can help you in decreasing Death Penalty. |
||
| + | </pvxbig> |
||
| + | |||
| + | === Notes === |
||
| + | * This build is much faster, but is riskier as well. |
||
| + | * The healing from the boosted Favor Divine helps the tank slightly. |
||
| + | * Only 2 Bonds grants you 2 extra Energy regeneration pips. |
||
| + | * You need to have fairly high ranks in Asura, Dwarf, and Sunspear title tracks to be efficient. |
||
| + | |||
| + | === Counters === |
||
| + | * Getting killed. |
||
| + | * In a fast run (or with a slow Wallow team), wallows might still be patrolling the area when killing the Rit Boss, so keep an eye on the compass. |
||
| + | |||
| + | === Variants === |
||
| + | <pvxbig> |
||
| + | * The tank may ask for {{icon|Vital Blessing}} [[Vital Blessing] or {{icon|Life Attunement}} [[Life Attunement]. Replace one of the PvE skills to fit, and move atrributes from Divine to Prot. |
||
| + | </pvxbig> |
||
| + | |||
| + | == Yeti Tank == |
||
| + | === Attributes and Skills === |
||
| + | <pvxbig> |
||
| + | [build prof=Mo/Rt prot=12+1+1 resto=12][Protective Spirit][Spirit Bond][Vengeful Was Khanhei][Vengeful Weapon][Ebon Vanguard Assassin Support]["Finish Him!"]["I Am Unstoppable!"][Essence Bond][/build] |
||
| + | [build prof=Rt/Mo prot=12 resto=12+1+1][Protective Spirit][Spirit Bond][Vengeful Was Khanhei][Vengeful Weapon][Ebon Vanguard Assassin Support]["Finish Him!"]["I Am Unstoppable!"][Essence Bond][/build] |
||
| + | |||
| + | === Equipment === |
||
| + | * Lowest AL Armor(with 550hp) |
||
| + | * A 40/20/20% staff is preferred, but any staff with 20% enchants will do. |
||
| + | [[Image:Yeti run.png | 200px | right]] |
||
| + | |||
| + | === Usage === |
||
| + | * Enchant yourself with {{icon|Essence Bond}} [[Essence Bond] and {{icon|Balthazar's Spirit}} [[Balthazar's Spirit]. |
||
| + | * Grab the blessing from the Luxon Priest. |
||
| + | * Before engaging in combat, enchant yourself with {{icon|Spirit Bond}} [[Spirit Bond], and {{icon|Protective Spirit}} [[Protective Spirit]. |
||
| + | * Use {{icon|"I Am Unstoppable!"}} [["I Am Unstoppable!"] to prevent knockdowns by the yeti. |
||
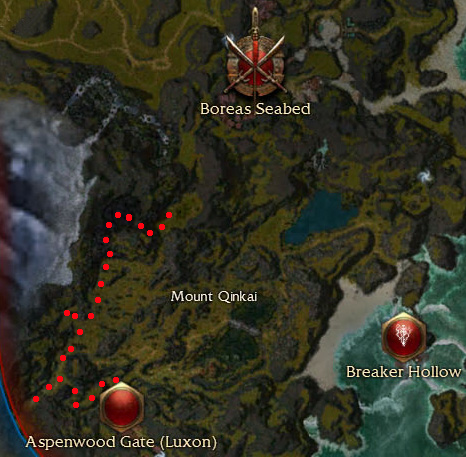
| + | * Follow the route outlined in the map on the right. |
||
| + | * Upkeep {{icon|Spirit Bond}} [[Spirit Bond] no matter what while in combat, and the other enchants as you can. |
||
| + | * Cast {{icon|Vengeful Weapon}} [[Vengeful Weapon] upon engaging. Then cast {{icon|Vengeful Was Khanhei}} [[Vengeful Was Khanhei]. |
||
| + | * Try to disarm the Traps, so your Smiter won't get hit, if your smiter isnt vigilant enough to avoid the traps |
||
| + | </pvxbig> |
||
| + | |||
| + | === Counters === |
||
| + | * Dying from Traps. |
||
| + | * Taking too much damage in the Yeti cave. |
||
| + | * Smiter and Finisher dying. |
||
| + | |||
| + | ==Finisher== |
||
| + | The finisher can be multiple professions: |
||
| + | |||
| + | <pvxbig> |
||
| + | [build prof=N/Mo sou=12+1 cur=12+3+1 smi=3][Necrosis][Spiteful Spirit][Reckless Haste][Ebon Vanguard Assassin Support]["Finish Him!"][Balthazar's Spirit][Essence Bond][Rebirth][/build] |
||
| + | </pvxbig> |
||
| + | <pvxbig> |
||
| + | [build prof=E/Mo fir=12+3+1 ene=12+1 pro=3][Searing Flames][Glowing Gaze][Ebon Vanguard Assassin Support][Pain Inverter]["Finish Him!"][Balthazar's Spirit][Essence Bond][Rebirth][/build] |
||
| + | </pvxbig> |
||
| + | <pvxbig> |
||
| + | [build prof=Me/Mo fas=12+1 dom=12+3+1][Visions of Regret][Empathy][Cry of Pain][Ebon Vanguard Assassin Support]["Finish Him!"][Balthazar's Spirit][Essence Bond][Rebirth][/build] |
||
| + | </pvxbig> |
||
| + | <pvxbig> |
||
| + | [build prof=Rt/Mo Pro=3 spawn=12 channeling=12+1+3][Ancestors' Rage][Spirit Rift][Renewing Surge][Clamor of Souls]["Finish Him!"][Balthazar's Spirit][Essence Bond][Rebirth][/build] |
||
| + | </pvxbig> |
||
| + | <pvxbig> |
||
| + | [build prof=R/Mo pro=12 bea=12+1+3 wil=3][Pain Inverter][Ebon Vanguard Assassin Support]["Finish Him!"][Serpent's Quickness][Edge of Extinction][Balthazar's Spirit][Essence Bond][Unyielding Aura][/build] |
||
| + | </pvxbig> |
||
| + | <pvxbig> |
||
| + | [build prof=Mo/R pro=12+1+1 bea=12 wil=3][Pain Inverter][Ebon Vanguard Assassin Support]["Finish Him!"][Serpent's Quickness][Edge of Extinction][Balthazar's Spirit][Essence Bond][Unyielding Aura][/build] |
||
| + | </pvxbig> |
||
| + | |||
| + | ==== Equipment ==== |
||
| + | *Max AL with as high health as possible (Sup Vigor, Survivor's, Vitae) |
||
| + | *40/40 set of appropriate attribute |
||
| + | |||
| + | ==== Usage ==== |
||
| + | * Maintain enchantments on the tank. |
||
| + | * Help kill stuff. |
||
| + | |||
| + | = Wallow Team = |
||
| + | == Wallow Channeling Ritualist (Rit 1) == |
||
| + | === Attributes and Skills === |
||
| + | <pvxbig> |
||
| + | [build prof=Rt/any chann=12+1+3 spawn=12+2][Ebon Escape][Signet of Spirits][Bloodsong][Agony][Spirit Siphon][Painful Bond][Summon Spirits (Luxon)][Flesh of my Flesh][/build] |
||
| + | [build prof=Rt/any cha=12+1+3 spa=12+2][Rupture Soul][Signet of Spirits][Bloodsong][Destruction][Spirit Siphon][Painful Bond][Summon Spirits (Luxon)][Flesh of My Flesh][/build] |
||
| + | [build prof=Rt/any cha=12+1+3 spa=12+2][Finish Him][Signet of Spirits][Bloodsong][Vampirism][Spirit Siphon][Painful Bond][Summon Spirits (Luxon)][Flesh of My Flesh][/build] |
||
| + | [build prof=Rt/any cha=12+1+3 spa=12+2][Agony][Signet of Spirits][Bloodsong][Vampirism][Spirit Siphon][Painful Bond][Summon Spirits (Luxon)][Flesh of My Flesh][/build] |
||
| + | </pvxbig> |
||
| + | |||
| + | |||
| + | *Note that all builds' skills can be interchanged with each other to suit the player. |
||
| + | |||
| + | === Equipment === |
||
| + | * As high health as possible (Sup Vigor, Survivor, Vitae) |
||
| + | * 40/40 Channeling Magic set |
||
| + | * 20 high energy staff |
||
| + | * Longbow for pulling |
||
| + | |||
| + | === Usage === |
||
| + | * Follow the Wallows (W) route. See on the map. |
||
| + | * Spawn the spirits in front of the wallows. Try not to pull aggro. |
||
| + | * Use the Longbow for the guardians. |
||
| + | * As the Communing Rit will be leading, use Ebon Escape for quicker maneuverability and for minor heals during fights. |
||
| + | |||
| + | === Counters === |
||
| + | * Allowing yourself to aggro the wallows rather than your spirits |
||
| + | * Bad spawns can sometimes lead to having to aggro 2 groups of wallows at a time, almost always leading to death |
||
| + | * Spirits getting killed |
||
| + | <br> |
||
| + | |||
| + | == Wallow Communing Ritualist (Rit 2) == |
||
| + | === Attributes and Skills === |
||
| + | <pvxbig> |
||
| + | [build prof=Rt/any comm=12+1+3 spa=12+2][optional][Pain][Shadowsong][Anguish][Disenchantment][Boon of Creation][Summon Spirits (Luxon)][Flesh of My Flesh][/build] |
||
| + | </pvxbig> |
||
| + | *Shadowsong can be exchanged for Vampirism if the Channelling rit is taking Rupture Soul + Destruction. |
||
| + | |||
| + | ====elite==== |
||
| + | <pvxbig> |
||
| + | *{{icon|Signet of Ghostly Might}} [[Signet of Ghostly Might@16] |
||
| + | *{{icon|Ritual Lord}} [[Ritual Lord@13] |
||
| + | *{{icon|Wanderlust}} [[Wanderlust@16] |
||
| + | </pvxbig> |
||
| + | |||
| + | === Equipment === |
||
| + | * As high health as possible (Sup Vigor, Survivor, Vitae) |
||
| + | * 40/40 Communing set. |
||
| + | * 20 high energy staff. |
||
| + | * Longbow for pulling |
||
| + | [[Image:Wallow run.png | 200px | right]] |
||
| + | |||
| + | === Usage === |
||
| + | * Follow the Wallows(W) route. See on the map. |
||
| + | * Spawn the spirits in front of the wallows. Try not to pull aggro. |
||
| + | * Use the Longbow for the Guardian. |
||
| + | |||
| + | === Counters === |
||
| + | * Allowing yourself to aggro the wallows rather than your spirits |
||
| + | * Bad spawns can sometimes lead to having to aggro 2 groups of wallows at a time, almost always leading to death |
||
| + | * Spirits getting killed |
||
| + | |||
| + | == Video Tutorials == |
||
| + | |||
| + | [http://www.youtube.com/watch?v=0TZAWwZDaz4 Wallow Team Teach (Ritualist 1 and 2)] |
||
| + | |||
| + | <br> |
||
| + | |||
| + | = Beach Team = |
||
| + | == Beach Smiter == |
||
| + | === Attributes and Skills === |
||
| + | <pvxbig> |
||
| + | [build prof=Mo/? smi=12+1+3 pro=12+3 divine=3+1][Essence Bond][Retribution][Vital Blessing][Holy Wrath][Shield of Judgment]["By Ural's Hammer!"][Ebon Vanguard Assassin Support][Rebirth][/build] |
||
| + | </pvxbig> |
||
| + | |||
| + | === Equipment === |
||
| + | * As high health as possible |
||
| + | * A 40/20/20% staff is preferred, but any staff with 20% enchants will do. |
||
| + | |||
| + | === Usage === |
||
| + | <pvxbig> |
||
| + | * Cast {{icon|Essence Bond}} [[Essence Bond], {{icon|Retribution}} [[Retribution], and {{icon|Vital Blessing}} [[Vital Blessing] on the Beach Tank, and maintain them. |
||
| + | * Stay back while the tank aggro's mobs, and wait until all of the melees have stopped moving before casting or recasting your spells. |
||
| + | * Cast {{icon|Holy Wrath}} [[Holy Wrath] and {{icon|Shield of Judgment}} [[Shield of Judgment] on the tank upon engage. |
||
| + | * Renew {{icon|Holy Wrath}} [[Holy Wrath] whenever possible, as it will quickly run out otherwise. |
||
| + | * Use {{icon|Ebon Vanguard Assassin Support}} [[Ebon Vanguard Assassin Support] to more quickly take down targets that aren't dying fast enough. You can also use it as a meat shield if you accidentally pull some of the aggro. |
||
| + | * Wait a few seconds before casting {{icon|"By Ural's Hammer!"}} [["By Ural's Hammer!"] for the tank to get aggro. |
||
| + | * Cast all enchantments prior to popping any Oni groups, as {{icon|Shadow Shroud}} [[Shadow Shroud] prevents any more enchantments afterward. This shouldn't happen, however, because the beach team does not normally travel near any Oni pops. |
||
| + | * If the tank gets a Condition while fighting Naga, it means he's Dazed. Use {{icon|Purge Signet}} [[Purge Signet] on him if you have it. |
||
| + | * If the tank dies, use {{icon|Rebirth}} [[Rebirth] to revive him. |
||
| + | </pvxbig> |
||
| + | |||
| + | === Variants === |
||
| + | <pvxbig> |
||
| + | * {{icon|Life Attunement}} [[Life Attunement] instead of {{icon|Vital Blessing}} [[Vital Blessing] |
||
| + | * {{icon|Purge Signet}} [[Purge Signet] instead of EVAS (shouldn't be needed with experienced tanks). |
||
| + | * The tank may ask for both {{icon|Life Attunement}} [[Life Attunement] and {{icon|Vital Blessing}} [[Vital Blessing]. In this case, use the "less experienced tank" variant from the Yeti team. |
||
| + | </pvxbig> |
||
| + | |||
| + | === Counters === |
||
| + | * Pulling aggro and dying. |
||
| + | <br> |
||
| + | |||
| + | == Beach Tank == |
||
| + | === Attributes and Skills === |
||
| + | <pvxbig> |
||
| + | [build prof=Mo/Rt prot=12(+3+1) divine=3+1 resto=12][Protective Spirit][Spirit Bond][Vengeful was Khanhei][Vengeful Weapon][Ebon Vanguard Assassin Support]["Finish Him!"][Balthazar's Spirit][Essence Bond][/build] |
||
| + | *{{icon|"I Am Unstoppable!"}} [["I Am Unstoppable!"] instead of {{icon|"Finish Him!"}} [["Finish Him!"] (You should only take it if you plan to take down the Wallow patrol at the bridge.) |
||
| + | </pvxbig> |
||
| + | |||
| + | === Equipment === |
||
| + | * Lowest AL Armor. |
||
| + | * Survivor Insignias. Vigor and Vitae runes. |
||
| + | * A 40/20/20% staff is preferred, but any staff with 20% enchants will do. |
||
| + | [[Image:Beach run.png | 200px | right]] |
||
| + | |||
| + | === Usage === |
||
| + | <pvxbig> |
||
| + | * Enchant yourself with {{icon|Balthazar's Spirit}} [[Balthazar's Spirit] and {{icon|Essence Bond}} [[Essence Bond]. |
||
| + | * Grab the blessing from the Luxon Priest. |
||
| + | * Before engaging in combat, enchant yourself with {{icon|Spirit Bond}} [[Spirit Bond] and {{icon|Protective Spirit}} [[Protective Spirit]. |
||
| + | * Follow the route outlined in the map on the right. |
||
| + | * Upkeep {{icon|Spirit Bond}} [[Spirit Bond] no matter what while in combat, and the other enchants as you can. |
||
| + | * In fight cast {{icon|Vengeful Was Khanhei}} [[Vengeful was Khanhei] and {{icon|Vengeful Weapon}} [[Vengeful Weapon]. |
||
| + | * Use {{icon|Ebon Vanguard Assassin Support}} [[Ebon Vanguard Assassin Support] and {{icon|"Finish Him!"}} [["Finish Him!"] |
||
| + | </pvxbig> |
||
| + | |||
| + | === Counters === |
||
| + | <pvxbig> |
||
| + | * Knockdowns from [[gw:Rot Wallow|Rot Wallows]]. |
||
| + | * {{icon|Shadow Shroud}} [[Shadow Shroud] and high damage from the [[gw:Oni|Oni]]. |
||
| + | * {{icon|Concussion Shot}} [[Concussion Shot] from [[gw:Naga Archer|Naga Archers]]. |
||
| + | * {{icon|Distracting Blow}} [[Distracting Blow] from [[gw:Naga Warrior|Naga Warriors]]. |
||
| + | * {{icon|Dark Apostasy}} [[Dark Apostasy] from [[gw:Outcast Assassin|Outcast Assassins]]. (should not be a problem with a good Runner) |
||
| + | * {{icon|Chilblains}} [[Chilblains] from [[gw:Outcast Necromancer|Outcast Necromancers]]. (should not be a problem with a good Runner) |
||
| + | </pvxbig> |
||
| + | |||
| + | <br> |
||
| + | |||
| + | == Runner == |
||
| + | === Attributes and Skills === |
||
| + | <pvxbig> |
||
| + | [build prof=W/P str=12 comma=12]["Incoming!"]["Fall Back!"]["Can't Touch This!"]["I Am Unstoppable!"]["By Ural's Hammer!"][Pain Inverter][Signet of Stamina]["We Shall Return!"][/build] |
||
| + | *Incoming is interchangeable with {{icon|"Charge!"}} [["Charge!"] as the player sees fit. |
||
| + | </pvxbig> |
||
| + | |||
| + | === Usage === |
||
| + | * Follow the Beach Smiter, stopping to get the quest [[gw:Return of the Yeti|Return of the Yeti]] from [[gw:Magistrate Kin|Magistrate Kin]] near the entrance to the zone, until you come to a fork. |
||
| + | * Split off and run down to where [[gw:Kayali the Brave|Kayali the Brave]] is. |
||
| + | * Make sure you get the aggro of the Naga and bring them close to Kayali's group so that they primarily kill the assassins (most important part), and possibly Kayali. Your job is then done. |
||
| + | * If any Smiter dies, and that group doesn't have a way to Resurrect him, you may be asked to run over and use a resurrection skill. |
||
| + | |||
| + | === Counters === |
||
| + | * Failing to pull enough Naga to the Outcasts. |
||
| + | * The boss group containing 2 Outcast Assassins, Kayali, and a Death-hand will probably wipe the Naga group. Make sure you kill the Assassins if this happens. It's also possible to pull the farthest Naga group to Kayali's group, though this is very hard. |
||
| + | |||
| + | === Variants === |
||
| + | <pvxbig> |
||
| + | [build prof=A/Mo dead=12+1 sha=12+1+3 pro=3][Shroud of Distress][Shadow Form][Deadly Paradox][Dark Escape][Dwarven Stability][Dash][Ebon Vanguard Assassin Support][Rebirth][/build] |
||
| + | </pvxbig> |
||
| + | <pvxbig> |
||
| + | [build prof=P/A leadership=12+1 command=12+1+1]["Incoming!"]["Fall Back!"][Dash][Enduring Harmony]["Can't Touch This!"]["I Am Unstoppable!"][Ebon Vanguard Assassin Support][Resurrection Signet][/build] |
||
| + | </pvxbig> |
||
| + | <pvxbig> |
||
| + | [build prof=Mo/P div=3 comma=12 mot=12][Mending Refrain]["Incoming!"]["Fall Back!"]["I Am Unstoppable!"]["Can't Touch This!"]["You Move Like a Dwarf!"][Ebon Vanguard Assassin Support]["We Shall Return!"][/build] |
||
| + | </pvxbig> |
||
| + | |||
| + | <br> |
||
| + | |||
| + | = Notes = |
||
| + | Many professions can take part in MQSC: |
||
| + | * Monk can play anything besides spirit spammer |
||
| + | * Any Profession can be runner with the right build. |
||
| + | * Ritualist can do Yeti and Beach tank. |
||
| + | |||
| + | |||
| + | == See Also (Outdated) == |
||
| + | * [http://www.youtube.com/watch?v=3jLcmVhsSgQ Yeti (tank) Run] |
||
| + | * [http://www.youtube.com/watch?v=bLzTIxfw-cw Perma Sin Runner] |
||
| + | * [http://www.youtube.com/watch?v=kp5jbwagAq4 Wallow (tank) Run] |
||
| + | * [http://www.youtube.com/watch?v=_vZHKXVVy_k Beach (tank) Run] |
||
| + | * [http://www.youtube.com/watch?v=PPhAruVlNzk Wallow (SB) Guide] |
||
| + | |||
| + | == Related Builds == |
||
| + | * [[Build:Team - MQSC Luxon FFF Ritway]] |
||
Revision as of 18:34, 13 October 2010
|
The PvXwiki community finds this to be an important part of the metagame. If you disagree with this rating, please discuss it on the build's talk page. This build has been designed for the following use: |
The MQSC (Mount Qinkai Speed Clear) build uses teams of smiters, tanks and a finisher in combination with a runner in order to farm Luxon faction at Mount Qinkai in Hard Mode from Aspenwood Gate. With an average team, faction rewards can come anywhere from 9.5k-11k a run and runs take 7-12 minutes. Groups are normally formed in the European German districts.
Overview
Party members should split into three teams (Update With Current Meta):
Yeti Team
 /
/ or /
or / (Yeti Smiter)
- / (Yeti Tank)
- / (Yeti Finisher)
Wallow Team
- / (Wallow Channeling Ritualist)
- / (Wallow Communing Ritualist)
Beach Team
- / (Beach Smiter)
- / (Beach Tank)
- / or / (Runner)
Yeti Team
Yeti Smite
Variant for Less Experienced Tank
<pvxbig> [build prof=mo/any smit=12+1+3 prot=12+3 divin=3+3][Retribution][Vital Blessing][Life Attunement][Essence Bond][Blessed Signet][Holy Wrath][shield of judgment][Rebirth][/build] </pvxbig>
Equipment
- Superior Protection and Smiting Headset
- 40/40 Smiting Prayer set
- Enchanting Staff for casting SoJ
- High energy set
Usage
<pvxbig>
- Follow the tank and:
- Cast [[Retribution], [[Vital Blessing], [[Life Attunement], [[Essence Bond].
- Use [[Blessed Signet] for more energy if needed.
- Cast [[Holy Wrath] as often as possible.
- Cast
</pvxbig>
Variant for More Experienced Tank
<pvxbig> [build name="y smit 2" prof=monk/eleme smitin=12+1+3 divine=12+1][retribution][essence bond][holy wrath][shield of judgment][air of superiority][by urals hammer][intensity][Rebirth][/build] </pvxbig>
Equipment
- Superior Smiting (Head) + Minor Divine Favor
- 40/40 Smiting Prayer set
- Enchanting Set for casting SoJ
- High energy set
Usage
<pvxbig>
- Follow the tank and:
- Cast [[Retribution] + [[Essence Bond] on the tank.
- Take the blessing from the priest.
- Cast [[Air of Superiority] + [[Holy Wrath] before the tank aggro's a mob.
- Wait for the tank to take aggro (the Finisher also has to wait).
- Cast [["By Ural's Hammer!"] + [[Intensity], and [[Holy Wrath] when you can (For small groups - You should have enough energy).
- Cast [[Shield of Judgment] too (For massive groups - You should have enough energy).
- Always keep [[Air of Superiority] on you to recast quickly, remove conditions, gain Health, or gain Energy. The extra experience given can help you in decreasing Death Penalty.
- Cast
</pvxbig>
Notes
- This build is much faster, but is riskier as well.
- The healing from the boosted Favor Divine helps the tank slightly.
- Only 2 Bonds grants you 2 extra Energy regeneration pips.
- You need to have fairly high ranks in Asura, Dwarf, and Sunspear title tracks to be efficient.
Counters
- Getting killed.
- In a fast run (or with a slow Wallow team), wallows might still be patrolling the area when killing the Rit Boss, so keep an eye on the compass.
Variants
<pvxbig>
- The tank may ask for [[Vital Blessing] or [[Life Attunement]. Replace one of the PvE skills to fit, and move atrributes from Divine to Prot.
</pvxbig>
Yeti Tank
Attributes and Skills
<pvxbig> [build prof=Mo/Rt prot=12+1+1 resto=12][Protective Spirit][Spirit Bond][Vengeful Was Khanhei][Vengeful Weapon][Ebon Vanguard Assassin Support]["Finish Him!"]["I Am Unstoppable!"][Essence Bond][/build] [build prof=Rt/Mo prot=12 resto=12+1+1][Protective Spirit][Spirit Bond][Vengeful Was Khanhei][Vengeful Weapon][Ebon Vanguard Assassin Support]["Finish Him!"]["I Am Unstoppable!"][Essence Bond][/build]
Equipment
- Lowest AL Armor(with 550hp)
- A 40/20/20% staff is preferred, but any staff with 20% enchants will do.
Usage
- Enchant yourself with [[Essence Bond] and [[Balthazar's Spirit].
- Grab the blessing from the Luxon Priest.
- Before engaging in combat, enchant yourself with [[Spirit Bond], and [[Protective Spirit].
- Use [["I Am Unstoppable!"] to prevent knockdowns by the yeti.
- Follow the route outlined in the map on the right.
- Upkeep [[Spirit Bond] no matter what while in combat, and the other enchants as you can.
- Cast [[Vengeful Weapon] upon engaging. Then cast [[Vengeful Was Khanhei].
- Try to disarm the Traps, so your Smiter won't get hit, if your smiter isnt vigilant enough to avoid the traps
</pvxbig>
Counters
- Dying from Traps.
- Taking too much damage in the Yeti cave.
- Smiter and Finisher dying.
Finisher
The finisher can be multiple professions:
<pvxbig> [build prof=N/Mo sou=12+1 cur=12+3+1 smi=3][Necrosis][Spiteful Spirit][Reckless Haste][Ebon Vanguard Assassin Support]["Finish Him!"][Balthazar's Spirit][Essence Bond][Rebirth][/build] </pvxbig> <pvxbig> [build prof=E/Mo fir=12+3+1 ene=12+1 pro=3][Searing Flames][Glowing Gaze][Ebon Vanguard Assassin Support][Pain Inverter]["Finish Him!"][Balthazar's Spirit][Essence Bond][Rebirth][/build] </pvxbig> <pvxbig> [build prof=Me/Mo fas=12+1 dom=12+3+1][Visions of Regret][Empathy][Cry of Pain][Ebon Vanguard Assassin Support]["Finish Him!"][Balthazar's Spirit][Essence Bond][Rebirth][/build] </pvxbig> <pvxbig> [build prof=Rt/Mo Pro=3 spawn=12 channeling=12+1+3][Ancestors' Rage][Spirit Rift][Renewing Surge][Clamor of Souls]["Finish Him!"][Balthazar's Spirit][Essence Bond][Rebirth][/build] </pvxbig> <pvxbig> [build prof=R/Mo pro=12 bea=12+1+3 wil=3][Pain Inverter][Ebon Vanguard Assassin Support]["Finish Him!"][Serpent's Quickness][Edge of Extinction][Balthazar's Spirit][Essence Bond][Unyielding Aura][/build] </pvxbig> <pvxbig> [build prof=Mo/R pro=12+1+1 bea=12 wil=3][Pain Inverter][Ebon Vanguard Assassin Support]["Finish Him!"][Serpent's Quickness][Edge of Extinction][Balthazar's Spirit][Essence Bond][Unyielding Aura][/build] </pvxbig>
Equipment
- Max AL with as high health as possible (Sup Vigor, Survivor's, Vitae)
- 40/40 set of appropriate attribute
Usage
- Maintain enchantments on the tank.
- Help kill stuff.
Wallow Team
Wallow Channeling Ritualist (Rit 1)
Attributes and Skills
<pvxbig> [build prof=Rt/any chann=12+1+3 spawn=12+2][Ebon Escape][Signet of Spirits][Bloodsong][Agony][Spirit Siphon][Painful Bond][Summon Spirits (Luxon)][Flesh of my Flesh][/build] [build prof=Rt/any cha=12+1+3 spa=12+2][Rupture Soul][Signet of Spirits][Bloodsong][Destruction][Spirit Siphon][Painful Bond][Summon Spirits (Luxon)][Flesh of My Flesh][/build] [build prof=Rt/any cha=12+1+3 spa=12+2][Finish Him][Signet of Spirits][Bloodsong][Vampirism][Spirit Siphon][Painful Bond][Summon Spirits (Luxon)][Flesh of My Flesh][/build] [build prof=Rt/any cha=12+1+3 spa=12+2][Agony][Signet of Spirits][Bloodsong][Vampirism][Spirit Siphon][Painful Bond][Summon Spirits (Luxon)][Flesh of My Flesh][/build] </pvxbig>
- Note that all builds' skills can be interchanged with each other to suit the player.
Equipment
- As high health as possible (Sup Vigor, Survivor, Vitae)
- 40/40 Channeling Magic set
- 20 high energy staff
- Longbow for pulling
Usage
- Follow the Wallows (W) route. See on the map.
- Spawn the spirits in front of the wallows. Try not to pull aggro.
- Use the Longbow for the guardians.
- As the Communing Rit will be leading, use Ebon Escape for quicker maneuverability and for minor heals during fights.
Counters
- Allowing yourself to aggro the wallows rather than your spirits
- Bad spawns can sometimes lead to having to aggro 2 groups of wallows at a time, almost always leading to death
- Spirits getting killed
Wallow Communing Ritualist (Rit 2)
Attributes and Skills
<pvxbig> [build prof=Rt/any comm=12+1+3 spa=12+2][optional][Pain][Shadowsong][Anguish][Disenchantment][Boon of Creation][Summon Spirits (Luxon)][Flesh of My Flesh][/build] </pvxbig>
- Shadowsong can be exchanged for Vampirism if the Channelling rit is taking Rupture Soul + Destruction.
elite
<pvxbig>
- [[Signet of Ghostly Might@16]
- [[Ritual Lord@13]
- [[Wanderlust@16]
</pvxbig>
Equipment
- As high health as possible (Sup Vigor, Survivor, Vitae)
- 40/40 Communing set.
- 20 high energy staff.
- Longbow for pulling

Usage
- Follow the Wallows(W) route. See on the map.
- Spawn the spirits in front of the wallows. Try not to pull aggro.
- Use the Longbow for the Guardian.
Counters
- Allowing yourself to aggro the wallows rather than your spirits
- Bad spawns can sometimes lead to having to aggro 2 groups of wallows at a time, almost always leading to death
- Spirits getting killed
Video Tutorials
Wallow Team Teach (Ritualist 1 and 2)
Beach Team
Beach Smiter
Attributes and Skills
<pvxbig> [build prof=Mo/? smi=12+1+3 pro=12+3 divine=3+1][Essence Bond][Retribution][Vital Blessing][Holy Wrath][Shield of Judgment]["By Ural's Hammer!"][Ebon Vanguard Assassin Support][Rebirth][/build] </pvxbig>
Equipment
- As high health as possible
- A 40/20/20% staff is preferred, but any staff with 20% enchants will do.
Usage
<pvxbig>
- Cast [[Essence Bond], [[Retribution], and [[Vital Blessing] on the Beach Tank, and maintain them.
- Stay back while the tank aggro's mobs, and wait until all of the melees have stopped moving before casting or recasting your spells.
- Cast [[Holy Wrath] and [[Shield of Judgment] on the tank upon engage.
- Renew [[Holy Wrath] whenever possible, as it will quickly run out otherwise.
- Use [[Ebon Vanguard Assassin Support] to more quickly take down targets that aren't dying fast enough. You can also use it as a meat shield if you accidentally pull some of the aggro.
- Wait a few seconds before casting [["By Ural's Hammer!"] for the tank to get aggro.
- Cast all enchantments prior to popping any Oni groups, as [[Shadow Shroud] prevents any more enchantments afterward. This shouldn't happen, however, because the beach team does not normally travel near any Oni pops.
- If the tank gets a Condition while fighting Naga, it means he's Dazed. Use [[Purge Signet] on him if you have it.
- If the tank dies, use [[Rebirth] to revive him.
</pvxbig>
Variants
<pvxbig>
- [[Life Attunement] instead of [[Vital Blessing]
- [[Purge Signet] instead of EVAS (shouldn't be needed with experienced tanks).
- The tank may ask for both [[Life Attunement] and [[Vital Blessing]. In this case, use the "less experienced tank" variant from the Yeti team.
</pvxbig>
Counters
- Pulling aggro and dying.
Beach Tank
Attributes and Skills
<pvxbig> [build prof=Mo/Rt prot=12(+3+1) divine=3+1 resto=12][Protective Spirit][Spirit Bond][Vengeful was Khanhei][Vengeful Weapon][Ebon Vanguard Assassin Support]["Finish Him!"][Balthazar's Spirit][Essence Bond][/build]
- [["I Am Unstoppable!"] instead of [["Finish Him!"] (You should only take it if you plan to take down the Wallow patrol at the bridge.)
</pvxbig>
Equipment
- Lowest AL Armor.
- Survivor Insignias. Vigor and Vitae runes.
- A 40/20/20% staff is preferred, but any staff with 20% enchants will do.

Usage
<pvxbig>
- Enchant yourself with [[Balthazar's Spirit] and [[Essence Bond].
- Grab the blessing from the Luxon Priest.
- Before engaging in combat, enchant yourself with [[Spirit Bond] and [[Protective Spirit].
- Follow the route outlined in the map on the right.
- Upkeep [[Spirit Bond] no matter what while in combat, and the other enchants as you can.
- In fight cast [[Vengeful was Khanhei] and [[Vengeful Weapon].
- Use [[Ebon Vanguard Assassin Support] and [["Finish Him!"]
</pvxbig>
Counters
<pvxbig>
- Knockdowns from Rot Wallows.
- [[Shadow Shroud] and high damage from the Oni.
- [[Concussion Shot] from Naga Archers.
- [[Distracting Blow] from Naga Warriors.
- [[Dark Apostasy] from Outcast Assassins. (should not be a problem with a good Runner)
- [[Chilblains] from Outcast Necromancers. (should not be a problem with a good Runner)
</pvxbig>
Runner
Attributes and Skills
<pvxbig> [build prof=W/P str=12 comma=12]["Incoming!"]["Fall Back!"]["Can't Touch This!"]["I Am Unstoppable!"]["By Ural's Hammer!"][Pain Inverter][Signet of Stamina]["We Shall Return!"][/build]
- Incoming is interchangeable with [["Charge!"] as the player sees fit.
</pvxbig>
Usage
- Follow the Beach Smiter, stopping to get the quest Return of the Yeti from Magistrate Kin near the entrance to the zone, until you come to a fork.
- Split off and run down to where Kayali the Brave is.
- Make sure you get the aggro of the Naga and bring them close to Kayali's group so that they primarily kill the assassins (most important part), and possibly Kayali. Your job is then done.
- If any Smiter dies, and that group doesn't have a way to Resurrect him, you may be asked to run over and use a resurrection skill.
Counters
- Failing to pull enough Naga to the Outcasts.
- The boss group containing 2 Outcast Assassins, Kayali, and a Death-hand will probably wipe the Naga group. Make sure you kill the Assassins if this happens. It's also possible to pull the farthest Naga group to Kayali's group, though this is very hard.
Variants
<pvxbig> [build prof=A/Mo dead=12+1 sha=12+1+3 pro=3][Shroud of Distress][Shadow Form][Deadly Paradox][Dark Escape][Dwarven Stability][Dash][Ebon Vanguard Assassin Support][Rebirth][/build] </pvxbig> <pvxbig> [build prof=P/A leadership=12+1 command=12+1+1]["Incoming!"]["Fall Back!"][Dash][Enduring Harmony]["Can't Touch This!"]["I Am Unstoppable!"][Ebon Vanguard Assassin Support][Resurrection Signet][/build] </pvxbig> <pvxbig> [build prof=Mo/P div=3 comma=12 mot=12][Mending Refrain]["Incoming!"]["Fall Back!"]["I Am Unstoppable!"]["Can't Touch This!"]["You Move Like a Dwarf!"][Ebon Vanguard Assassin Support]["We Shall Return!"][/build] </pvxbig>
Notes
Many professions can take part in MQSC:
- Monk can play anything besides spirit spammer
- Any Profession can be runner with the right build.
- Ritualist can do Yeti and Beach tank.