|
The PvXwiki community finds this to be an excellent build. If you disagree with this rating, please discuss it on the build's talk page. This build has been designed for the following use: |
| This build is part of the current PvE meta. Remove this tag if it is no longer used in the current PvE meta. |
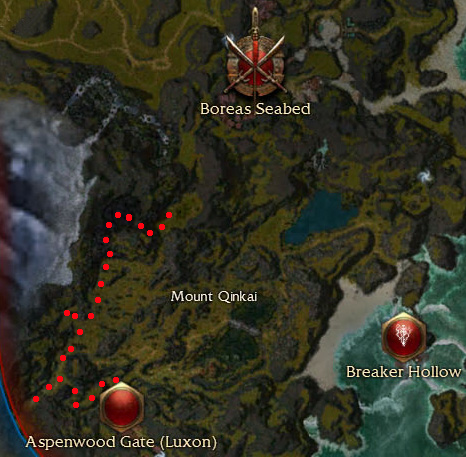
The MQSC (Mount Qinkai Speed Clear) build uses a team of a smiter, tank, and SB monk in combination with a runner in order to farm Luxon faction at Mount Qinkai in Hard Mode from Aspenwood Gate. With an average team, faction rewards can come anywhere from 10k-11k a run and runs take 6-9 minutes. Groups are normally formed in the European German districts.
Team Composition
Beach Smiter
Attributes and Skills
<pvxbig> [build prof=Mo/Me smi=12+1+3 pro=12+3] [Retribution][Holy Wrath][Balthazar's Spirit][Vital Blessing@16][Blessed Signet][Purge Signet][Unyielding Aura][Leech Signet][/build] </pvxbig>
Equipment
- Smiting Headgear with Superior Smiting Prayers Rune.
- Protection Headgear with Superior Protection Prayers Rune.
- Any armor (but max AL with extra Health is preferred).
- Any weapons will do.
Usage
- If the world has the favor of the gods, receive the Monk of Dwayna blessing from the shrine next to the priest.
- Cast Retribution , Balthazar's Spirit and Holy Wrath, with the Smiting Headgear equipped, on the Beach Tank. Maintain them.
- Cast Vital Blessing with the Protection Headgear equipped, on the Beach Tank. Maintain them.
- Get the blessing from the Luxon Priest and follow the Beach Tank (see map below).
- Make sure you do not get within aggro range of the tank.
- If the tank gets Hexed by the Oni before casting Spell Breaker, use Purge Signet quickly. This shouldn't happen.
- If the tank gets a Condition while fighting Naga, it means he's Dazed. Try to use Purge Signet on him quickly, but take care not to pull much aggro.
- If Kayali the Brave, is still alive, use Leech Signet to interrupt Healing Signet shortly before he would die.
- Near the end of the run, if the boss, Kayali the Brave, is still alive, cast Primal Echoes (if you brought it instead of Leech Signet) and then let the tank do the work.
- If the tank dies, use Unyielding Aura to revive him.
Counters
- Pulling aggro and dying.
Variants
- Replace Balthazar's Spirit with Life Attunement. Some Tanks prefer one or the other. Consult your Tank before you head out.
- Replace Purge Signet with By Ural's Hammer!. Purge is not usually necessary in the beach run if you have an experienced tank. Using By Ural's Hammer! you can significantly increase your damage output. Cast this in battle by casting Blessed Signet and then spamming Ural's Hammer so you can get it off just before your energy is leached by Holy Wrath.
Beach Tank
Attributes and Skills
<pvxbig> [build prof=Mo/Me ins=10 pro=10+1+1 div=11+1][Spirit Bond][Protective Spirit][Shield of Absorption][Spell Breaker][Mantra of Resolve]["I Am Unstoppable!"][Blessed Aura][Essence Bond][/build] </pvxbig>
Equipment
- Lowest AL Armor.
- Survivor Insignias. Vigor and Vitae runes.
- Any weapon with enchantments last 20% longer will do.

Usage
- Enchant yourself with Blessed Aura and Essence Bond.
- Grab the blessing from the Luxon Priest.
- Before engaging in combat, enchant yourself with Spirit Bond, Protective Spirit and Shield of Absorption. You could enchant Shield of Absorption after you engage if you prefer.
- Follow the route outlined in the map on the right.
- Upkeep Spirit Bond no matter what while in combat, and the other enchants as you can.
- Against Wallows cast Spell Breaker and "I Am Unstoppable".
- Against Oni cast Spell Breaker and Shield of Absorption before aggroing.
- Against Naga cast Mantra of Resolve.
- Against the boss, Kayali the Brave, ensure the smiter has Primal Echoes up.
- If Hexed by the Oni, run toward your smiter so he may try and remove it. Cast Spell Breaker soon after and try to tank.
or
- If Hexed by the Oni (with Shadow Shroud), move from their spawn point towards your smiter. See to it that he doesn't get aggro! Find a nice spot to die - you have 3-4 seconds - and get resurrected, when the Oni retreat to their spawn point.
- If Dazed by the Naga, run toward your smiter so he may try and remove it. Try not to pull aggro on him though.
- If the Assassins in Kayali's group are not dead, you may need the entire party to try to kill them due to their enchant removal.
- Watch out for pop ups of Oni.
Counters
- Knockdowns from Rot Wallows.
- Shadow Shroud and high damage from the Oni.
- Concussion Shot from Naga Archers.
- Distracting Blow from Naga Warriors.
- Dark Apostasy from Outcast Assassins.
- Chillbains from Outcast Necromancers.
Variants
Very good alternative for experienced tank:
- Have your smiter bring Life Attunement and Vital Blessing.
- If facing more than 3 Oni try strafing around between casts of spirit bond. Taking full damage from all 4 may kill you.
Wallow SB
Attributes and Skills
<pvxbig> [build prof=Mo/R div=12+1+3 bea=12][Blessed Aura][Spell Breaker][Balthazar's Spirit][Essence Bond][Succor][Edge of Extinction][Toxicity][Rebirth][/build] </pvxbig>
Equipment
- Any armor (but max AL with extra Health is preferred).
- Any weapon with enchantments last 20% longer will do.
Usage
- Enchant Blessed Aura on yourself and maintain it.
- Enchant Balthazar's Spirit, Essence Bond and Succor on the Tank and maintain them.
- Grab the enchant from the Luxon Priest
- Before the Wallow Tank engages cast Spell Breaker.
- If you have less then ~18 energy after battle, ask the smiter for a Blood Ritual.
- After the Wallow Tank starts tanking the group, cast Edge of Extinction and Toxicity. Note, that Wallows will run away a bit when low on health, so don't stand too close.
- If Wallow Tank dies in difficult spot, cast Spell Breaker on yourself, pull aggro, while smiter uses Unyielding Aura to rez tank.
Counters
- Pulling aggro and dying.
- Lack of energy
Variants
Wallow Smiter
Attributes and Skills
<pvxbig> [build prof=Mo/N smi=12+1+3 pro=12+3 blood=2 divine=2][Retribution][Holy Wrath][Life Attunement@16][Vital Blessing@16][Optional][Blessed Signet][Blood Ritual][Unyielding Aura][/build] </pvxbig> For Optional Slot
 Purge Signet not really necessary, but your tank may want it.
- "By Ural's Hammer!" can significantly increase your damage output. Cast this in battle by casting Blessed Signet and then spamming Ural's Hammer so you can get it off just before your energy is leached by Holy Wrath.
Equipment
- Smiting Headgear with Superior Smiting Prayers Rune.
- Protection Headgear with Superior Protection Prayers Rune.
- Any armor (but max AL with extra Health is preferred).
- Any weapons will do.
Usage
- Cast Retribution and Holy Wrath, with the Smiting Headgear equipped, on the Wallow Tank. Maintain them.
- Cast Life Attunement and Vital Blessing, with the Protection Headgear equipped, on the Wallow Tank. Maintain them.
- Get the blessing from the Luxon Priest and follow the Wallow Tank (see map below).
- Make sure you do not get within aggro range of the tank.
- Cast Blood Ritual on the Wallow SB and Wallow Tank when necessary.
Wallow Tank
Attributes and Skills
<pvxbig> [build prof=Mo/D pro=12+1+1 div=10+1 earthp=8][Spirit Bond][Protective Spirit][Shield of Absorption][Fleeting Stability][Radiation Field]["Finish Him"][Blessed Aura][Essence Bond][/build] </pvxbig>
Equipment
- Lowest AL Armor.
- Survivor Insignias. Vigor and Vitae runes.
- Any weapon with enchantments last 20% longer will do.

Usage
- Enchant yourself with Blessed Aura and Essence Bond.
- Grab the blessing from the Luxon Priest.
- Before engaging in combat, enchant yourself with Spirit Bond, Protective Spirit and Fleeting Stability.
- Follow the route outlined in the map on the right.
- Upkeep Spirit Bond and Fleeting Stability no matter what while in combat, and the other enchants as you can.
- Once the Wallows mob around you, cast Radiation Field.
- Use "Finish Him" against the Island Gurdians which are under 50% health and other low targets.
- You can Ping the last skill you cast before engaging to signal to the SB when he should cast Spell Breaker on you.
Counters
- Failing to keep up Fleeting Stability.
- Too much Life Stealing.
Variants
- Replace Shield of Absorption with Smite Hex, some tanks do not use SoA at all.
- Replace "Finish Him!" with Pain Inverter.
- Replace Fleeting Stability and "Finish Him" with "I Am Unstoppable!" and Balanced Stance. Spec 2-4 into Tactics.
- You can also take Balanced Stance and Dwarven Stability if you got a high Delver rank (rank 8 or more).
- You can take Dwarven Stability instead of Fleeting Stability if consuming alcohol.
- You can tell the SB to take Toxicity instead of Frozen Soil to get a higher
degeneration on targets.
This is usually considered the hardest role to play in MQSC and there are many variants. Here are a few:
<pvxbig>
[build prof=Mo/Me pro=10+1+1 div=8+1 dom=12][Protective Spirit][Spirit Bond][Shield of Absorption][Visions of Regret][Dwarven Stability]["Finish Him"][Blessed Aura][Essence Bond][/build]
</pvxbig>
<pvxbig> [build prof=Mo/W pro=10+1+1 div=8+1 sword=12 tact=3][Protective Spirit][Spirit Bond][Shield of Absorption][Balanced Stance][I Am Unstoppable!][Whirlwind Attack][Hundred Blades][Ebon Battle Standard of Honor][/build] </pvxbig>
<pvxbig> [build prof=E/Mo Energy=12+1+1 pro=12 Earth=3][Protective Spirit][Spirit Bond][Shield of Absorption][Ether Renewal][I Am Unstoppable!][Ward Of Stability][Radiation Field]["Finish Him"][/build] </pvxbig>
Yeti Smiter
Attributes and Skills
<pvxbig> [build prof=Mo/W smi=12+1+3 pro=12+3 tactics=3][Retribution][Holy Wrath][Life Attunement@16][Vital Blessing@16][Purge Signet][Blessed Signet][Healing Signet][Unyielding Aura][/build] </pvxbig>
Equipment
- Smiting Headgear with Superior Smiting Prayers Rune.
- Protection Headgear with Superior Protection Prayers Rune.
- Any armor (but max AL with extra Health is preferred).
- Any weapons will do.
Usage
- Cast Retribution and Holy Wrath, with the Smiting Headgear equipped, on the Yeti Tank. Maintain them.
- Cast Life Attunement and Vital Blessing, with the Protection Headgear equipped, on the Yeti Tank. Maintain them.
- Get the blessing from the Luxon Priest and follow the Yeti Tank (see map below).
- Make sure you do not get within aggro range of the tank except when necessary to cast Purge Signet or to revive the tank.
- Cast Healing Signet when taking damage from Vengeful Weapon or Traps.
- Cast Purge Signet when you or the tank get Crippled by the Traps.
Counters
- Pulling aggro and dying.
- Traps and/or Vengeful Weapon killing you.
Yeti Tank
Attributes and Skills
<pvxbig> [build prof=Rt/Mo pro=12 spawn=3 res=12+1+1][Spirit Bond][Protective Spirit][Vengeful Weapon][Vengeful Was Khanhei]["Finish Him!"][Ebon Vanguard Assassin Support][Balthazar's Spirit][Essence Bond][/build] </pvxbig>
Mo/rt variant:
<pvxbig> [build prof=Mo/Rt pro=12+1 div=3 res=12][Spirit Bond][Protective Spirit][Vengeful Weapon][Vengeful Was Khanhei]["Finish Him!"][Ebon Vanguard Assassin Support][Balthazar's Spirit][Essence Bond][/build] </pvxbig>
Equipment
- Lowest AL Armor.
- Survivor Insignias. Vigor and Vitae runes.
- Any weapon with enchantments last 20% longer will do.
Usage
- Enchant yourself with Essence Bond and Balthazar's Spirit.
- Grab the blessing from the Luxon Priest.
- Before engaging in combat, enchant yourself with Spirit Bond, and Protective Spirit.
- Follow the route outlined in the map on the right.
- Upkeep Spirit Bond no matter what while in combat, and the other enchants as you can.
- Cast Vengeful Weapon upon engaging. Then cast Vengeful Was Khanhei.
- If necessary (Yeti are not dead after a bit), cast "Finish Him" and/or Ebon Vanguard Assassin Support.
- When fighting the Yeti group with the Monk Boss Hukhrah Earthslove, make sure to concentrate your efforts on taking him down. It's possible when he's wasting energy healing other Yeti and using Strength of Honor on them, but it's almost impossible to kill him when he's alone. You'll require help from the Wallow team.
- Try to disarm the Traps, so your Smiter won't get hit, if your smiter isnt smart enough to avoid the traps
Counters
- Dying from Traps.
- Too much damage in the Yeti cave.
- Your Smiter dies.
- Failing to kill Hukhrah Earthslove.
Variants
- A N/Mo with spiteful spirit works well.
Runner
Attributes and Skills
<pvxbig> [build prof=A/E dead=12+1 sha=12+1+3 air=3][Glyph of Swiftness][Deadly Paradox][Shadow Form][Shadow Sanctuary (Luxon)][Dash][Dark Escape][Optional][Resurrection Signet][/build] </pvxbig> For the optional slot you can either add another resurrection skill such as the Sunspear Rebirth Signet, or a healing skill such as Feigned Neutrality or Viper's Defense. Shadow of haste is also quite helpfull Also try adding "Finish Him" to help the beach tank with the last stubborn wallow. (speeds up run)
Equipment
- Weapon with +20% enchanting (such as Totem Axe and a shield).
- Any armor can do with attunement and radiant runes. Get your energy as high as you can.
Usage
- Follow the Beach Smiter, stopping to get the quest Return of the Yeti from Magistrate Kin near the entrance to the zone, until you come to a fork.
- Split off and run down to where Kayali the Brave is.
- Make sure you get the aggro of the Naga and bring them close to Kayali's group so that they primarily kill the assassins (most important part), and possibly Kayali. Your job is then done.
- If any Smiter dies, and that group doesn't have a way to Resurrect him, you may be asked to run over and use a resurrection skill.
Counters
- Failing to keep up Shadow Form.
- Failing to pull enough Naga to the Outcasts.
- The boss group containing 2 Outcast Assassins, Kayali, and a Death-hand will wipe the Naga group regardless. Make sure you kill the Assassins if this happens.
- Getting hit by Chilblains while pulling
Variants
- Pretty much any good runner build will do, regardless of profession. This spot is very flexible.
See Also
- Yeti (tank) Run
- Perma Sin Runner <---WORST EXAMPLE!
- Better Perma Sin Runner <---Revised
- Wallow (tank) Run
- Beach (tank) Run